Before you can exploit the full power of the object-oriented features in VB .NET, it is important for you to know exactly what object-oriented programming is and understand some of its major concepts.
Classes and objects are at the core of the object-oriented programming paradigm. They form the basis of everything that goes on during program design and execution. Before you can understand the fundamental concepts of classes and objects, it is important to know a little about their roots from a computer science perspective.
In computer science, a data type refers to a mathematical set containing values of the same sort. A sort, in this case, is a defined number of operations that can be conducted on a particular value. For example, you can add, multiply, divide, and subtract all values of the type Integer with some exception rules. You cannot do these operations on values of type Boolean. This is because Boolean values belong to the Boolean set while the Integer values belong to the Integer set. Such basic sets of values are called primitive data types.
Advances in computing, pushed by pressure from business data processing, required that data types be more complex than the primitive types. This was the reason for the emergence of composite data types, like arrays, lists, and records.
Programming language linguistics went further. People started to think about the feasibility of having one data type that could incorporate a set of things—tangible entities, not just simple values or lists of values. Object-oriented programming, the idea of classes and objects, grew out of this thought. The definitions for object and classes are two simple phrases:
An object is a programmer-defined data type.
A class is a module of code that defines an object.
The OOP paradigm provides the developer with a rich set of tools and standards that can be used to manipulate and work with objects more easily. Like all entities around you, objects can have attributes and behaviors. The most interesting of all is that you, the programmer, define these attributes and behaviors through classes. They can be as complex, as clever, or as obtuse as you want them to be.
Everything in VB .NET is an object. Whether it is a form or a control, the VB .NET entity provides the developer with a rich set of attributes, methods, and events to work with.
In the next few sections, we will walk through the development and consumption of a simple class using VB .NET. The class does not have a commercial purpose; it is simply to teach you the practice of OOP in VB .NET. You will notice that the class expands as we go further into the chapter. This is an attempt to get you up and running quickly in your ultimate goal to develop classes. We cover the concepts of OOP by example. The project that is used for this example is the AppendixOne.sln solution provided on the companion CD-ROM with this book.
Assuming that you have correctly installed Visual Basic .NET, load the development environment. The view should be similar to that illustrated in Figure A-1.

The project you are about to create does something quite simple. It loads a form with two input controls into which you enter some information about your favorite customer. Then, it creates a Customer object and assigns these attributes to it.
To achieve this amazing feat, you are going to work with two main objects, a visual form and a non-visual class. The forms you program with in VB .NET are also objects instantiated from classes, but these classes are built into the .NET Framework Common Language Runtime to facilitate your job as a web developer. There are other classes in the CLR that you will learn about later in this book.
The Customer class is the primary focus of the following section because you are going to walk through its design and implementation while learning the ropes of object-oriented programming.
As we go along in this appendix, you will be able to see how objects are created and used in VB .NET.
Before we go into creating the form, which is a quite simple task, let’s take a good look at the creation of a class. First, create a new Visual Basic .NET Windows Application project. Save it to a convenient location and name it AppendixOneExample.
In this section, you will prepare the user interface that will be used with the Customer object. This is the only means through which the user can gain access to the object and its attributes.
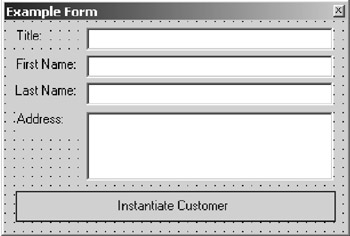
The new solution project loads a form by default. Change the form’s name to frmExample. Click on the form to give it focus.
From the Windows Forms tab of the toolbox pane, drop a Label control onto the form. Name it lblTitle, align it properly, and set its Text property to Title.
From the Windows Forms tab of the toolbox pane, drop another Label control onto the form. Name it lblFirstName, align it properly, and set its Text property to First Name.
To the left of the newly added control, drag and drop a TextBox control onto the frmExample. Name it txtFirstName and empty its Text property. This is used as the input control for the customer’s first name.
Copy and paste lblFirstName and txtFirstName onto the window. Align the pasted controls just below the previous ones. Rename the label to lblLastName and the textbox to txtLastName.
Paste the two controls onto the form again. This time, label the two controls lblAddress and txtAddress, respectively. Set the text property of lblAddress to Address. txtAddress is the input control for the customer’s address. Set its MultiLine property to True.
Below txtAddress, add a command button. Name it cmdInstantiate, and label it Instantiate Customer. This is the button that will trigger the creation of a Customer object with the input values on frmExample.
The frmExample form should look similar to the illustration in Figure A-2. It is a good idea to play around with some of the properties that the form object has in VB .NET. This is not our focus here, so let’s move on.
The user interface that instantiates and consumes the object is ready. In this section, you will create a new, empty class and add it to the project. If you are accustomed to creating class modules in Visual Basic 6, this task is not new to you. Follow these steps to create and add a new class to AppendixOneExample:
From the File menu, click the Add New Item option.
In the Add New Item dialog, illustrated in Figure A-3, you are given a choice to select the type of new item that you want to create. In the Categories tree list, select the Local Project Items node. The items for that particular category are listed in the Templates list on the right. Click on the Class item.
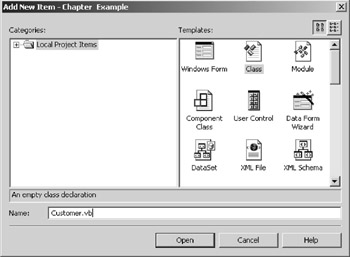
Figure A-3: The Add New Item dialog
In the Name field, specify the name for the new class. Call it ![]() Customer.vb.
Customer.vb.
Click the Open button to load the new class as part of the project. The code window for the class opens with the following code:
Public Class Customer
End Class
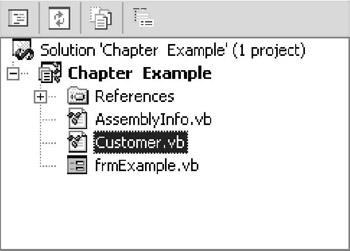
Public Class Customer is the statement that declares the Customer class. The End Class statement is the last statement in the chunk of code that is part of the class. Anything outside these two statements is not part of the class. As illustrated in Figure A-4, the Solution Explorer shows the newly added Customer class.
The class is expanded as object-oriented programming concepts are introduced in the subsequent pages.
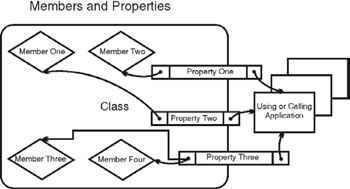
Properties and members are the two most important characteristics that an object has. You already learned that an object is a complex data type made of simpler data types or even more complex objects. Properties and members define the amount and type of values that an object can hold.
A member is often referred to as a member variable. It is a variable of any type that is initialized as part of the object when it is instantiated. An object’s member variables have object scope only; they cannot be used nor referenced, and do not exist outside the object’s definition, which is the class. An example of a member variable is a string containing the first name of a customer. Member variables are used for the internal process of the object. Its content is usually hidden by a technique called encapsulation, which is covered later in this appendix.
A property is an attribute that an object has. Similar to a member, a property can hold different values of the same type. However, in a properly planned object-oriented application, properties are used to encapsulate—that is, to hide a member’s value. At other times, they provide a better visual presentation of an object’s data to a user. This might be the case when a user reads a property called name, which is, in fact, the concatenated result of the firstname and lastname member variables of an object.
A user usually sets attributes for an object. It is, therefore, fair to draw a conclusive argument on the relationship of properties and members. The members are the data values that the object contains, while the properties are the information obtained from these values. This relationship is illustrated in Figure A-5. As can be perceived, the properties form an interface between any calling application and an object. Values for the internal processes of the object are stored in its member variables. Internal operations are carried out by member functions, while methods are also part of the interface. Methods are covered later.
Now that the fundamental and conceptual bases of members and properties have been established, you are ready to implement members and properties for the class that serves as the code base for instantiating Customer objects.
Once instantiated, the Customer object will be able to perform the following tasks:
Allow users to assign values to its attributes. The following attributes must be available:
title: Title of the customer (i.e., Dr. for Doctor)
firstName: First name of the customer (i.e., Terrence)
lastName: Last name of the customer (i.e., Joubert)
address: Address of the customer (i.e., 78 Drake Street, MA 02120)
salutation: The full name and title for the customer (i.e., Dr. Terrence Joubert)
Provide a generic structure and architecture from which future objects can inherit
Adding members to a VB .NET class is as simple as declaring variables in any module of Visual Basic code. The syntax for declaring a member variable is:
access_specifier variable_name [As DataType]
access_specifier provides instructions to the compiler about the level of access that the member variable should have. Note that the access_specifier keywords that are described here apply to all types of entities that one can create inside a class. The keywords are three possible access levels for a class member variable.
Private: This keyword denotes that the member variable is available to the code in that particular class only. Functions and procedures inside the class can reference this variable. Nowhere else outside the class or inside its inherited children will you be able to reference a private member variable.
Protected: This keyword denotes that the member variable is available to the class in which it is declared and all the classes that inherit from it. Functions and procedures inside the class Dog inherited from the class Mammal are able to reference a Mammal member variable of access specifier Protected. Inheritance is covered later in this chapter.
Public: This keyword denotes that the member variable can be referenced anywhere in the program. It acts like a property, in the sense that its value can be read and written to like that of any normal variable. In well-written object-oriented applications, the Public access specifier is not used on member variables of classes. Doing so will violate the rules of encapsulation of object data. After instantiating a Dog object inside a code module, it is possible to make it bark by calling its Bark() method of Public access specifier, but it must be impossible to change the dog’s voice, because then it will lose its uniqueness and personality.
variable_name is the identifier of the member variable. It must follow the same legal rules for all identifiers in the Visual Basic language syntax.
The [As DataType] clause is the data type of the member variable. It is optional to specify a data type for a member. Not doing so will cause VB .NET to mark the variable as having the type System.Object, and doing so will severely affect the performance of the object instantiated from the class. For this reason, I strongly recommend specifying a defined data type and leave System.Object for variables that are not predetermined.
From the list of attributes that we defined for the customer earlier, we now have a very clear idea of what members the customer will have.
Open the code module for the ![]() Customer.vb class. Just after the Public Class Customer statement, type the following lines of code:
Customer.vb class. Just after the Public Class Customer statement, type the following lines of code:
Private strTitle As String
Private strFirstName As String
Private strLastName As String
Private strAddress As String
This declares four member variables for the Customer class. The names of the variables are quite self-descriptive in relation to their purposes.
The properties that a Customer class has are the same attributes that were outlined above:
title
firstName
lastName
address
salutation
The first step to adding a property to a class is to determine what information the property will give to an end user or developer who happens to be working with the object. Then comes the issue of how the property should be used. A property may be read-only or allow read and write. The details about the properties of the Customer class are listed in Table A-1.
|
Property Name |
Purpose |
Content |
Usage |
|---|---|---|---|
|
title |
Title of the customer |
strTitle member variable |
Read and write |
|
firstName |
First name of the customer |
strFirstName member variable |
Read and write |
|
lastName |
Last name of the customer |
strLastName member variable |
Read and write |
|
address |
Address of the customer |
strAddress member variable |
Read and write |
|
salutation |
Salutation for the customer |
strTitle + <space> + strFirstName + <space> + strLastName |
Read-only |
A property is implemented using a type of procedure called the Property procedure. Property procedures are special because they hold two other procedures inside their code body. These are the Get and Set procedures. To better understand the functionality of Property procedures, it is important to understand their syntax.
    <access_modifier> Property <property_name>() As
      <data_type_x>
        Get
            ‘Code module for Get
        End Get

        Set (ByVal <identifier> As < data_type_x >)
            ‘Code module for Set
        End Set
    End Property
The syntax for the Property procedure is very interesting. It is important that you understand each part of it.
<access_modifier> Property <property_name>() As
  <data_type_x>
This part of the syntax is the declaration of the procedure. Notice the End Property statement that terminates the code body of the procedure. As you have noticed, the Property procedure is declared similar to other procedures that you are accustomed to. The only exception is the use of the property statement instead of procedure. The <property_name> clause defines a name for the property. This name must conform to the legal identifier names allowed in Visual Basic .NET.
<data_type_x> defines a data type for the particular property. This can be of any legal data type.
        Get
            ‘Code module for Get
        End Get
Get is a special procedure that returns the value of the property. The Get procedure is automatically executed when the calling code attempts to retrieve a property value with the statement:
Object.Property
Any logic can be coded inside the Get procedure, given of course that the logic makes sense in the context of retrieving a property value. Anything that happens whenever the calling code retrieves the value of a property must be coded inside the Get procedure.
        Set (ByVal <identifier> As < data_type_x >)
             ‘Code module for Set
        End Set
The Set procedure is called whenever the calling code attempts to assign a value to a property with this statement:
Object.property = anyValue
<identifier> defines any valid identifier that you may specify. This identifier references the value that is assigned to the property. In the case of the calling statement above, <identifier> would reference anyValue. The two should be of the same data type specified in < data_type_x >.
As with the Get procedure, the code body of the Set procedure can hold any form of logic. The most relevant however, is validating the value before assigning it to the property.
The Set procedure also plays a key role in the case of a read-only property. To specify a property as read-only, do not perform an assignment inside the Set procedure. To create a better user interaction, you may opt to pop up a message that tells the user or developer that a value cannot be assigned to the property because it is read-only. If you do not wish to have a user-friendly Set property procedure, use the access modifier ReadOnly for the property and do not specify a Set procedure.
Open the code window for the Customer class. Just after the declaration of the member variables, type the following code to define the Title, FirstName, LastName, and Address properties for the Customer class:
    'Begin Properties
    'Property Procedure for the Title property
    Public Property Title() As String
        Get
            Return strTitle
        End Get

        Set(ByVal Value As String)
            strTitle = Value
        End Set
    End Property
    ''''''''''''''''''''''''''''''''''''''''''''''

    'Property Procedure for the FirstName property
    Public Property FirstName() As String
        Get
            Return strFirstName
        End Get

        Set(ByVal Value As String)
            strFirstName = Value
        End Set
    End Property
    ''''''''''''''''''''''''''''''''''''''''''''''

    'Property Procedure for the LastName property
    Public Property LastName() As String
        Get
            Return strLastName
        End Get

        Set(ByVal Value As String)
            strLastName = Value
        End Set
    End Property
    ''''''''''''''''''''''''''''''''''''''''''''''

    'Property Procedure for the Address property
    Public Property Address() As String
        Get
            Return strAddress
        End Get

        Set(ByVal Value As String)
            strAddress = Value
        End Set
    End Property
    ''''''''''''''''''''''''''''''''''''''''''''''
    'End Properties
The Get and Set code is very straightforward. When the calling code retrieves the value of the property, the Get procedure returns the value in the corresponding member variable. When the calling code assigns a value to the property, the Set procedure assigns the value of the assigned value of the corresponding member variable. This method of hiding the value of the member variables is called encapsulation. It ensures that the data inside the object is secure at all times. For example, using Property procedures, you can perform a complex security check on the current user of the application before allowing this individual to either retrieve or assign a value to a class member.
The Property procedure for the Salutation property has a little more overhead. Salutation is read-only, meaning that you cannot assign it a value. Another issue is that it is a computed property. It returns the value of more than one member variable. Write the code body for the Salutation Property procedure as the following:
    'Property Procedure for the Salutation property
    ReadOnly Property Salutation() As String
        Get
            With Me
                'compute the salutation and return it
                Return .Title + ". " + .FirstName + " "
                  + .LastName
            End With
        End Get
    End Property
    ''''''''''''''''''''''''''''''''''''''''''''''
This code marks the property as read-only and returns the salutation of the customer. A typical value for the Salutation property would be Mr. John Doe.
In this section, we instantiate a Customer object and use the controls on frmExample to input values into properties and see how it functions.
Open the frmExample Windows Form object.
Double-click the cmdInstantiate command button control to get to its click() event handler. This event is triggered when the button is clicked. Add the following code to the event handler:
        Dim cust As New Customer()
        With cust
            .Title = Me.txtTitle.Text
            .FirstName = Me.txtFirstName.Text
            .LastName = Me.txtLastName.Text()
            .Address = Me.txtAddress.Text
            MsgBox(.Salutation & vbCr & " Lives at: " &
                   vbCr & .Address)
        End With
        cust = Nothing
When the button is clicked, a new Customer object is instantiated and its properties are assigned the values from the input controls on the window. A message box appears, telling you the salutation and address of the customer. Then the Customer object is released from memory.
Run the example, input some information in the controls, and click the button. The result should be something like that illustrated in Figure A-6.
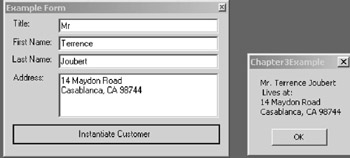
Figure A-6: The result of the sample application
Methods are the elements of a class that implement the particular behaviors of the resulting object. At first sight, methods may seem like simple functions inside the code module of a class. In fact, they are, but by the strict rules of OOP, every method must provide one specific behavior to an object. A behavior in this case is an action that an object can take or a reaction that is a response to the surrounding environment. Therefore, methods must be carefully planned and their actions properly coordinated.
Inside a class, a method is implemented similar to a modular regular or global function. In fact, a method can take the form of a function or a procedure, depending on what you intend to achieve. If you hope to return a value, use functions; otherwise, a procedure approach will do the job.
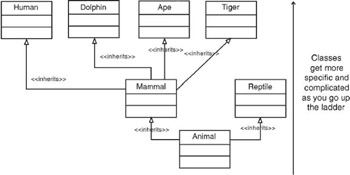
The principle of inheritance is that a class can be derived from another class. This relationship results in objects that inherit the properties, members, and methods of other objects. A good example is to think of the class Dog as one that is derived from the class Mammal. A Dog object would behave similar to a Mammal and, in fact, have all the attributes of the Mammal, but its properties and methods are somewhat specific to “doggy” behavior. In a scenario of developing an application that incorporates a lot of related classes (Dolphin, Human, Ape, Tiger), such a principle allows the developer to code a generic class—Mammal, from which the other classes can inherit behaviors and properties. The chain of inheritance can go further to include the classes illustrated in Figure A-7:
Unlike its predecessors, the VB .NET object-oriented architecture supports the full power of inheritance, like C++, C#, and Java. This has helped it become the favorite .NET language among developers who prefer development speed and ease of use over the classical taste of the other languages.
In VB .NET, the following rules apply to inheritance:
A class can be optionally marked as non-inheritable, meaning that no other class can be derived from it. This is done using the NotInheritable keyword to declare the class:
<access_modifier> NotInheritable Class <classname>
    ‘Class code body
End Class
A derived class can implement a method that overrides or extends the same functionality of the same method of its parent class.
A class can be derived from one class only. There is no support for multiple inheritance.
A class can also be declared as MustInherit. In this case, your code cannot consume its instance directly but rather consumes the instance of a class derived from it.
The syntax for implementing an inherited class is:
Public Class ClassX
   Inherits ClassY
   ' Overrides, overloads, and extends members
   ' inherited from the base class
End Class
Notice the use of the Inherits keyword after the class declaration. This tells VB .NET that ClassX is derived from ClassY. VB .NET does not support multiple inheritance, so it is impossible to have two Inherits statements.
After the base class is specified, you have the option to override or overload methods and extend the base class members.
In this section, we attempt to extend the AppendixOneExample solution to demonstrate the principle of inheritance at work. Load the solution into the development environment.
Upon testing the current functionality of the application, you have found that one thing is left out. For later analysis purposes, you want to obtain the customer’s zip code and state of residence. Since you hope to market the application internationally, requiring a zip code and state in the current customer functionality will cause trouble with international customers. You decide to create a new USCustomer class that inherits generic customer attributes and behaviors, while providing an extended functionality for American customers.
The first thing you need to do is change two things with the Customer class. Change the declaration of member variable strAddress, setting its access modifier to Protected. This will allow the code in any inherited class to reference this variable directly. Then, place the keyword Overridable between the keywords Public and Property in the declaration section of the Address property. It should now look like this:
    Protected strAddress As String
        ‘Other parts of the class here
    Public Overridable Property Address() As String
        Get
            Return strAddress
        End Get
        Set(ByVal Value As String)
            strAddress = Value
        End Set
    End Property
Create a new class and name it USCustomer. Then enter the following code:
Public Class USCustomer
    Inherits Customer

    Private strZipCode As String
    Private strState As String

    Public Property zipCode() As String
        Get
            Return strZipCode
        End Get

        Set(ByVal Value As String)
            strZipCode = Value
        End Set
    End Property

    Public Property state() As String
        Get
            Return strState
        End Get

        Set(ByVal Value As String)
            strState = Value
        End Set
    End Property

    'The new address property overrides the one in
    'Customer
    Public Overrides Property Address() As String
        Get
            Return strAddress & " " & strState & " " &
              strZipCode
        End Get
        Set(ByVal Value As String)
            strAddress = Value
        End Set
    End Property
End Class
There are a couple of interesting things that are happening in this class. First, we declare two member variables to hold values for the zip code and state, respectively. Then, the zipCode and State properties are added. The most interesting inheritance feature in this class is overriding the Address property of the base Customer class. The keyword Overrides is used to perform this task. In order to use this keyword on an entity in a derived class, the keyword Overridable must be specified on the declaration of that particular entity in the base class. Overriding methods and member variables work the same way as overriding properties in Visual Basic .NET. This allows you to call one method that may perform different actions, depending on which type of object you are calling it on. This feature is called polymorphism in object-oriented programming.
Now you are ready to test the new USCustomer class.
Open the frmExample form object.
Add two pairs of label and textbox controls to the form. Name the labels lblZipCode and lblState and set their Text property accordingly. Name the text boxes txtZipCode and txtState.
Open the code body of the click() event handler for the cmdInstantiate command button. Replace the code in that handler with the following:
    Private Sub cmdInstantiate_Click(ByVal sender As
      System.Object, _
    ByVal e As System.EventArgs) Handles
      cmdInstantiate.Click

        Dim USCust As New USCustomer()

        With USCust

            .Title = Me.txtTitle.Text
            .FirstName = Me.txtFirstName.Text
            .LastName = Me.txtLastName.Text
            .Address = Me.txtAddress.Text
            .zipCode = Me.txtZipCode.Text
            .state = Me.txtState.Text
            MsgBox(.Salutation & vbCr & " Lives at: " &
                   vbCr & .Address)

        End With

        USCust = Nothing

    End Sub
The code does only a few new things: instantiates a new USCustomer object and assigns the appropriate values to its State and zipCode properties.