| [ Team LiB ] |
|
12.4 Windows Data BindingSo far, the examples have concentrated on a single control designed specifically for data binding: the Windows DataGrid. But the Windows Forms platform also supports data binding with just about any control (as demonstrated a little later in this section) and automatically synchronizes multiple data-bound controls. This ability goes far beyond just ADO.NET and the DataSet. In fact, the ability to bind a data object to a Windows control depends on the small set of interfaces shown in Table 12-4.
Some collection classes, such as the Array and ArrayList, support data binding because they implement the IList interface. This is the minimum requirement for simple read-only data binding. The ADO.NET data objects implement three additional interfaces, giving them the ability to support notification, editable binding, and error information. 12.4.1 The CurrencyManager and BindingContextThese interfaces don't tell the whole data binding story, however. Windows Forms can also synchronize multiple controls. This allows you to (for example) choose a record using a list control and see the related field information automatically appear in other data-bound text or label controls on the same form. This ability isn't directly derived from ADO.NET; in fact, unlike the ADO Recordset, classes such as the DataSet and DataView don't store any positional information that would allow them to "point" to a single row. Instead, this ability comes from the Windows Forms architecture and is provided by two classes: CurrencyManager and BindingContext. When you bind a data object to a control, it is automatically assigned a CurrencyManager object. The CurrencyManager keeps track of the position in the data source. If you are binding to more than one data object, each has a separate CurrencyManager. If several controls are bound to the same data source, they share the same CurrencyManager. Every form has a BindingContext object. The BindingContext object keeps track of all the CurrencyManager objects on the form. It is possible to create and use more than one BindingContext object (as discussed a little later) but, by default, every form is given a single BindingContext. Figure 12-5 diagrams this relationship. Figure 12-5. The binding context of a form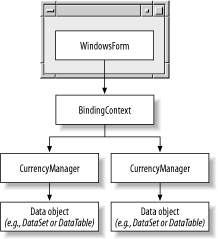 The next few sections show how to use Windows Forms data binding with the common set of .NET controls. 12.4.2 List BindingAll controls that derive from ListControl (including ListBox and ComboBox) support read-only data binding to a DataTable object. Indicate the desired DataTable by setting the DataSource property, much as you would with the DataGrid control. However, list controls can track only two pieces of information, and they can display only a single field. Specify the field to display by setting the DisplayMember property to the field name. For example, the following code binds a DataTable to a ComboBox and shows the CustomerID field. (You can add this code to the end of Example 12-1 to test it.) cboCustomerID.DataSource = ds.Tables["Customers"].DefaultView; cboCustomerID.DisplayMember = "CustomerID"; You can also use the ValueMember property to store additional information (technically, an instance of any .NET type) with each list item: cboCustomer.DataSource = ds.Tables["Customers"].DefaultView; cboCustomer.DisplayMember = "ContactName"; cboCustomer.ValueMember = "CustomerID"; You can then retrieve the value of the currently selected item using the SelectedValue property. For example, here's the event handler for a button that displays the CustomerID of the currently selected record: private void button1_Click(object sender, System.EventArgs e)
{
// Display the CustomerID of the currently selected record.
MessageBox.Show(cboCustomer.SelectedValue.ToString());
}
Keep in mind that this is only a convenience. When you bind a DataTable, the object is retained with all its information, regardless of what item you choose to show in the control. By accessing the binding context directly, the following code snippet accomplishes the same task, relying on the display member. This approach is useful if you need to retrieve several columns of undisplayed information. private void button1_Click(object sender, System.EventArgs e)
{
// Retrieve the binding context for the form.
BindingContext binding = this.BindingContext;
// Look up the currency manager for the appropriate data source.
BindingManagerBase currency = binding[cboCustomer.DataSource];
// Using the currency manager, retrieve the currently selected
// DatRowView.
DataRowView drView = (DataRowView)currency.Current;
// Display the CustomerID of the currently selected record.
MessageBox.Show(drView["CustomerID"].ToString());
}
12.4.3 Single-Value BindingMost controls don't provide a DataSource property. For example, common .NET controls such as the TextBox, Label, and Button don't provide any special data-binding member. However, they can display a single value of bound information. This functionality is inherited from the base Control class. The Control class provides a DataBindings collection that allows you to link any control property to a field in the data source. Usually, you'll add a data binding that binds information to a display property like Text. However, much more exotic designs are possiblesuch as binding a color name to the Control.ForeColor property. To connect a TextBox to the ContactName field of a DataTable, use the following code: txtContact.DataBindings.Add("Text", ds.Tables["Customers"].DefaultView,
"ContactName");
The first parameter is the name of the control property. .NET uses reflection to find the matching property at runtime (although it can't catch mistakes at design time). The second parameter is the data source. The third parameter is the property or field in the data source that will be boundin this case, the ContactName field. The Add( ) method is a shorthand that allows you to create and add a Binding object in one step. Here's the equivalent code that creates the Binding object manually: Binding propertyFieldBinding; = new Binding("Text",
ds.Tables["Customers"].DefaultView, "ContactName");
txtContact.DataBindings.Add(propertyFieldBinding);
You can use a similar approach to link the CustomerID value to the TextBox.Tag property. The Tag property isn't used by .NET but is available for information storage you might want later. This way, you can determine the CustomerID for the current customer, just as you did with the list control. txtContact.DataBindings.Add("Tag", ds.Tables["Customers"].DefaultView,
"CustomerID");
Unlike the list binding, single-value binding provides no way to move from record to record. However, if you've followed the previous examples, you will now have a form with multiple synchronized controls. When you choose a record in a list control or DataGrid control, the corresponding information is shown in any linked single-value controls such as the Label or TextBox (see Figure 12-6). Figure 12-6. Multiple bound controls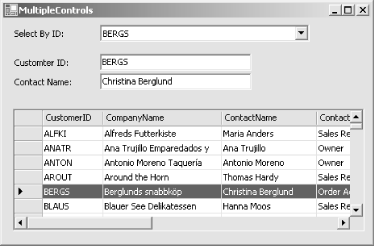 Single-value binding is also useful with list controls. When you bind a list control by setting the DataSource property, you create a read-only navigational control. When a value is selected from the list, the CurrencyManager moves to the appropriate record, and all other controls are updated appropriately. When you use single-value binding with a list, you create an editable value that allows you to modify the bound field for the current record. To use a list control in this fashion, follow these two steps:
Now, the list control shows the bound field automatically when you navigate to a record. However, the user can also select a new value to modify the field. 12.4.4 Format and ParseOne of the traditional limitations with data binding was that it provided relatively few opportunities to format the data. Unfortunately, the raw data drawn directly from a database may contain numeric codes or short forms that need to be replaced with more descriptive equivalents or numbers that need to be formatted to a specific scale or currency format. If your data is editable, you'll also need to take user-supplied data and convert it to data that can be inserted into the database. To accomplish these tasks, you need to handle the Format and Parse events for the Binding object. Use the Format event handler to modify values from the database before they appear in a data bound control. Use the Parse event handler to take a user-supplied value and modify it before it is entered in the data object. Figure 12-7 diagrams the process. Figure 12-7. Format and parse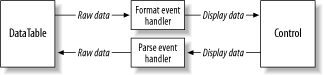 For example, the Products table in the Northwind database includes a UnitPrice column. By default, this displays a number in ordinary decimal format as shown here: 21.3 12 14.33 A more consistent representation looks like this: $21.30 $12.00 $14.33 The following code shows how you might write the data binding code to support this conversion. This code binds the UnitPrice field to a TextBox and registers to handle the Format and Parse events: // Create the binding.
Binding dataBinding = new Binding("Text",
dsStore.Tables["Products"].DefaultView, "UnitPrice");
// Connect the methods for formatting and parsing data.
dataBinding.Format += new ConvertEventHandler(DecimalToCurrencyString);
dataBinding.Parse += new ConvertEventHandler(CurrencyStringToDecimal);
// Add the binding.
txtUnitCost.DataBindings.Add(dataBinding);
The Format and Parse event handlers access the value to convert from the ConvertEventArgs.Value property. They replace this value with the converted value. It's also good practice for the Format and Parse event handlers to verify the expected data type using the ConvertEventArgs.DesiredType property. For example, in a TextBox, every value is converted to a string. However, the reverse conversion expects a decimal. If the desired type doesn't meet expectations, the event handlers leave the value untouched. See Example 12-4. Example 12-4. Formatting and parsing valuesprivate void DecimalToCurrencyString(object sender, ConvertEventArgs e)
{
if (e.DesiredType == typeof(string))
{
// Use the ToString method to format the value as currency ("c").
e.Value += ((decimal)e.Value).ToString("c");
}
}
private void CurrencyStringToDecimal(object sender, ConvertEventArgs e)
{
if (e.DesiredType == typeof(decimal))
{
// Convert the string back to decimal using the static Parse()
// method.
e.Value = Decimal.Parse(e.Value.ToString(),
System.Globalization.NumberStyles.Currency, null);
}
}
12.4.5 Controlling NavigationSo far, we've considered only one way to control navigation: using a navigational control such as a ListBox or DataGrid. However, you can also control navigation programmatically by directly interacting with the CurrencyManager. Example 12-5 shows the event handlers for Next and Previous buttons. When one of these buttons is clicked, a new record is selected, and all bound controls are updated automatically. In this case, the CurrencyManager is retrieved every time it is needed. It might be a better approach to store a reference to it in a private form-level variable. Example 12-5. Changing record position programmaticallyprivate void cmdPrev_Click(object sender, System.EventArgs e)
{
// Retrieve the binding context for the form.
BindingContext binding = this.BindingContext;
// Look up the currency manager for the appropriate data source.
BindingManagerBase currency = binding[dataGrid1.DataSource];
// Move to the previous record.
currency.Position--;
}
private void cmdNext_Click(object sender, System.EventArgs e)
{
// Retrieve the binding context for the form.
BindingContext binding = this.BindingContext;
// Look up the currency manager for the appropriate data source.
BindingManagerBase currency = binding[dataGrid1.DataSource];
// Move to the next record.
currency.Position++;
}
In this example, the code doesn't bother to check whether it's reached the limits of the data source. For example, if the user clicks the previous button while positioned on the first record, it tries to set the Position property to the invalid value -1. Fortunately, the CurrencyManager simply ignores invalid instructions, and the Position remains unchanged. Example 12-6 shows the event handler you'll need. Example 12-6. Handling the PositionChanged eventprivate void Binding_PositionChanged(object sender, System.EventArgs e)
{
// Retrieve the binding context for the form.
BindingContext binding = this.BindingContext;
// Look up the currency manager for the appropriate data source.
BindingManagerBase currency = binding[dataGrid1.DataSource];
if (currency.Position == currency.Count - 1)
{
cmdNext.Enabled = false;
}
else
{
cmdNext.Enabled = true;
}
if (currency.Position == 0)
{
cmdPrev.Enabled = false;
}
else
{
cmdPrev.Enabled = true;
}
}
And here is some of the data binding code, which now also hooks up the required event handler: // Bind a DataGrid. dataGrid1.DataSource = ds.Tables["Customers"].DefaultView; // Hook up the PositionChanged event handler. BindingContext binding = this.BindingContext[dataGrid1.DataSource]; currencyPositionChanged += new EventHandler(Binding_PositionChanged); 12.4.6 Master-Detail FormsThe PostionChanged event also makes it easy to create master-detail forms (see Figure 12-8). A master-detail binds two data objects and uses two CurrencyManager objects. When the parent record changes, the child data must also be modified. This modification can be accomplished by configuring the DataView.RowFilter property. Example 12-7. Master-detail data bindingpublic class MasterDetail : System.Windows.Forms.Form
{
private System.Windows.Forms.DataGrid gridSuppliers;
private System.Windows.Forms.DataGrid gridProducts;
// (Designer code omitted.)
DataSet ds = new DataSet("Northwind");
private void MasterDetail_Load(object sender, System.EventArgs e)
{
string connectionString = "Data Source=localhost;" +
"Initial Catalog=Northwind;Integrated Security=SSPI";
string SQL = "SELECT * FROM Products";
// Create ADO.NET objects.
SqlConnection con = new SqlConnection(connectionString);
SqlCommand com = new SqlCommand(SQL, con);
SqlDataAdapter adapter = new SqlDataAdapter(com);
// Execute the command.
try
{
adapter.Fill(ds, "Products");
com.CommandText = "SELECT * FROM Suppliers";
adapter.Fill(ds, "Suppliers");
}
finally
{
con.Close();
}
// Display the results.
gridSuppliers.DataSource = ds.Tables["Suppliers"].DefaultView;
gridProducts.DataSource = ds.Tables["Products"].DefaultView;
// Handle the PositionChanged event for the Suppliers table.
BindingManagerBase currency;
currency = this.BindingContext[gridSuppliers.DataSource];
currency.PositionChanged += new
EventHandler(Binding_PositionChanged);
}
private void Binding_PositionChanged(object sender, System.EventArgs e)
{
string filter;
DataRowView selectedRow;
// Find the current category row.
selectedRow = (DataRowView)this.BindingContext[
gridSuppliers.DataSource].Current;
// Create a filter expression using its SupplierID.
filter = "SupplierID='" + selectedRow["SupplierID"].ToString() +
"'";
// Modify the view onto the product table.
ds.Tables["Products"].DefaultView.RowFilter = filter;
}
}
Figure 12-8. A master-detail form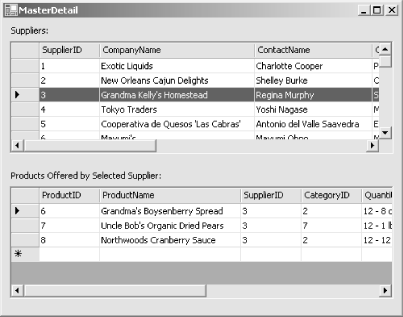 Example 12-7 uses two DataGrid controls: one that displays Suppliers (the parent table) and one that displays the Products offered by the currently selected supplier. The DataGrid controls are bound as before. The difference is that the PositionChanged event handler dynamically builds a filter string based on the currently selected supplier and uses it to filter the product list. Another equivalent option is to use the CreateChildView( ) method discussed earlier in this chapter to generate a new DataView object based on a DataRelation each time the position changes. 12.4.7 Creating New Binding ContextsEvery form provides a default BindingContext object. As you've seen, you can access this object to determine the currently selected item or change the current position. However, what happens if you want to create a form that has more than one BindingContext? For example, imagine you show two differently filtered views of the same data. In this case, when the user selects an item in one view, you don't want the same item selected in the second view, even if it is available. Fortunately, you can create new binding contexts with these three steps:
|
| [ Team LiB ] |
|