| [ Team LiB ] |
|
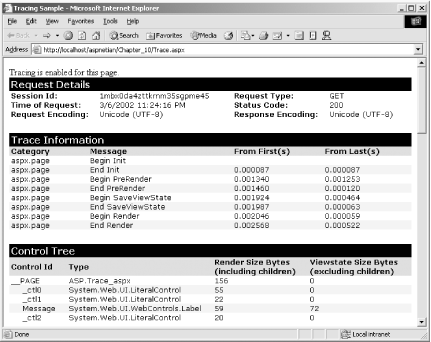
10.3 TracingThe other useful tool provided by ASP.NET for debugging is the trace feature. Tracing allows you, through a simple configuration setting or page-level attribute, to have ASP.NET write a whole host of information about the currently executing request to the page or to a trace log. This information includes the SessionID; the time, type, and status code of the request; timing information for events such as Init, PreRender, SaveViewState, and Render; a Control Tree of all controls in the page; and the contents of the Cookies collection, the HTTP Headers, the QueryString collection (if any QueryString values were passed), the Form collection (if any form fields were passed), and the ServerVariables collection. Essentially, tracing allows you to automatically write out the contents of all collections exposed by the classic ASP Request object, plus some really useful additional information. This allows you to examine a great deal of information about a request on a single page, which can assist greatly in debugging. More importantly, you can also write to the trace output using the Trace.Write and Trace.Warn methods, which are exposed by the Trace property of the Page class. These methods can now be used in place of Response.Write when you determine the value of a variable on a page at a certain point in page execution or write out a notification that a certain point in the page has been hit. With Trace.Write or Trace.Warn, once you've disabled tracing, you can leave the statements in your code and you don't have to worry about anyone seeing the output. If you've ever deployed a page to production without removing or commenting out your Response.Write statements used for debugging, you'll be grateful for this feature. 10.3.1 Page-Level TracingEnabling tracing at the page level is very simple. Simply add the Trace attribute to the @ Page directive and set its value to True, as shown in the following code snippet: <%@ Page Language="VB" Trace="True" %> This provides a quick and easy way to get an overview of what's going on for a given page. The output from a page with tracing enabled looks similar to Figure 10-8. Figure 10-8. Page-level tracing One downside to enabling tracing at the page level is that if you use it with many pages, it's more work to add and remove the Trace attribute for each page (or to set the attributes to False). This can also make it more likely that you'll forget one and end up with trace information being written out in a production application. Not what you want. 10.3.2 Application-Level TracingASP.NET provides the ability to enable tracing at the application level through the <trace> element in web.config. Application-level tracing makes it possible to disable tracing in a single location in your application and makes it easier to enable tracing for multiple pages. Example 10-8 shows a web.config file with tracing enabled at the application level.
Example 10-8. The <trace> element<configuration>
<system.web>
<trace enabled="true"
localOnly="true"
pageOutput="true"
requestLimit="15"
traceMode="SortByCategory" />
<system.web>
</configuration>
In addition to providing a single point of control over enabling/disabling tracing, the <trace> element allows you to control several other factors: whether trace output is visible to machines other than the local host (using the localOnly attribute); whether the output is sent to the page or to a trace log (using the pageOutput attribute); the number of traces that are kept in the trace log (requestLimit); and how the Trace Information section of the trace output is sorted (traceMode). If pageOutput is set to False, you can still view the trace output by entering the special URL Trace.axd (which isn't an actual file, but a URL that invokes an HttpHandler for the trace functionality) from the root of the application. Trace.axd lists all saved traces for the application. Note that once the number of traces specified by the requestLimit attribute is met, no more traces are saved until the trace log is cleared. Trace.axd provides a link for this purpose. 10.3.3 Using Trace.Write and Trace.WarnFinally, as mentioned in the introduction to this section, instead of using Response.Write (as done in classic ASP) to write out variable values or flag certain points in your code, ASP.NET enables you to use Trace.Write and Trace.Warn. Both the Write and Warn methods are overloaded and can take one of the following sets of arguments:
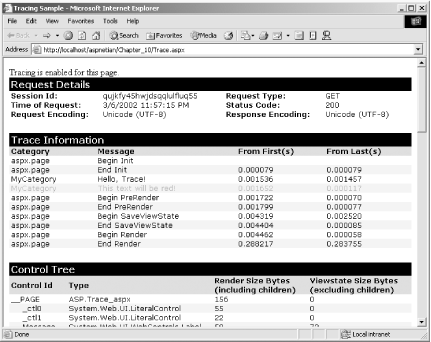
The only difference between Write and Warn is that entries written with the Warn method appear in red text, making them ideal for conditions that require special attention. Example 10-9 shows an ASP.NET page with tracing enabled that uses Trace.Write and Trace.Warn to write to the trace output. Figure 10-9 shows the output of this page. Example 10-9. Trace.aspx<%@ Page Language="VB" Trace="True" %>
<html>
<head>
<title>Tracing Sample</title>
<script runat="server">
Sub Page_Load( )
If Page.Trace.IsEnabled = True Then
Trace.Write("MyCategory", "Hello, Trace!")
Trace.Warn("MyCategory", "This text will be red!")
Message.Text = "Tracing is enabled for this page."
Else
Message.Text = "Tracing is not enabled for this page."
End If
End Sub
</script>
</head>
<body>
<asp:label id="Message" runat="server"/>
</body>
</html>
Figure 10-9. Output of Trace.aspx |
| [ Team LiB ] |
|