Recipe 15.5 Post Web Form Data to an Access Database
15.5.1 Problem
You want to be able to collect data
from a user of your web site and post the data to an Access database.
You are not using a SharePoint server and you'd
prefer to accomplish this task with little or no programming. Is
there a way to use FrontPage to collect form data and
send it to an Access database?
15.5.2 Solution
You can use Form Page Wizard to help you create a web page that
collects information from a user using an HTML form and posts it to
one of a number of different choices. A database, however, is not one
of the choices. Fortunately, with a little post-wizard wizardry, you
can change the form so it points its data to an Access database.
Follow these steps to create a form that posts to an Access database:
 |
This solution will not work with a SharePoint-enabled web site.
|
|
Startup FrontPage 2003. Select Select File  New... to create a new web site. On the
New task pane, click on "One page Web
site..." under New Web site. New... to create a new web site. On the
New task pane, click on "One page Web
site..." under New Web site. At the Web Site Templates dialog box click on Empty Web Site and
enter the following location for the web site: http://localhost/15-05 FrontPage creates a new empty web site on the current machine. If you
do not have a Microsoft web server running on the current machine,
you will need to change localhost to the name or address of a
Microsoft web server for which you have site creation privileges. Select File  Import. Click on Add File... from the Import
dialog box. Import. Click on Add File... from the Import
dialog box. Navigate to the 15-05.MDB sample database and
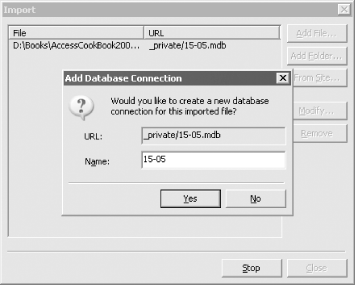
click Open. Click OK to add the database to the site. When you click OK, FrontPage recognizes that you are importing a
database and asks you if you wish to create a database connection for
the database as shown in Figure 15-14.

Enter "15-05" for the database
connection name and click Yes to import the database and create the
database connection. FrontPage displays an additional dialog box suggesting that the
database be moved to the fpdb folder. This is a good practice, so you
should click Yes. Select File  New... to create a new page. On the New task
pane, click on "More page
templates..." under New page. New... to create a new page. On the New task
pane, click on "More page
templates..." under New page. Click on the General tab of the Page Templates dialog box, select the
Form Page Wizard template, and click OK. FrontPage starts the Form Page wizard. Click Next at the first page
of the wizard which merely tells you about the wizard. At the second page of the wizard, click Add to add a new question to
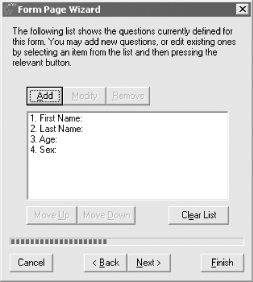
the form. The questions you will add to the form are listed in Table 15-1. After adding the four fields, the wizard should look like Figure 15-15.
Table 15-1. Adding questions to the form|
|
String
|
First Name:
|
txtFirstName
|
Maximum length = 20
| |
String
|
Last Name:
|
txtLastName
|
Maximum length = 20
| |
Number
|
Age
|
txtAge
|
Maximum length = 3
| |
One of several options
|
Sex:
|
txtSex
|
Radio buttons = Male, Female
|

Click Next. FrontPage displays the Presentation Options page of the
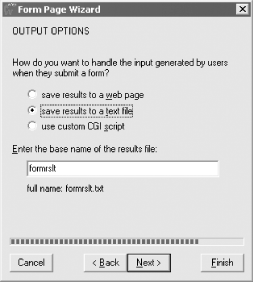
wizard. The default responses should be fine, so click Next. FrontPage displays the Output Options page as shown in Figure 15-16. Notice that there isn't any
option to save the results to a database. This is an obvious
oversight on the part of the FrontPage team, but you will be able to
remedy this problem later. For now, select "save
results to a text file" and click Finish.

Select File  Save to save the page, naming it
"register.asp". Save to save the page, naming it
"register.asp". Select File  New... to create a new page. On the New task
pane, click on "Blank Page" under
New page to create a new blank page. New... to create a new page. On the New task
pane, click on "Blank Page" under
New page to create a new blank page. On the new page, enter the text "Thank you for
registering". Select File  Save to save the page, naming it
"confirm.asp". Save to save the page, naming it
"confirm.asp". When the wizard is complete, click the mouse anywhere within the
form. Right-click on the form and select Form Properties from the
popup menu. At the Form Properties dialog box, under Where to store results,
select the Send to database option and click on the Options...
button. At the Options for Saving Results to Database dialog box, select the
"15-05" database connection under
Database Connection to Use and tblRegister under Table to hold form
results. Under URL of confirmation page (optional), enter
"confirm.asp". Click the Saved Results tab and modify each field so that it maps to
the fields in tblRegister according to Table 15-2:
Table 15-2. Mapping the form fields to tblRegister fields|
|
txtAge
|
Age
| |
txtFirstName
|
FirstName
| |
txtLastName
|
LastName
| |
txtSex
|
Sex
|
Click OK to dismiss the Options for Saving Results to Database dialog
box and OK to dismiss the Form Properties dialog box. Change the heading of the page to "Registration
Form" and replace the introductory text on the form
with "Please register by completing the following
form." Select File  Save to save the changes you have made to the
register.asp page. Save to save the changes you have made to the
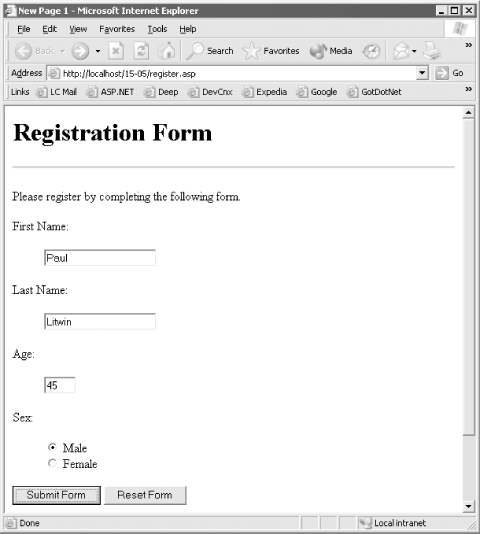
register.asp page. Select File  Preview in Browser to display the page in your
browser. The page should look similar to the one shown in Figure 15-17. Enter data into each of the fields and click
Submit Form. Preview in Browser to display the page in your
browser. The page should look similar to the one shown in Figure 15-17. Enter data into each of the fields and click
Submit Form.

Open the 15-05.MDB database to verify that the
data was added to the tblRegister table.
15.5.3 Discussion
You don't need to use the Form Page wizard to connect a form
to an Access database. If you'd prefer to setup the
form yourself, go ahead and create the form, skipping steps 9-15 of
the solution. The remainder of the solution, however, should still
apply.
If you don't have an existing Access database to
work with, you can have
FrontPage create a new one for
you. From the Options for Saving Results to Database dialog box (see
Step 21), click on the Create Database... button to create a new
database. FrontPage creates a new database and hooks the form up to a
table in the database named Results.
The steps in this solution apply when using FrontPage 2003. However,
except for some trivial differences, the steps are virtually
identical when using FrontPage 2002.
15.5.4 See Also
See Database Power with Microsoft FrontPage version 2002. http://msdn.microsoft.com/library/default.asp?url=/library/en-us/odc_fp2003_ta/html/odc_fpbldgxmlwebs.asp
|


