| [ Team LiB ] |
|
11.1 Using the GUI to Examine PermissionsTo access the default permissions for any object, select the Active Directory Users and Computers MMC and right-click on it. Choose Properties from the drop-down menu and select the Security tab of the properties window that is displayed.
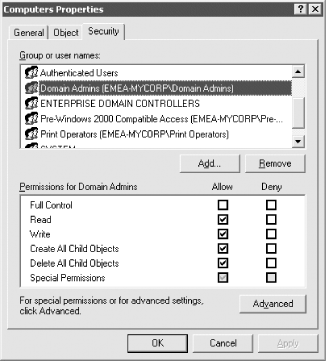
The window in Figure 11-2 is your first point of contact for permissions. The top area contains a complete list of all groups and users who have permissions to the object whose properties we are looking at. The Permissions section below this list displays which general permissions are allowed and denied for the highlighted user or group. The general permissions listed are only those deemed to be the most likely to be set on a regular basis. Each general permission is only an umbrella term representing a complex set of actual implemented permissions hidden underneath the item. Consequently, the general permission called Read translates to specific permissions like Read All Properties and List Contents, as we will show later. Below the Permissions section are three important parts of this window:
Figure 11-3. Advanced Security Settings for an object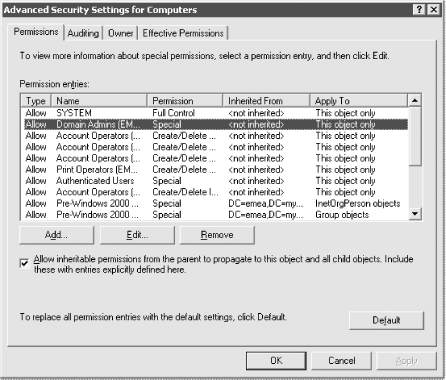 While the Advanced Security Settings window gives only slightly more information than the previous window, it serves an important purpose: it is a gateway to the lowest, most atomic level of permissions. The Advanced window allows you to view the globally set permissions from Figure 11-2, as well as a brief summary of the advanced permissions that may be set for each object. While the Name and Permission columns effectively duplicate information from Figure 11-2, the Type field shows whether the permissions to the object for this user or group are Allow or Deny. If a group has some allow and some deny permissions, two entries are recorded in this window. The Inherited From field is a new addition in Windows Server 2003 that allows you to see what object, if any, the permission was inherited from. The Apply To column usefully indicates what the permission applies to. This could be to this object only, the object and all subobjects, or just to an individual property, say telephoneNumber, of a user object. Again this window allows you to indicate whether to orphan the object. You now have two choices to view the atomic permissions. You can click Add, which pops up a window allowing you to add a new user or group to those with permissions set on this object. Alternatively, you can highlight an existing user or group and click the Edit button (or View/Edit on Windows 2000). If you highlight a user or group or add one from the pop-up window, the next screens you see are the PE windows, shown in Figure 11-4 and Figure 11-5. Figure 11-4. Permission Entry for an object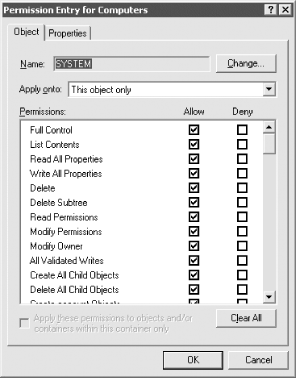 Figure 11-5. Permission Entry for an object's properties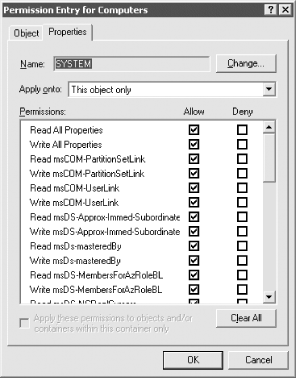
The PE windows are two sides of the same coin, one representing permissions to the object and the other representing permissions to the properties of that object. This is the lowest, most atomic level you can get to when setting permissions. Here is where you can really tailor a system to do exactly what you want. The object name is displayed in the title of the PE window, with the name of the user or group that has permissions prominently displayed in the field at the top. The user or group then has permissions allowed and denied from the column entries. The entries in the window are relative and vary depending on the entry in the drop-down list under the heading of Apply Onto. What is not immediately obvious from this window is how large the drop-down box can actually get. Figure 11-6 shows this nicely. If you look at the scroll bar, you will get an idea of how many items are currently not displayed. Figure 11-6. Permission Entry window showing the large number of targets to which permissions can be applied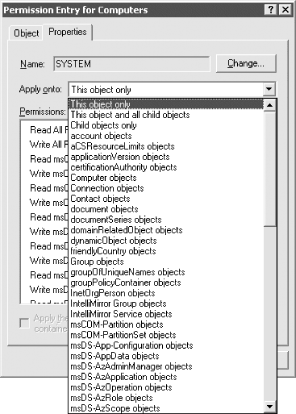 To set a permission from the PE window, pick where you want to apply the permission and then click the relevant Allow and Deny boxes, selecting OK when done. Since Microsoft has not provided an Apply button, you cannot specify a set of permissions applied onto one area, click Apply, and then repeat the cycle until you are done with this user and group. You have to click OK, which means the window closes, whereupon you then have to click Add again, and so on. This is a tiresome problem if you are implementing multiple changes from a set of prepared designs, but one you have to live with. 11.1.1 Reverting to the Default PermissionsIn Figure 11-3 you may have noticed the Default button at the bottom. This is a new feature in Windows Server 2003 that allows you to revert the current permission set to the default security as defined in the schema for the objectclass of the object. If you click Default for an object you have not modified the permissions on, you may notice that the list still changes. If you look closer, you'll see that the inherited permissions were the ones removed. That is because inherited permissions are not defined as part of the default security of an object and will be removed. Even if you then click OK to apply the permissions, as long as the Allow Inheritable Permissions box is checked, the inherited permissions will still apply. Having the ability to apply the default permissions is a useful feature, especially for administrators who are trying to determine what changes have been made from the default installation. 11.1.2 Viewing the Effective Permissions for a User or GroupAnother new feature in Windows Server 2003 is Effective Permissions, which is available from the Advanced button when viewing the security for an object. The Effective Permissions screen allows you to select a user or group and determine its effective (or actual) permissions to the object taking into account group membership and permission inheritance. Figure 11-7 shows the results of the effective permissions for Authenticated Users on the EMEA domain object. As you can see, Authenticated Users have List Contents, Read All Properties, and Read Permissions. All objects in the forest will inherit these permissions unless inheritance has been blocked. As you might guess, this is a significant feature that allows for much easier troubleshooting of permission problems. There are some limitations to be aware of, however. Figure 11-7. Viewing the effective permissions for authenticated users on the EMEA domain object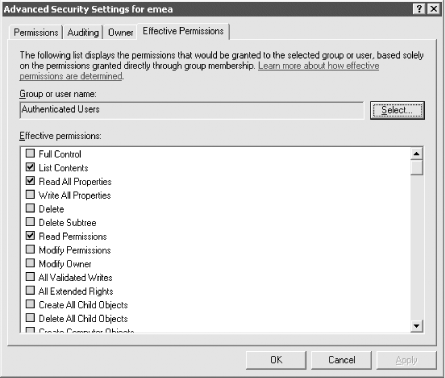 The Effective Permissions tool is only an approximation of the actual permissions a user or group has and does not take into account many of the well-known security principals such as Anonymous Logon and Network. Another potential issue to be mindful of is that the user running the Effective Permissions tool must have the rights to read the group membership of the target user or group. By default, Authenticated Users has this right. 11.1.3 Using the Delegation of Control WizardTo help with delegating permissions for objects in Active Directory, Windows 2000 and Windows Server 2003 come with a wizard called the Delegation of Control wizard. It is intended to allow administrators to delegate management of certain types of objects to key individuals or groups in the organization. It is activated by right-clicking almost any container in the DIT and selecting the wizard from the pop-up menu. Builtin and LostAndFound are the two containers for which it does not work by default. The wizard is useful only when you need to clearly apply general allow permissions to one or more object types below a container. It is not useful if you want to specify deny permissions (which it doesn't support), remove previously delegated control, delegate control over individual objects, or apply special permissions to branches of the tree. The wizard's great strength is its ability to set permissions and apply them to multiple users and groups at the same time. We use the wizard to set these sorts of permissions, although much less regularly than we do the standard GUI, since it is much more limited in what it can do. Scripting with ADSI also provides a solution here which is more adaptive to an administrator's own needs. The wizard provides several screens for you to navigate through. The first is the welcome screen, which tells you what the wizard does. The second is an object picker for you to select which users or groups to delegate to. The third screen asks what task you wish to delegate control for in that container. Figure 11-8 shows this window. Figure 11-8. Delegation of Control wizardobject type selection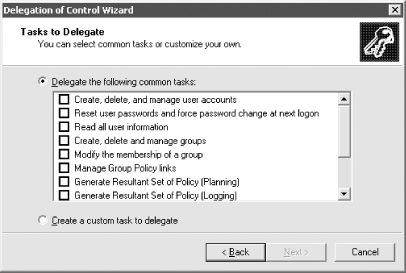 The default is to delegate control for a specific task, and there are several to choose from. In fact, several new tasks have been added in Windows Server 2003. Since the list scrolled off the screen in Figure 11-8, we'll list them here:
If you choose the Custom radio button and click Next, an extra page opens, allowing you to specify individual objects. Figure 11-9 shows this. Figure 11-9. Delegation of Control wizardchoosing objects to delegate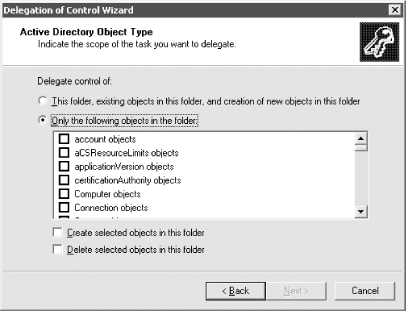 If you want to delegate certain permissions to computer or user objects in a specific container or branch, you can do it from here. The next screen of the wizard allows you to specify what permissions you wish to assign for the selected users/ groups. Figure 11-10 shows this screen. Figure 11-10. Delegation of Control wizardaccess rights selection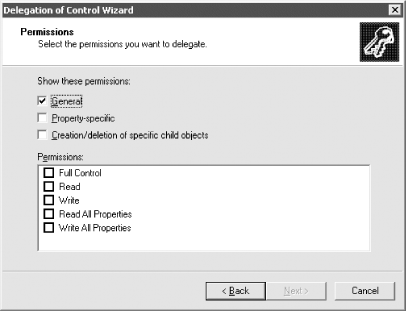 When the window opens initially, only the first checkbox is checked. As you click each of the other boxes, the list of specific permissions that you can delegate becomes very large as it encompasses all of the permissions that you could potentially delegate. Finally, the last screen of the wizard summarizes the previous answers and allows the user to go back, cancel, or finish and grant the permissions. However, just as the permissions listed in the security properties for an object (Figure 11-2) can change, so can the permissions listed in the access rights box, depending on the object(s) to which permissions are being applied. A good demonstration of this is to open up the security permissions for any user and scroll through the displayed list of permissions. Next open up the wizard on any container and specify Custom Task (see the screen shown in Figure 11-8) and only user objects (see Figure 11-9). The screen shown in Figure 11-10 should then display the same list that the screen in Figure 11-2 does. This makes sense since they should be the same; available permissions for one user should be the same as the available permissions for all users. It is still nice to see the correlation and appreciate it in the flesh, so to speak. |
| [ Team LiB ] |
|