| [ Team LiB ] |
|
4.7 Working with ImagesNSImage and NSImageRep are Cocoa's image-handling workhorses. NSImage provides a convenient and easy-to-use frontend to a powerful and flexible backend comprised of NSImageRep's many subclasses. NSImage provides a high level interface for loading, saving, and drawing images onscreen. NSImageRep and its subclasses, on the other hand, provide interfaces for working with specific image formats. 4.7.1 NSImageNSImage provides the high-level interface for working with images, which includes the ability to load and save images and draw them to screen. With NSImage, you don't need to worry about image formats, which are handled internally by NSImage and the NSImageRep set of classes. To initialize instances of NSImage use these methods:
When you initialize anything by reference, as with the first two methods, the data is not loaded until the object actually needs it. This contrasts with initWithContents..., which loads the data and initializes the object immediately. The last method, initWithSize:, initializes an empty image. imageNamed: is a useful method for creating image objects with images contained in the application bundle. With this method, you don't have to provide a path to the file or include the file extension in the nameNSImage knows where to find it within the bundle.
4.7.1.1 CompositingYou can also use NSImage to composite images to the screen through Quartz. Earlier in the chapter, we saw that all drawing had to be done within the locked focus of an NSView. Like NSView, NSImage interacts directly with Quartz to accomplish drawing. Compositing combines a source image, your NSImage object, with a destination image, the existing image displayed on the screen, according to a given operation. Table 4-4 lists the various compositing operations.
The Developer Tools installation includes several sample applications that demonstrate various aspects of the available frameworks. CompositeLab, found in /Developer/Examples/AppKit/CompositeLab, lets you combine two images with any of the compositing operations listed in Table 4-4; the result is immediate, and you can easily experiment with NSImage compositing. The source code is also available, so you can see how it's implemented. Figure 4-11 shows CompositeLab in action. Figure 4-11. The CompositeLab demo application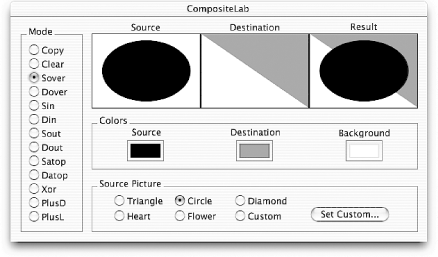 You can composite an NSImage to screen with any of the following methods:
In each method, the operation: argument is one of the constants given in Table 4-4. The first argument, compositeToPoint:, is an NSPoint structure indicating where the origin of the image should be placed in the coordinate system of the view whose focus is currently locked; the origin is the lower-left corner of the image. By using a method with a fromRect: parameter, you can specify a cropped portion of the source image to be composited to the point. Finally, the fraction: parameter seen in the last two methods in the list indicates the degree of blending that should occur between the source image and the destination image. This parameter is useful, for example, in an application in which you need to cross-fade between two images, as is often seen in Aqua. The following two methods are also useful for this task:
You can also use the following two methods to draw an image:
These methods differ from the compositing methods because they consider the rotation and scaling of the destination coordinate system, drawing the image with the appropriate scaling and rotation applied. The fromRect:, operation:, and fraction: parameters behave as compositing methods. Example 4-9 demonstrates how to create an NSImage and composite it to a point on screen using the NSCompositeCopy operation. Example 4-9. Using NSImage// Use a named image NSImage *image = [NSImage imageNamed:@"buttonImage"]; [image compositeToPoint:NSZeroPoint operation:NSCompositeCopy]; 4.7.1.2 Drawing into an imageCompositing an image is considerably faster than rendering a Bezier path or drawing text. Many graphics are static, which means that you don't have to necessarily reconstruct and render a path every time a view is redrawn. Applications can take advantage of the capability to make an instance of NSImage a drawing destination (rather than a view). You can draw a path to an image, and then composite this image to the view. The advantage is that the path need only be rendered once, since redrawing the view involves compositing only the image containing the rendered path. Example 4-10 shows how to accomplish this. Example 4-10. Drawing to an imageNSImage *image = [[NSImage alloc] initWithSize:NSMakeSize( 400, 400 )]; // Lock focus of image, make it a destination for drawing [image lockFocus]; // Set background color to white [[NSColor whiteColor] set]; NSRectFill( NSMakeRect( 0, 0, 400, 400 ))); // Construct and draw path as you would in drawRect: [self drawMyPath]; [image unlockFocus]; // Now draw in a view by compositing [image compositeToPoint:NSZeroPoint operation:NSCompositeCopy]; 4.7.2 NSImageRepThe relationship between NSImage and NSImageRep in the Application Kit is powerful and has important architectural ramifications. NSImage provides a high-level interface to Cocoa's image manipulation capabilities by defining functionality that is independent of the image's data format. This functionality includes drawing and compositing, which was discussed previously, as well as tasks such as loading and saving image data (which may seem to depend on the data's format, but is implemented in a way that hides the details from clients) and setting/getting attributes of the image such as its display size. A browse through NSImage's methods reveals that many are used to manage image representations. Image representations are instance of subclasses of NSImageRep; they are bridges between the high-level abstraction of NSImage and the image's data-dependent representation. That is, NSImageRep and its subclasses let NSImage work with multiple formats of data, ranging from EPS and PDF formats to the most prevalent bitmapped image data formats. AppKit provides six subclasses of NSImageRep; they were described in Table 4-1, and are listed again as follows:
A key feature in the NSImage/NSImageRep relationship is that NSImage usually stores and uses multiple instances of NSImageRep. Some image representations, such as NSEPSImageRep or NSPDFImageRep, are well suited for printing, while others are better suited for onscreen display. For example, it might be best for a bitmap image representation to display an image to a full-color screen, while an EPS image representation would be better suited for output to a PostScript printer due to the ability of EPS to reproduce high resolution graphics. By keeping multiple image representations handy, a single instance of NSImage can adapt to a variety of display situations, including the ability to adapt to various color depths and output resolutions. NSImageRep provides a base implementation for image representations that lets you determine many image properties, such as the number of bits in each pixel sample, whether or not the image has an alpha (transparency) channel, the size of the image in pixels, and the name of the color space for the image. Equivalent methods set these image representation properties. With NSImageRep, you can also draw the image to a view as you can in NSImage by using the draw, drawAtPoint:, and drawInRect: in NSImageRep methods. Most importantly, several class methods let you create an image rep instance from various data sources, such as a file, URL, an NSData object, and even the pasteboard. Two categories of class methods create new image representations. The methods that begin with imageRep... return an image rep object that most appropriately represents the given data. They are:
Another set of these convenience constructors include:
These methods return an array of NSImageRep objects that are initialized with data from the specified source. Also of note are the set of class methods that include:
These methods return the class object for the NSImageRep subclass that best represents the given data. NSImage provides several methods that manage image representations used by the image object. The methods, addRepresentation: and addRepresentations:, are add image representations to an image. The first takes a single NSImageRep, and the second takes an array of NSImageRep instances. You can find the representations managed by an image by invoking the method representations and remove a representation by using removeRepresentation:. 4.7.3 NSBitmapImageRepBitmapped graphics are the types of images you will probably use most. The NSBitmapImageRep class recognizes the following image file formats:
Like its parent class, NSBitmapImageRep includes methods that initialize an instance from existing data. To create an empty image data buffer from scratch that creates new images, use the method shown in Example 4-11. Example 4-11. Creating an empty image data buffer- (id)initWithBitmapDataPlanes:(unsigned char **)planes
pixelsWide:(int)width
pixelsHigh:(int)height
bitsPerSample:(int)bps
samplesPerPixel:(int)spp
hasAlpha:(BOOL)alpha
isPlanar:(BOOL)isPlanar
colorSpaceName:(NSString *)colorSpaceName
bytesPerRow:(int)rowBytes
bitsPerPixel:(int)pixelBits
You can use the method shown in Example 4-11 to initialize a new blank instance of NSBitmapImageRep with the given properties. Then use either bitmapData or getBitmapDataPlanes: (which one you use depends on whether you passed YES or NO as the isPlanar: argument) to access the data buffers where the actual image data is stored, to give you the means to manipulate bitmap images byte-by-byte. The former returns a pointer of type unsigned char *, and the latter takes an unsigned char ** pointer, which is set to the beginning of the planar (2D) image data. Example 4-12 shows how to manipulate an image's data to invert the image's colors. Example 4-12. Manipulating an image's data on a byte level// srcImageRep is the NSBitmapImageRep of the source image
int n = [srcImageRep bitsPerPixel] / 8; // Bytes per pixel
int w = [srcImageRep pixelsWide];
int h = [srcImageRep pixelsHigh];
int rowBytes = [srcImageRep bytesPerRow];
int i;
NSImage *destImage = [[NSImage alloc] initWithSize:NSMakeSize(w, h)];
NSBitmapImageRep *destImageRep = [[[NSBitmapImageRep alloc]
initWithBitmapDataPlanes:NULL
pixelsWide:w
pixelsHigh:h
bitsPerSample:8
samplesPerPixel:n
hasAlpha:[srcImageRep hasAlpha]
isPlanar:NO
colorSpaceName:[srcImageRep colorSpaceName]
bytesPerRow:rowBytes
bitsPerPixel:NULL] autorelease];
unsigned char *srcData = [srcImageRep bitmapData];
unsigned char *destData = [destImageRep bitmapData];
for ( i = 0; i < rowBytes * h; i++ )
*(destData + i) = 255 - *(srcData + i);
[destImage addRepresentation:destImageRep];
This example works by first creating a new instance of NSBitmapImageRep with the properties you want out of the image. Since the properties will be the same as the source image, use several NSBitmapImageRep methods to determine those properties and use them in the initialization of destImageRep. Next, in the for-statement, use C pointer arithmetic to traverse the buffers obtained immediately before the for-loop, and do the math necessary to invert the image. In this case, subtract the value of each source pixel from 255 and store the result as the value of the destination pixel. Finally, finish things off by adding NSBitmapImageRep's destImageRep to NSImage's destImage. This is a common paradigm for working with bitmap image data in which only the algorithms limit you to operating on the image data. |
| [ Team LiB ] |
|
