| [ Team LiB ] |
|
7.3 Updating Zone DataFor nearly all changes to
your
zones, you'll use the DNS console. In Chapter 4 we described how to add a name server to the
DNS console, create zones, and create resource records. Deleting
these objects is easy:
just
select the object by left-clicking it, then press Delete (or select Action Changing resource record data is easy, too. Just double-click the
record in the right pane (or select it with a single click and choose
Action 7.3.1 Adding and Deleting Resource Records by HandMost of the time, you really should use the DNS console to make changes to your zones. However, the DNS console isn't suited for some taskssometimes you might want to edit the zone datafiles by hand. For example, adding, deleting, or changing a lot of records at once is tough with the DNS console but easy with a little Perl code or a good text editor. If you run a name server for long enough, you'll eventually want to make a change outside the DNS console. Editing by hand is a little complicated because you have to manually perform some steps that the DNS console does for you automatically. The following list describes what to do:
Your changes won't take effect until you restart the primary name server: stop it, and then start it again. This is another task handled by the DNS console. When you make changes with the DNS console, the changes take effect immediately in the name server's memory and are written to disk later. Editing by hand reverses the process: you make the changes first on disk and have to restart the name server to get the changes into its memory. Secondary name servers load the new data after some length of time within the time interval defined in the SOA record for refreshing their data. Sometimes your users won't want to wait for the secondaries to pick up the new datathey'll want it available right away. Can you force a secondary to load the new information right away? If you've enabled zone change notification, the secondaries will pick up the new data quickly because the primary notifies the secondary of changes within 15 minutes of the change. (See Chapter 11 for more information on zone change notification.) If you don't have notification set up, you should! But you can get the same effect the hard way by restarting the name server on each of the secondaries. When the name server starts up, it does a serial number compare with its master for every zone for which it's a secondary. If it discovers an out-of-date zone, it immediately performs a zone transfer. To delete a host, remove all the resource records pertaining to it from the appropriate zone datafiles. Make sure you remove the A record, any MX records, and the PTR record. Also be sure to increment the serial number in each zone datafile you modify and restart your primary name server. (But, realistically, deleting hosts is best done with the DNS console.) 7.3.2 SOA Serial NumbersEvery zone has a serial number. Every time the data in a file is changed, the zone's serial number must be incremented. If the serial number is not incremented, secondary name servers for the zone will not pick up the updated data. The change is simple. If the original datafile had the following SOA record: @ IN SOA terminator.movie.edu. hostmaster.movie.edu. (
24 ; serial number
900 ; refresh
600 ; retry
86400 ; expire
3600 ) ; default TTL
the updated datafile would have the following SOA record: @ IN SOA terminator.movie.edu. hostmaster.movie.edu. (
25 ; serial number
900 ; refresh
600 ; retry
86400 ; expire
3600 ) ; default TTL
(Recall from Chapter 4 that "@" expands to the current origin of the zone datafile, which is usually the name of the zone. In this example, the "@" stands for movie.edu.) This simple change is the key to distributing the data to all of your secondaries. Failing to increment the serial number is the most common mistake made when updating by hand. The first few times you make a change manually, you'll remember to update the serial number because this process is new and you are paying close attention. After modifying zone datafiles becomes second nature (we bet you can't wait for that), you'll make some quick little change, forget to update the serial number . . . and none of the secondaries will pick up the new data. Eternal vigilance is the price of modifying zone datafiles by hand. There are several good ways to manage serial numbers, which are just integers. The obvious way is just to use a counter: increment the serial number by one each time the file is modified. That's what the DNS console does. Every time it updates a zone, it increments the zone's serial number. If you make changes with the DNS console, you're locked into this method. If you modify the zone datafiles only by hand, you have other options, such as deriving the serial number from the date. For example, you could use the eight-digit number formed by <year><month><day>. Suppose today is March 5, 2004. In this form, your serial number would be 20040305. This scheme allows only one update per day, though, and that may not be enough. Add another two digits to this number to indicate how many times the file has been updated that day. The first number for March 5, 2004, would then be 2004030500. The next modification that day would change the serial number to 2004030501. This scheme allows 100 updates per day. Whatever scheme you choose (or are forced to go along with), the serial number must be less than or equal to 2,147,483,647.[2] And since you probably want to use the DNS console at least some of the time, you may just want to follow its numbering scheme.
7.3.3 Additional RecordsAfter you've been running a name server for a while, you may want to add data to your name server to help you manage your domain. Have you ever been stumped when someone asked you where one of your hosts is? Maybe you don't even remember what kind of host it is. Administrators have to manage larger and larger populations of hosts these days, making it easy to lose track of this information. The name server can help you out. And if one of your hosts is acting up and someone notices remotely, the name server can help them get in touch with you. So far, we've covered records critical to everyday operation: SOA, NS, A, CNAME, MX, and PTR. Name servers need these records to operate, and applications look up data of these types. Two other useful resource record types are TXT (text) and RP (Responsible Person); these can be used to tell you the machine's location and who is responsible for it. But DNS defines still more data types. For a list of the most useful resource records, see Appendix A. 7.3.3.1 General text informationTXT stands for TeXT. These records contain simply a list of strings.
The Microsoft DNS Server supports one string of up to 255 characters
per
TXT record. TXT records can be used
for anything you want; a common use is to list a
host's location. Creating a TXT record is
easy: just highlight the zone or domain in the DNS
console's left pane and select Action Figure 7-2. Creating a TXT record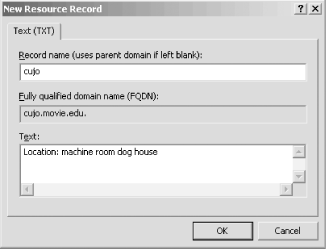 The TXT record shown in Figure 7-2 looks like this in a zone datafile: cujo IN TXT "Location: machine room dog house" 7.3.3.2 Responsible PersonDomain administrators will undoubtedly develop a love/hate relationship with the Responsible Person (RP) record. The RP record can be attached to any domain name, internal or leaf, and indicates who is responsible for that host or domain. This enables you to locate the miscreant responsible for the host peppering you with DNS queries, for example. But it also leads people to you when one of your hosts acts up. The record takes two arguments as its record-specific data: an
electronic mail address in domain name format and a domain name,
which points to additional data about the contact. The electronic
mail address is in the same format the SOA record uses: it
substitutes a dot (.) for the at sign (@). The next argument is a
domain name, which must have a TXT record associated with it. The TXT
record contains free-format information about the contact, such as a
full name and phone number. You can omit either field and specify the
root (.) as a placeholder instead. For example,
let's say that the Movie U. Network Hotline is
responsible for the host robocop. It also
happens that the Movie U. hotline reads all mail sent to
root@movie.edu. You'd add the
RP record shown in Figure 7-3 with Action Figure 7-3. Creating an RP record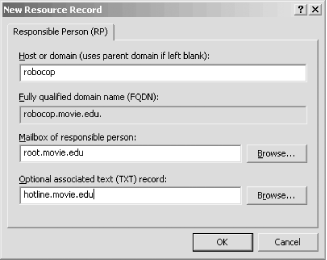 You'd also add the TXT record shown in Figure 7-4 for hotline.movie.edu. Figure 7-4. Creating an associated TXT record Here's what these records would look like in a zone datafile: robocop IN RP root.movie.edu. hotline.movie.edu. hotline IN TXT "Movie U. Network Hotline, (415) 555-4111" Note that a TXT record for root.movie.edu isn't necessary since it's only the domain name encoding of an electronic mail address (i.e., root@movie.edu), not a real domain name. 7.3.4 Keeping cache.dns CurrentAs we explained in Chapter 4, the cache.dns file tells your server where the servers for the root zone are. We also explained that, unlike a BIND name server (which never modifies the cache file), a Microsoft DNS Server updates cache.dns with its current notion of the root name servers every time it exits. The root name servers don't change very often, but they do change. A Microsoft DNS Server that starts with a proper cache file should, in theory, always have the current list of root name servers in its cache file. A good practice and a part of maintaining your name server is to check your cache.dns file a couple times a year. In Chapter 4, we told you to get the current cache file by ftping to ftp.rs.internic.net. That's probably the best method to keep the file current. Remember that you must stop the name server before updating cache.dns! If you don't, the cache file you install will be overwritten the next time the server does stop. You can use dig, a utility that works like nslookup, to retrieve the current list of roots just by running: C:\> dig @a.root-servers.net . ns > cache.dns See Chapter 12 for more details about using dig. |
| [ Team LiB ] |
|
