DekGenius.com
Previous Section Next Section

6.3 The Site Window

The logical map of a web site determines how visitors find information, just as the directory structure determines where developers physically organize the files. Without a well-planned logical structure, a site's appeal and usefulness is compromised; without a well-planned physical structure, development takes longer than necessary and results in a less reliable site.

There is only one Site window, but it has three different panes:

  • The Site Map pane is a graphical representation of your site.

  • The Local Files pane shows the files in the local (development) folder.

  • The Remote Files pane shows the files on the remote (live) site.

To display these panes, the Site window has three different modes:

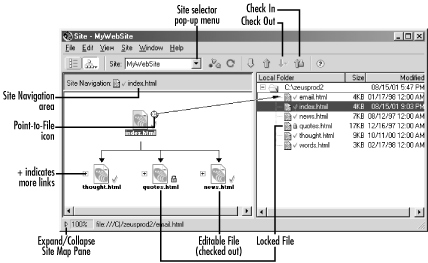
  • The Site Map and Files view (see Figure 6-8) displays the Site Map pane and either the Local Files pane or the Remote Files pane.

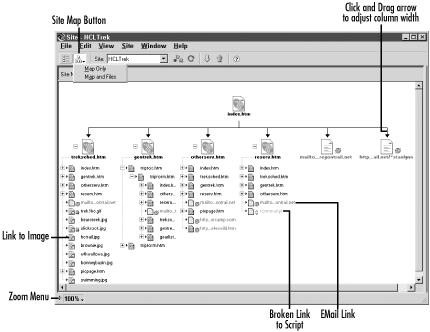
  • The Site Map Only view (see Figure 6-9) displays only the Site Map pane.

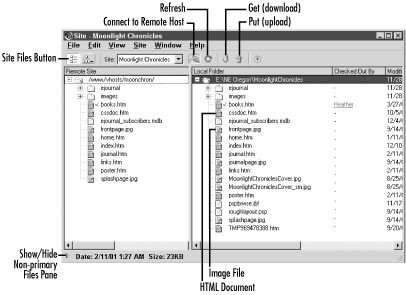
  • The Site Files view (see Figure 6-11) displays both the Local Files and Remote Files panes.

Site Map and Files view and Site Map Only view are both variations of the Site Map view as controlled by the Site Map button in the Site window toolbar, also indicated in Figure 6-9 (click and hold the Site Map button to switch modes). The subsequent sections describe how to use and configure the Site window's various incarnations.

6.3.1 The Site Map and Files View

Dreamweaver represents a site's logical interconnections using a graphical site map. Open the Site Map window (shown in Figure 6-8) using Window figs/U2192.gif Site Map, or Alt+F8 (Windows), or Opt+F8 (Macintosh).

Figure 6-8. The Site Map and Files view of the Site window showing a site map and local file list
figs/dwn_0608.gif

On the left side of the Site window is the Site Map pane showing the site map of a small site; on the right side is the Local Files pane showing the file directory structure of the same site. (You can't use Site Map view until you have specified the home page for your site. Use the Site Map Layout category of the Site Definition dialog box to do so.) You can show the Local Files pane on the left side instead of the right using Edit figs/U2192.gif Preferences figs/U2192.gif Site figs/U2192.gif Always Show Local Files on the Left. To display the Remote Files pane instead of the Local Files pane alongside the Site Map pane, use Edit figs/U2192.gif Preferences figs/U2192.gif Site figs/U2192.gif Always Show Remote Files on the Right/Left.

Although the two panes both represent the same site, the site map shows interconnections created by hyperlinks, independent of the document files' locations on the hard drive. Furthermore, some files in the Local Files pane may not be used within the site. Use the arrow button in the lower-left corner of the window (indicated in Figure 6-8) to show or hide the Site Map pane temporarily.

Notice that selecting a file in one pane also selects it in the other pane. When a file is selected in the Site Map pane, a Point-to-File icon appears at its upper right. Click on the Point-to-File icon and a draggable arrow appears, as shown in Figure 6-8; you can create a link to a new document by dragging this arrow to point to a file in the Local Files pane. (You can't simply drag a file from the Local Files pane to the Site Map pane, or vice-versa).

Figure 6-8 shows the Site Map window as it appears when File Check In/Check Out has been enabled in the Site Definition dialog box. The file shown with a lock icon isn't editable until it is checked out; checked out files are accompanied by checkmarks (see Figure 6-10).

6.3.1.1 Manipulating files and folders in the Local Files and Remote Files panes

You can manipulate files within the Local Files and Remote Files panes of the Site window in several ways. These options are available from the contextual menu that appears when you right-click (Windows) or Ctrl-click (Macintosh) on a document in the files list.

Operations that can be performed from the contextual menu include:

New File or New Folder

Creates new files or folders.

Open

Opens a document in Dreamweaver's Document window (you can simply double-click a document instead). Opening a document opens its design notes if the Show When File Is Opened checkbox is enabled in the Design Notes dialog box.

Open With (Local Files pane only)

Pick an application to open the document.

Add to Favorites (Local Files pane only)

Copies an asset to the Favorites list in the Assets panel.

Get, Check Out, Put, and Check In

Used to download and upload files and check them out and in.

Undo Check Out

Used to check in a file without updating it.

Turn Off Read Only

Used to edit a locked file that hasn't been checked out.

Locate in Remote Site or Locate in Local Site

Finds the selected local file in the Remote Files pane or the selected remote file in the Local Files pane.

Set as Home Page (Local Files pane only)

Uses the selected file as the new home page for your site (contrast with the View as Root command in the Site Map pane's contextual menu).

Preview in Browser (F12)

Tests the page in a browser.

Check Links

Verifies links for the selected file or the entire site.

Synchronize

Synchronizes the Local Files and Remote Files panes (based on file dates).

Cut, Copy, Paste, Delete, and Rename

Use these commands to move, rename, or delete files. Performing similar operations in the Windows File Explorer or Macintosh Finder would cause broken links.

Design Notes command (Local Files pane only)

Associates notes with the selected file.

To select one or more documents in the Local Files pane:

  • Click on a filename.

  • Click on a document and then Shift-click on another to select all files in between.

  • Ctrl-click (Windows) or Cmd-click (Macintosh) to select one or more discontiguous documents.

  • Selecting a folder implicitly selects all files and folders contained within it, even though they are not explicitly highlighted in the Local Files pane.

See Section 6.8.3 later in this chapter for ways to tell Dreamweaver to automatically select files based on a specific criterion.

6.3.2 The Site Map Only View

Let's look at the Site Map in closer detail. Click and hold down the Site Map button on the Site window's toolbar, as shown in Figure 6-9, to switch between the Site Map and Files view and the Site Map Only view.

Figure 6-9. Site Map Only view showing a site's logical structure
figs/dwn_0609.gif

The pages that are linked from the home page are shown in the site map using large icons. Subsequent levels below that are indicated by a plus (+) icon to the left of a file. Click the plus (+) icon next to a file to show the hyperlinks within it (hyperlinks are shown in the order in which they appear in the HTML source code). Subsequent levels in the hierarchy are shown using smaller icons to prevent the site map from rapidly becoming too large.

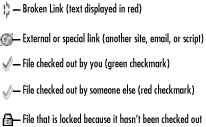
The site map shows only the hyperlinks implemented with the <a href> tag (corresponding to the Link field in the Property inspector) including both http: and mailto: links; it doesn't show hyperlinks implemented within complex objects such as Flash Text or Flash Button objects. The document icons next to each linked file indicate the file's type, if applicable. The secondary icons shown in Figure 6-10 indicate the type of file or link. Broken links are shown in red; links to email, scripts, and external sites are shown in blue; read-only (locked) files are indicated by a lock icon; files that are checked out are indicated by checkmarks. The lock and checkmark icons are used only when File Check In/Check Out is enabled.

Figure 6-10. Interpreting icons in the Site Map window
figs/dwn_0610.gif
6.3.2.1 Manipulating documents and links in the Site Map window

You can create and remove links within the Site Map window in several ways. These options are available from the contextual menu that appears when you right-click (Windows) or Ctrl-click (Macintosh) on a document in the Site Map pane:

View as Root

Temporarily changes the root of the site map tree. Also available using Ctrl+Shift+R (Windows) or Cmd+Shift+R (Macintosh).

Link to a New File

Creates a new link to a new blank document.

Link to Existing File

Creates a new link to an existing file (can be used to create a link to an image, but not to insert an image in a document).

Change Link

Alters an existing link by selecting a new destination document for it.

Remove Link

Deletes a link in the Site Map (same as selecting a file and using the Delete key). This deletion removes a link, but does not delete the file from the Local Files pane.

Show/Hide Link

Marks a link for hiding, but doesn't actually hide it unless the Show Hidden Links option is unchecked (in the View menu of the Site window under Windows or under the Site figs/U2192.gif Site Map View menu on the Macintosh).

Open to Source of Link

Opens the file that links to the currently selected file in the site map.

Check Target Browsers

Produces a report showing potential problems when displaying the page in the targeted browsers.

To display all files that link to a particular file, move the file in the Local Files pane. Dreamweaver will warn you about all files that may be affected by the move. There is no way to cancel the operation, so be sure to move the file back to its original location. (You should either update links both times you move the file or neither time.)

The Open, Open With, Add to Favorites, Get, Check Out, Put, Check In, Undo Check Out, Preview in Browser, Check Links, and Design Notes commands in the contextual menu are the same as those available in the Local Files pane and discussed in the previous section.

To select one or more documents in the Site Map pane:

  • Click a document icon.

  • Click and drag a selection rectangle enclosing one or more documents in the Site Map.

  • Shift-click on one or more documents.

  • Ctrl-click (Windows) or Cmd-click (Macintosh) on one or more documents.

6.3.2.2 Viewing and hiding pages in the Site Map window

The site map ordinarily displays HTML hyperlinks between pages; to show so-called dependent files, such as GIF files embedded with the <img> tag, choose View figs/U2192.gif Show Dependent Files in the Site window (Windows) or Site figs/U2192.gif Site Map View figs/U2192.gif Show Dependent Files (Macintosh). In this case, practically every file in your site map will have a plus (+) icon next to it, indicating a list of linked assets to be expanded. Double-click the plus (+) icon to expand the list of dependent assets associated with each file; double-click the minus (-) icon next to an expanded list to collapse it again. If your site uses a navigation bar on each page, it is common for two pages to link to each other. In such a case, Dreamweaver creates an infinite list of links indicated by successive plus (+) icons; you can safely ignore these redundancies.

To view a branch of the site map, select a page within the hierarchy and choose View figs/U2192.gif View as Root (Windows) or Site figs/U2192.gif Site Map View figs/U2192.gif View as Root (Macintosh). This command allows you to focus on subareas of your site by temporarily changing the root of the site map tree, but it does not change the actual home page of your site. Use the Site Navigation area indicated in Figure 6-8 to move back up the hierarchy (i.e., to restore your true home page as the root of the site map).

To hide extra links that you do not wish to see in your site map, select the file(s) you wish to hide and choose Show/Hide Link from the contextual pop-up menu.

To view or hide all links marked as hidden, use View figs/U2192.gif Show Files Marked as Hidden in the Site window (Windows) or Site figs/U2192.gif Site Map View figs/U2192.gif Show Files Marked as Hidden (Macintosh).

See Section 6.2.4 earlier in this chapter for settings that configure the Site Map view. Use the Zoom pop-up menu at the bottom of the Site window (as indicated in Figure 6-9) to enlarge or shrink the site map.

6.3.3 Renaming and Moving Pages

The site map can display either the title or filename of the pages in your site; toggle between the two alternatives using View figs/U2192.gif Show Page Titles in the Site window (Windows) or Site figs/U2192.gif Site Map View figs/U2192.gif Show Page Titles (Macintosh).

To change the title or filename of a page, select the file, then pause briefly before clicking the title or filename again; the text should become editable. This is a great way to fix inappropriately titled documents quickly without having to open each individually. If you double-clicked (i.e., clicked too quickly), Dreamweaver opens the document instead of allowing you to rename the file. A document can also be retitled (but not renamed) using the Modify figs/U2192.gif Page Properties option in the Document window.

The Local Files pane always shows filenames and not page titles. Another way to rename a file is to right-click (Windows) or Ctrl-click (Macintosh) on the file and choose Rename from the contextual menu that appears. If you change a file's three-letter extension while renaming it, servers will no longer recognize the file's type (Dreamweaver does not provide a warning when you change a file's extension the way the Windows File Explorer does).

You can move files in the Local Files pane by dragging them into a different folder. Dreamweaver will prompt you to update all links to or from this document to ensure their integrity. You should choose to update the links in most cases.

Set the Edit figs/U2192.gif Preferences figs/U2192.gif Update Links when Moving Files option to Always to automatically update links without prompting. Moving or renaming site-related files outside of Dreamweaver, such as in the Windows File Explorer or Macintosh Finder, breaks links. Using the Site window to move and rename files allows Dreamweaver to update all links to and from the file. Dreamweaver also updates URLs within JavaScript, if possible. However, in some cases you may need to delete and reapply the behavior or correct the problem by hand editing the JavaScript code.

You can also use the Cut, Copy, and Paste commands under the Edit menu to copy and move files in the Site window, but moving files in this way will likely break existing links and should therefore be avoided.

After renaming or moving files, be sure to refresh both the Local and Remotes Files panes using F5. Dreamweaver is not smart enough to rename the remote version of a file when you rename the local version. Instead, it attempts to upload the new file and, optionally, delete the old file when synchronizing the local and remote versions of the site. (See the Delete Remote Files Not on local Drive checkbox in the Synchronization dialog box.)

6.3.4 A Site's File Structure

A site's physical structure should be laid out to make life easy for the site's designers and maintainers, just as the navigational structure aids the site's visitors. With multiple developers working on a site, the directory structure and file-naming convention must be agreed upon.

Here are some hints for structuring your site and naming your files:

  • Use consistent file extensions, for example all of your HTML files should use either .html or .htm as the extension, but not a mixture of both. (The default file extension for HTML documents can be set under Edit figs/U2192.gif Preferences figs/U2192.gif General figs/U2192.gif Add Extension when Saving.) Likewise, use either .jpg or .jpeg for your JPEG image extension. I prefer using three-letter extensions because they are less likely to cause problems with old network file-transfer programs.

  • Except for images that are used globally throughout the site (which should be in a common directory for efficient reuse), put images in their own directory for each subdirectory in your web site.

  • Use a consistent file naming scheme. For example, all press releases could be named pr<date>.htm, and all job descriptions could be named jd<jobnumber>.htm. Likewise, thumbnails images for the press release page could be namedpr<date>-<imagenum>th.gif.

  • Because URLs are typically case-sensitive, try to use either all lowercase or all uppercase letters for your filenames. I prefer all lowercase letters.

  • Do not use the characters \, /, :, *, ?, ", <, >, or | in filenames. These characters are not allowed under Windows and can confuse Dreamweaver when used on the Macintosh as it attempts to translate file paths across platforms.

  • Do not use the characters &, @, or ? in filenames, as they have a special meaning to web servers and may confuse the server when it manipulates your documents and document links.

  • Do not use spaces in filenames or folder names, as they can confuse older browsers and many web servers. Use underscores (_) to separate words instead.

  • Use a matching site structure for multiple sites on the same server. In other words, use the same system for managing files and scripts across the server.

  • See the Macromedia TechNote 14610, "Naming strategies for Dreamweaver, UltraDev and various interpreters" for more tips: http://www.macromedia.com/support/dreamweaver/ts/documents/naming_tips.htm.

6.3.5 The Site Files View

Dreamweaver can show you the physical directory structure of both the local site and the remote copy on the server using the Site Files view, as seen in Figure 6-11. Switch to the Site Files view using Window figs/U2192.gif Site Files, F8, or the Site Files button (as indicated in Figure 6-11).

Figure 6-11. The Site Files view showing the Local Files pane on the right and the Remote Files pane on the left
figs/dwn_0611.gif

You can sort the file list in either pane by clicking on the column headings; click the column heading again to reverse the sort order.

To move a document within a site, simply drag and drop it into the new location. You can drag files between the remote and local panes, but if you drag and drop a file into the wrong directory in the other pane, you will often break existing links. You are better off using Put (upload), Get (download), or the Site figs/U2192.gif Synchronize command to copy files between the remote and local sites.

The position of the Local Files and Remote Files panes can be swapped using Edit figs/U2192.gif Preferences figs/U2192.gif Site figs/U2192.gif Always Show Remote Files on the Right. This preference also causes the Remote Files panel to be shown next to the Site Map pane in the Site Map and Files view. Therefore, it differs from Edit figs/U2192.gif Preferences figs/U2192.gif Site figs/U2192.gif Always Show Local Files on the Left, which causes the Local Files pane to be shown in the Site Map and Files view. Furthermore, the arrow in the lower-left corner of the Site window hides whichever pane is not given priority in the preferences.

After transferring files between the local and remote sites, be sure to refresh the file listings.

To refresh the Local Files pane:

  • Use Shift+F5 while the Site window is active.

  • Choose View figs/U2192.gif Refresh Local in the Site window (Windows) or Site figs/U2192.gif Site Files View figs/U2192.gif Refresh Local (Macintosh).

  • Enable the Refresh Local File List Automatically option in the Local Info category of the Site Definition dialog box.

To refresh the Remote Files pane:

  • Use Alt+F5 (Windows) or Opt+F5 (Macintosh) while the Site window is active.

  • Choose View figs/U2192.gif Refresh Remote in the Site window (Windows) or Site figs/U2192.gif Site Files View figs/U2192.gif Refresh Remote (Macintosh).

  • Enable the Refresh Remote File List Automatically option in the Remote Info category of the Site Definition dialog box.

To refresh both the Local Files and Remote Files panes:

  • Use F5 while the Site window is active.

  • Choose View figs/U2192.gif Refresh in the Site window (Windows) or Site figs/U2192.gif Site Files View figs/U2192.gif Refresh (Macintosh).

    Previous Section Next Section