8.1 Creating a Template
A
template is similar to other HTML documents except that certain areas
are locked. In fact, the entire template (except the page title) is
locked by default; only the editable regions that you create within
the template can be changed.
When designing templates, remember:
Information that should appear on all pages should be
noneditable (part of the template).
Create editable regions to hold any page-specific information that
will vary in pages that use the template.
Test your
template
before creating dozens of pages based on it. Although you can
automatically update all pages based on a template, it is easiest
when the changes are minor. Major changes to a template may require
you to manually update the pages based on the template. For example,
deleting an editable region from a template will delete the content
in that region on each page, unless you move the content to another
region (see Figure 8-8).
 |
Documents created using the File  New command are based on the
default document
template,
default.html, which can be customized as described in
Chapter 20. New command are based on the
default document
template,
default.html, which can be customized as described in
Chapter 20.
|
|
8.1.1 Starting a Template
Create a template from scratch using File  New to open a blank
document, or base a template on an existing file by using
File New to open a blank
document, or base a template on an existing file by using
File
 Open. Any content you add appears on the pages derived from
this template. Open. Any content you add appears on the pages derived from
this template.
Use File  Save as Template to save the template. This command
opens the Save As Template dialog box, where you should specify the
name for the template. You can also specify the site to which the
template applies. Dreamweaver gives the template a .dwt extension and saves it in the
Templates folder within the
specified site's root folder (which is why you specify a
filename only and not a folder). The window title bar of a template
file contains the word <<Template>>. Saved templates
appear in the Templates panel (Window Save as Template to save the template. This command
opens the Save As Template dialog box, where you should specify the
name for the template. You can also specify the site to which the
template applies. Dreamweaver gives the template a .dwt extension and saves it in the
Templates folder within the
specified site's root folder (which is why you specify a
filename only and not a folder). The window title bar of a template
file contains the word <<Template>>. Saved templates
appear in the Templates panel (Window  Templates). Templates).
8.1.2 Using Images in Templates
If you own Fireworks, you can use it to lay out your
template, slice it up (divide it into smaller pieces
for optimization), and export it as an HTML
table for use in Dreamweaver. (If you
don't own Fireworks, I strongly recommend you buy a
copy. You can download a trial version from Macromedia's site.)
Section 8.1.2.1 explains how to create such a table in
Fireworks. Refer also to the Help  Lessons Lessons  Creating
Slices tutorial accessible from Fireworks' Help menu. Creating
Slices tutorial accessible from Fireworks' Help menu.
8.1.2.1 Procedure 3
Open your source image, typically a
.png file, in Fireworks.
In Fireworks, select an element or region to be sliced and use the
Insert  Slice command or the Slice tool to create a slice.
Repeat for as many regions as you'd like to slice. Slice command or the Slice tool to create a slice.
Repeat for as many regions as you'd like to slice.
In Fireworks, use File  Export Preview
  Options Options  Format to choose JPEG or GIF
format (BMP and TIFF files are not web-compatible formats). Format to choose JPEG or GIF
format (BMP and TIFF files are not web-compatible formats).
In Fireworks' Export Preview dialog box click the Export button
to open the Export dialog box. (File  Export is another way to
open the Export dialog box if you've already closed the Export
Preview dialog box.) In the Export dialog box, set the Save as Type
option to HTML and Images; set the HTML option to Export HTML File;
set the Slices option to Export Slices. Because Fireworks exports a
separate image for each slice, enable the Put Images In Subfolder
checkbox to keep the exported images in a tidy folder. Use the
Include Areas Without Slices checkbox to also export images for areas
that are not sliced. Export is another way to
open the Export dialog box if you've already closed the Export
Preview dialog box.) In the Export dialog box, set the Save as Type
option to HTML and Images; set the HTML option to Export HTML File;
set the Slices option to Export Slices. Because Fireworks exports a
separate image for each slice, enable the Put Images In Subfolder
checkbox to keep the exported images in a tidy folder. Use the
Include Areas Without Slices checkbox to also export images for areas
that are not sliced.
In Fireworks, while still in the Export dialog box, choose a filename
for your HTML file and click the Save button. Fireworks will export
the images according to your choices in Step 4 and create an HTML
page containing a table that uses the sliced images. By default, the
sliced images' filenames are based on the saved file's
name plus the row and column number, such as myfile_r2_c3.gif. The naming convention for
exported slices can be configured using the Document Specific tab of
Fireworks' HTML Setup dialog box (opened by using either File
 HTML Setup or the Options button in the Export dialog box). HTML Setup or the Options button in the Export dialog box).
If you want to use this table as the basis for your entire page, open
the HTML page that you just exported from Fireworks in
Dreamweaver's Document window using File  Open. If you
want to insert the table into an existing Dreamweaver document,
choose Insert Open. If you
want to insert the table into an existing Dreamweaver document,
choose Insert  Interactive Images Interactive Images  Fireworks HTML
instead. Fireworks HTML
instead.
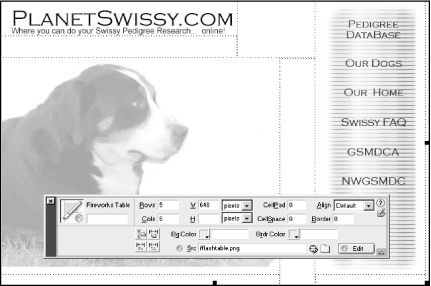
When you select the table and open the Property inspector,
you'll see that Dreamweaver identifies it as a Fireworks Table
(if you are in Standard view and not Layout view).
In Dreamweaver, use File  Save As Template. Save As Template.
Figure 8-1 shows an example Fireworks Table and the
Property inspector.

Although this layout might look good for a single page, it
won't work as well if the content on the page varies. Any
information that exceeds the dimensions of the original table may
distort the layout and ruin the page's composition. To make
this layout usable for the addition of text and other images,
you'll probably want to remove the image of the dog from the
table itself and use it as a background image (using the CSS
background-image property described in Table 10-4). You'll also want to merge the
remaining cells and remove any white images occupying them. Leave the
menu bar and the title graphic alone; they'll become permanent
parts of the template. Figure 8-2 shows what the
document might look like after you've made these changes.
Resave the file as a template using File  Save as Template when
you're done. Save as Template when
you're done.
8.1.3 Creating Links in a Template
Links can be added to images or text
within templates just as they would be in a standard HTML document.
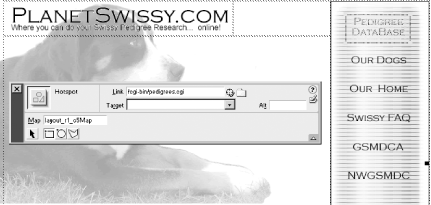
Templates can also use client-side or server-side image maps. Figure 8-2 shows an image map being added to a template.

 |
When creating links within templates, avoid errors by using the file
browser to select files. Your links should be relative to the Site
Root and should start with a
slash (/).
|
|
If you've enabled the Edit  Preferences Preferences  Invisible
Elements Invisible
Elements  Client-Side Image Maps checkbox, you'll see a
small icon representing the <map> tag for
any image maps you create. Move this icon somewhere unobtrusive, such
as the bottom of the page, so that it doesn't distract people
using the template. Client-Side Image Maps checkbox, you'll see a
small icon representing the <map> tag for
any image maps you create. Move this icon somewhere unobtrusive, such
as the bottom of the page, so that it doesn't distract people
using the template.
8.1.4 Adding Template Fields
A template's editable
regions are areas that allow pages derived from the
template to be customized. To add an editable region, highlight an
element and use Modify  Templates
  New Editable Region, Ctrl+Alt+V (Windows), or
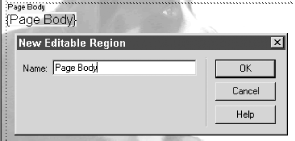
Cmd+Opt+V (Macintosh). In the New Editable Region dialog box, shown
in Figure 8-3, provide a Name for the editable
region (i.e., template field) and click OK.
Dreamweaver won't allow two regions in a single template to
have the same name. The new template field is surrounded by a light
blue outline and has a blue tab displaying its name. Repeat this
process for each new template field. New Editable Region, Ctrl+Alt+V (Windows), or
Cmd+Opt+V (Macintosh). In the New Editable Region dialog box, shown
in Figure 8-3, provide a Name for the editable
region (i.e., template field) and click OK.
Dreamweaver won't allow two regions in a single template to
have the same name. The new template field is surrounded by a light
blue outline and has a blue tab displaying its name. Repeat this
process for each new template field.

You can also make an
image into an editable region (in which
case it is displayed in dark gray). You can highlight existing text
and use Modify  Templates Templates  New Editable Region to make it
editable (in DW3, this option was named Mark Selection as Editable).
HTML formatting styles applied to a template field serve as the
default style for elements inserted in its place, but styles can be
modified using HTML (not CSS) during page development. New Editable Region to make it
editable (in DW3, this option was named Mark Selection as Editable).
HTML formatting styles applied to a template field serve as the
default style for elements inserted in its place, but styles can be
modified using HTML (not CSS) during page development.
Editable regions are enclosed in comment tags as seen here:
<!-- #BeginEditable "regionName" -->editable content<!-- #EndEditable -->
Anything between the comments is editable; anything outside the
comments is not. In the preceding example, only the text is editable,
not the tags that surround it. Note how the following example
includes the <p></p> tags within the
editable region:
<!-- #BeginEditable "editableParagraph" -->
<p>This is a paragraph</p>
<!-- #EndEditable -->
 |
You can add new paragraphs within an editable region if the template
field encompasses a block-level tag, such as
<p></p>
. To prevent new paragraphs from being
added, ensure that the template field doesn't encompass a
block-level tag (tweak the HTML in Code view, if necessary). To allow
a user to place an image but not text, ensure that the
src attribute, but not the
<img> tag itself, is within an editable
template area.
|
|
When working with a template that uses a
table for page layout, you'll
probably want to make one or more
cells editable regions. To do so, select a
<td> tag from the Tag selector and use
Modify  Templates Templates  New
Editable Region. New
Editable Region.
8.1.4.1 Exporting and importing XML content
Templates are similar to
XML documents in that they
define the structure of a document separate from its contents. A
template's editable regions are analogous to XML name/value
pairs (the region's name corresponds to the XML
attribute's name, and the region's content corresponds to
the XML attribute's value). Therefore, Dreamweaver can export
data from a template to an XML file and can import data from an XML
source into a template.
To export data from a file based on a template to an XML file, use
the File  Export Export  Export
Editable Regions As XML command. Dreamweaver creates a new HTML
document that references the original template but contains the
contents of the editable regions. (This command is active only when
editing a file based on a template. It is not available when editing
an ordinary HTML file or when editing a template itself.) You can
choose to export the file using standard Dreamweaver XML tags or
using the editable region names as XML tags. An example of the former
style might look as follows: Export
Editable Regions As XML command. Dreamweaver creates a new HTML
document that references the original template but contains the
contents of the editable regions. (This command is active only when
editing a file based on a template. It is not available when editing
an ordinary HTML file or when editing a template itself.) You can
choose to export the file using standard Dreamweaver XML tags or
using the editable region names as XML tags. An example of the former
style might look as follows:
<?xml version="1.0"?>
<templateItems template="/Templates/Untitled-4.dwt">
    <item name="doctitle"><![CDATA[
<title>Untitled Document</title>
]]></item>
    <item name="region1"><![CDATA[
<p>This is some text</p>
]]></item>
</templateItems>
To import data from an XML source, use the File  Import Import  Import XML
Into Template command. Dreamweaver creates a new HTML document based
on the template specified by the XML file and fills in the editable
regions with the data in the XML file. This operation is analogous to
choosing File Import XML
Into Template command. Dreamweaver creates a new HTML document based
on the template specified by the XML file and fills in the editable
regions with the data in the XML file. This operation is analogous to
choosing File  New From Template in that it creates a new HTML
document based on a template (the difference being that it also fills
in the editable fields). To ensure that the XML file follows the
correct format, you can first export a dummy file as described in the
preceding paragraph and use it as a basis for other XML
files. New From Template in that it creates a new HTML
document based on a template (the difference being that it also fills
in the editable fields). To ensure that the XML file follows the
correct format, you can first export a dummy file as described in the
preceding paragraph and use it as a basis for other XML
files.
8.1.5 Saving a Template
Whenever you change a
template,
you should resave it and update all the documents that use the
template. When you resave the template using File  Save, Dreamweaver
displays a list of pages derived from the current template and asks
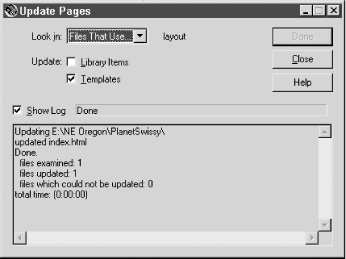
you whether to update them. Choosing to update the pages opens the
Update Pages dialog box shown in Figure 8-4. Save, Dreamweaver
displays a list of pages derived from the current template and asks
you whether to update them. Choosing to update the pages opens the
Update Pages dialog box shown in Figure 8-4.

This dialog box can be confusing. When you save a template and choose
to update the pages based on it, this dialog box opens automatically
and shows the results of the update. You can change the
Look In
pop-up menu to update an entire site. However, if you close the
dialog box and reopen it via Modify  Templates
  Update Pages (or even Modify Update Pages (or even Modify
 Library Library  Update Pages), you can choose to update files
that use any template (or library item, as seen in Figure 9-4 in the next chapter). Use the dialog
box's Start button to commence the update, or simply use the
Close button to dismiss it. Update Pages), you can choose to update files
that use any template (or library item, as seen in Figure 9-4 in the next chapter). Use the dialog
box's Start button to commence the update, or simply use the
Close button to dismiss it.
|


