|
|
< Day Day Up > |
|
2.1 Developing Java CodeIf there's anything that takes more time than it seems to be worth in Java, it's creating code from scratch. While the logic inside a method, interface, or class is unique, the modifiers of a method, the imports for a class, and the syntax involved with new packages is the same over and over again. This often results in a lot of repetitive typing, wasted time, and in many cases, annoying little typo-related bugs. Eclipse can help with all this and more. 2.1.1 Creating New MethodsEclipse—through code assist—makes it easy to create new methods. As an example, we're going to create and call a new method named printer, which displays the message "No worries.", as you can see in Example 2-1. Example 2-1. The Ch02_01.java examplepublic class Ch02_01
{
public static void main(String[] args) {
    printer( );
}

private static void printer( )
{
    System.out.println("No worries.");
}
}
How do you create new methods? Start Eclipse now and create a new project named Ch02_01. Then create a new Java class named Ch02_01, making it part of the org.eclipsebook.ch02 package. Leave the checkbox for the creation of a stub for the main method checked when you create this new class. This gives you the code: public class Ch02_01 {
public static void main(String[] args) {
}
}
You could simply type in the printer method, of course, but Eclipse can also be of assistance here. Move the cursor below the body of the main method and type private to make this new method a private method, and then type Ctrl+Space to open code assist, as you see in Figure 2-1. Figure 2-1. Creating a private method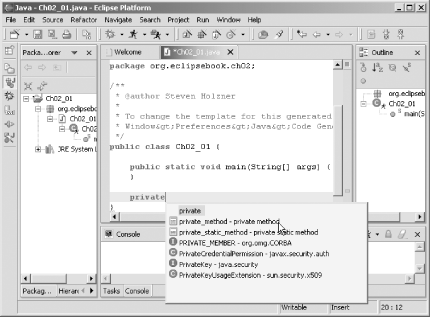 Code assist lets you select the type of private method you want to create—private, private static, and so on. Here, select the private static method, creating the new method template you see in Figure 2-2. The placeholder return_type is highlighted, ready for you to enter in a type; use void. Next, replace the name placeholder with the name printer and delete the arguments placeholder. Figure 2-2. Setting the new method's return type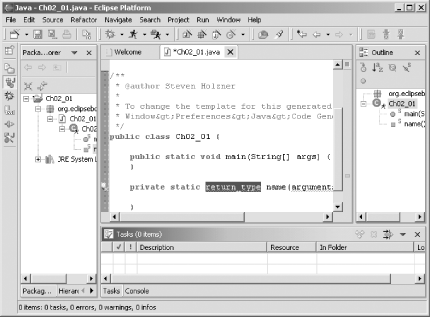 This creates the new method in outline; all that's left is to add the code that will display the message (as before, you can take advantage of code assist to pause after you type each dot for suggestions): public static void main(String[] args) {
}
private static void printer( )
{
System.out.println("No worries.");
}
Then just add the call to printer from main: public static void main(String[] args) {
printer( );
}
private static void printer( )
{
System.out.println("No worries.");
}
That's all you need;
now you can run the example with the Run As 2.1.2 Creating New ClassesWe've created a new method and given it a name, but what if you want that new method to be in a different class? For example, say that your main method is in a class named Ch02_02, but the printer method is in a class named Ch02_02Helper: Ch02_02 | +--------main Ch02_02Helper | +--------printer In this case, you could create a new object of the Ch02_02Helper class in the main method, and then you could call that object's printer method, as you see in Example 2-2. Example 2-2. The Ch02_02.java examplepublic class Ch02_02 {
public static void main(String[] args) {
Ch02_02Helper helper = new Ch02_02Helper( );
helper.printer( );
}
The Ch02_02Helper class, with the printer method in it, appears in Example 2-3. Example 2-3. The Ch02_02Helper.java examplepublic class Ch02_02Helper {
public void printer( ) {
System.out.println("No worries.");
}
}
To implement this example with its two classes in Eclipse, create a new project named Ch02_02 and add the new class Ch02_02Helper to the project. Make this class public and put it into the org.eclipsebook.ch02 package (and make sure that you don't create a main method stub in this class). Next, add the printer method to this class, as in Example 2-2. Then save the file. This is an important step because if you don't save the file, the printer method won't be available to the rest of your project's code. This is essential to know—whenever you want to work with items from file A in file B, you have to save file A first because Eclipse compiles from the files, not what's in its editors. Having created the new Ch02_02Helper class, the next step is to create the class containing code that will make use of it, the Ch02_02 class. Create that new class in the project and add a stub for the main method to it. Now all you need to do in the main method is add the code to create an object of the Ch02_02Helper class and call that object's printer method: public class Ch02_02 {
public static void main(String[] args) {
Ch02_02Helper helper = new Ch02_02Helper( );
helper.printer( );
}
Then save all your work and run the application; Eclipse's compiler handles locating both classes in the same package for you. You should see the "No worries." message as shown in Figure 2-3. As you can see in the Package Explorer, we're using multiple classes in the same project. Figure 2-3. Using multiple classes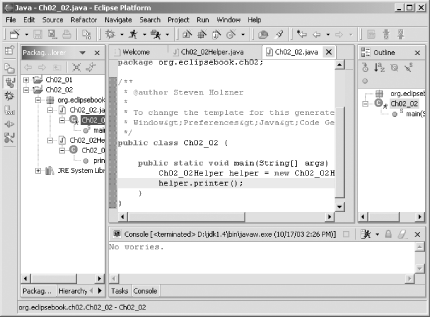 And
there's more you can do with multiple classes here
as well. Say you want to override the printer
method and change the text it displays. You can do that by deriving a
new class based on the Ch02_02Helper class and
overriding printer in this new class. To do this,
right-click the org.eclipsebook.ch02 package
inside the Ch02_02 project and select the
New Figure 2-4. Creating a derived class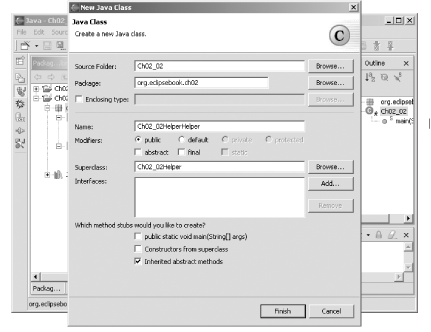 Name the new class Ch02_02HelperHelper, enter the package name, and deselect the main stub checkbox. To derive this class from Ch02_02Helper, type Ch02_02Helper in the Superclass box (you can also implement interfaces by entering them into the Interfaces box), and click Finish to create the new class. Here's what you get—this new class automatically extends the Ch02_02Helper class: public class Ch02_02HelperHelper extends Ch02_02Helper {
}
We want to
override the printer method from the base
class's version here, so open the new class,
Ch02_02HelperHelper, and select the
Source Figure 2-5. Overriding a method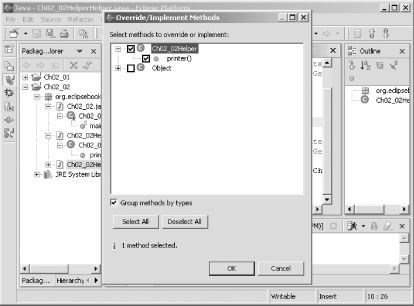 This dialog shows a list of possible overrides; all you have to do is pick one. In this case, select the printer method and click OK. When you do, you'll see a stub for the new version of the printer method in the Ch02_02HelperHelper class: public class Ch02_02HelperHelper extends Ch02_02Helper {
/* (non-Javadoc)
* @see org.eclipsebook.ch02.Ch02_02Helper#printer( )
*/
public void printer( ) {
// TODO Auto-generated method stub
super.printer( );
}
}
In this overriding version, use this code to display a new message, "No problems.": public void printer( ) {
System.out.println("No problems.");
}
And that's it—you've overridden a method in a derived class. As the final step here, change the code in the main method to use your new class: public class Ch02_02 {
public static void main(String[] args) {
Ch02_02HelperHelper helper = new Ch02_02HelperHelper( );
helper.printer( );
}
}
When you run this example, you should see the new message, "No problems.", as in Figure 2-6. Figure 2-6. Using our derived class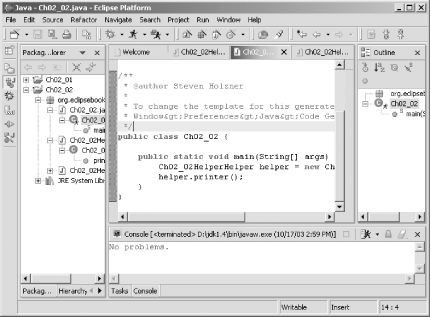 As you can see, automatic code generation can be a timesaver. In this case, you used it to override a method, but there are other options available in the Source menu:
For example, say you've stored the message that the printer method displays in a class field named message: public class Ch02_02HelperHelper extends Ch02_02Helper {
/* (non-Javadoc)
* @see org.eclipsebook.ch02.Ch02_02Helper#printer( )
*/
String message = "No problems.";
public void printer( ) {
System.out.println(message);
}
Instead of simply
storing this data in a class field, you can use getter and setter
methods to access it (these methods are of the standard form used in
JavaBeans™ to support properties). In this case, you
can create getter and setter methods for the value in
message by selecting the Source Figure 2-7. Creating Getter and Setter methods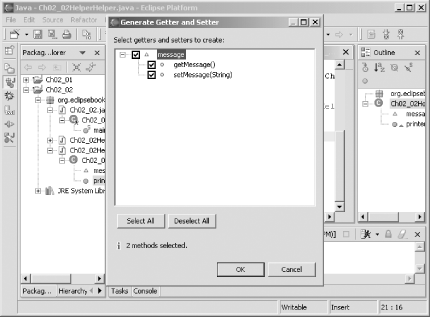 Eclipse will create the new getter and setter methods getMessage and setMessage; we can use getMessage when we want to display the message in the printer method this way: public class Ch02_02HelperHelper extends Ch02_02Helper {
/* (non-Javadoc)
* @see org.eclipsebook.ch02.Ch02_02Helper#printer( )
*/
String message = "No problems.";
public void printer( ) {
System.out.println(getMessage( ));
}
/**
* @return
*/
public String getMessage( ) {
return message;
}
/**
* @param string
*/
public void setMessage(String string) {
message = string;
}
Another good timesaver is the
Source 2.1.3 Creating New PackagesBesides using multiple classes in the same project, it's also easy to distribute your code over multiple packages in the same project. For example, you can break up your code into two packages, org.eclipse.ch02 and org.eclipse.ch02_2, as you can see in the Package Explorer at left in Figure 2-8. Here, we're putting the Ch02_03Helper class, which contains the printer method, into an entirely new package, org.eclipse.ch02_2. Figure 2-8. Using multiple packages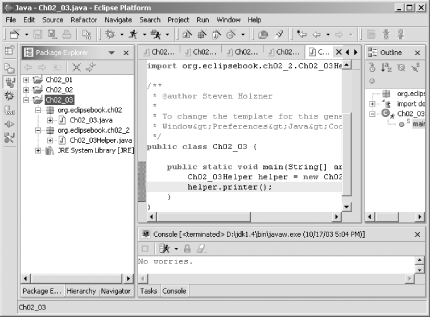 If you want to access a class in another package, just remember to import it—in this case, that means using the fully qualified name of the class you want access to, which is org.eclipsebook.ch02_2.Ch02_03Helper. After you've imported the class, you can create objects using it, like this: import org.eclipsebook.ch02_2.Ch02_03Helper;
/**
* @author Steven Holzner
*
* To change the template for this generated type comment go to
* Window>Preferences>Java>Code Generation>Code and Comments
*/
public class Ch02_03 {
public static void main(String[] args){
Ch02_03Helper helper = new Ch02_03Helper( );
helper.printer( );
}
}
And that's all it takes; as you can see, multiple packages in the same project are no problem at all. What if the code you want to use is not only in a different package, it's also in another project? When you create a project, you have the option of adding other projects to the build path. For example, if you want to create a new project that works with the code in the org.eclipsebook.ch02_2 package from a new project, Ch02_03, just click the Projects tab in the second pane of the New Java Project dialog and add the Ch02_03 project to the build path, as you see in Figure 2-9. Figure 2-9. Adding a project to the build path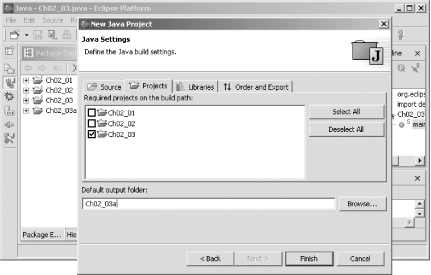 Now the code in Ch02_03, including the org.eclipsebook.ch02_2 package, is accessible to your new project. You can also add other projects to the build path after a project has been created by selecting the project in the Package Explorer, right-clicking it, and selecting the Properties context menu item. In the Properties dialog that opens, select Java Build Path and click the Projects tab, giving you the same display as in Figure 2-9. |
|
|
< Day Day Up > |
|