|
|
< Day Day Up > |
|
Recipe 9.2 Creating Dialogs9.2.1 ProblemYou need some input from the user, and a dialog box would be perfect. 9.2.2 SolutionCreate a new shell, configure it as a dialog, display it, and recover the data the user entered. 9.2.3 DiscussionSWT has message boxes and a number of prebuilt dialogs that come with it, such as the FileDialog class that creates file dialogs or the FontDialog class that enables users to choose a font. But if you need more than those prebuilt dialogs, you can build your own custom dialog. In this example, we're going to assume you want to confirm the user's decision to delete a file. When the user clicks a button labeled Delete File, the application (DialogApp at this book's site) displays a confirming dialog with OK and Cancel buttons. You can then determine which one the user clicked. The application starts by creating a shell with the Delete File button and a text widget in whch we'll display the response to the user's button click: Display display = new Display( );
Shell shell = new Shell(display);
shell.setText("Dialog Example");
shell.setSize(300, 200);
shell.open( );
final Button button = new Button(shell, SWT.PUSH);
button.setText("Delete File");
button.setBounds(20, 40, 80, 25);
final Text text = new Text(shell, SWT.SHADOW_IN);
text.setBounds(140, 40, 100, 25);
.
.
.To create a dialog, you create a shell and give it the style SWT.APPLICATION_MODAL | SWT.DIALOG_TRIM, making it an application-modal dialog (the user must dismiss it before continuing with the application) and styling the shell as a dialog box. We'll also add to the dialog a "Delete the file?" prompt as well as OK and Cancel buttons: final Shell dialog = new Shell(shell, SWT.APPLICATION_MODAL |
SWT.DIALOG_TRIM);
dialog.setText("Delete File");
dialog.setSize(250, 150);
final Button buttonOK = new Button(dialog, SWT.PUSH);
buttonOK.setText("OK");
buttonOK.setBounds(20, 55, 80, 25);
Button buttonCancel = new Button(dialog, SWT.PUSH);
buttonCancel.setText("Cancel");
buttonCancel.setBounds(120, 55, 80, 25);
final Label label = new Label(dialog, SWT.NONE);
label.setText("Delete the file?");
label.setBounds(20, 15, 100, 20);That gets you a dialog box, and to display it, all you have to do is to call its open method. So, what about determining which button the user clicked? To get data from the dialog, we'll use a listener based on an anonymous inner class. To get data from the listener's methods, we'll use a class field. In this example, we'll set a boolean variable, deleteFlag, indicating whether the user clicked the OK button in the button listener's code: package org.cookbook.ch09;
import org.eclipse.swt.*;
import org.eclipse.swt.widgets.*;
public class DialogClass {
static boolean deleteFlag = false;
.
.
.
Listener listener = new Listener( ) {
public void handleEvent(Event event) {
if(event.widget == buttonOK){
deleteFlag = true;
}else{
deleteFlag = false;
}
dialog.close( );
}
};
buttonOK.addListener(SWT.Selection, listener);
buttonCancel.addListener(SWT.Selection, listener);
.
.
.All that's left is to display an appropriate message in the text widget depending on the value of deleteFlag, and that's simple enough, as shown in Example 9-1. Example 9-1. Creating dialogspackage org.cookbook.ch09;
import org.eclipse.swt.*;
import org.eclipse.swt.widgets.*;
public class DialogClass {
static boolean deleteFlag = false;
public static void main(String [] args) {
Display display = new Display( );
Shell shell = new Shell(display);
shell.setText("Dialog Example");
shell.setSize(300, 200);
shell.open( );
final Button button = new Button(shell, SWT.PUSH);
button.setText("Delete File");
button.setBounds(20, 40, 80, 25);
final Text text = new Text(shell, SWT.SHADOW_IN);
text.setBounds(140, 40, 100, 25);
final Shell dialog = new Shell(shell, SWT.APPLICATION_MODAL |
    SWT.DIALOG_TRIM);
dialog.setText("Delete File");
dialog.setSize(250, 150);

final Button buttonOK = new Button(dialog, SWT.PUSH);
buttonOK.setText("OK");
buttonOK.setBounds(20, 55, 80, 25);

Button buttonCancel = new Button(dialog, SWT.PUSH);
buttonCancel.setText("Cancel");
buttonCancel.setBounds(120, 55, 80, 25);

final Label label = new Label(dialog, SWT.NONE);
label.setText("Delete the file?");
label.setBounds(20, 15, 100, 20);
Listener listener = new Listener( ) {
public void handleEvent(Event event) {
if(event.widget == buttonOK){
deleteFlag = true;
}else{
deleteFlag = false;
}
dialog.close( );
}
};
buttonOK.addListener(SWT.Selection, listener);
buttonCancel.addListener(SWT.Selection, listener);
Listener buttonListener = new Listener( ) {
public void handleEvent(Event event) {
dialog.open( );
}
};
button.addListener(SWT.Selection, buttonListener);
while(!dialog.isDisposed( )) {
if(!display.readAndDispatch( )) display.sleep( );
}
if(deleteFlag){
text.setText("File deleted.");
} else {
text.setText("File not deleted.");
}
while(!shell.isDisposed( )) {
if(!display.readAndDispatch( )) display.sleep( );
}
display.dispose( );
}
}Run this example now and click the Delete File button that appears in the window, as shown in Figure 9-1. Figure 9-1. The dialog example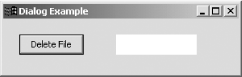 Clicking the Delete File button makes the dialog appear, as shown in Figure 9-2. Figure 9-2. The new dialog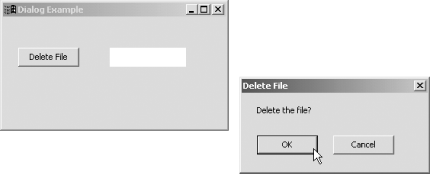 Click the OK button now, and a confirming message will appear in the main window's text widget, as shown in Figure 9-3. Figure 9-3. Recovering results from a dialog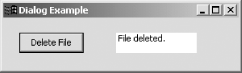 |
|
|
< Day Day Up > |
|