|
|
10.4 StylesNow
that we've
seen where styles are stored, let's look at styles themselves
in more detail. A style is a formatting
rule that can be applied to an item, such as
text, an image, or a table. For example, you can define a style that
uses 14-pt, blue, Helvetica text and apply it to all your
subheadings. As usual, Dreamweaver provides a friendly UI for
defining styles. You can open the New Style dialog box, where
you'll begin the process of adding a new style, by using Text
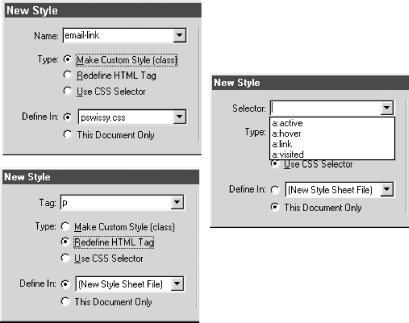
Figure 10-5. Using the New Style dialog box
Only custom styles created using the
Make Custom Style (class) option appear in the CSS Styles panel (see
Figure 10-15). These styles are called
class selectors and also appear under the Text
Though Dreamweaver writes the CSS style code for you, it helps to know what the rules look like if you want to edit them by hand. A style or rule is comprised of a selector followed by one or more declarations separated by semicolons and enclosed in curly braces. Each declaration is comprised of a property/value pair. Thus, each style looks something like this: selector {property1: value1; property2: value2}
Now let's look at the three variants of CSS styles that you can create using the New Style dialog box. 10.4.1 Making Custom Styles (Class Selectors)Custom styles (also known as class selectors) are convenient for defining your own custom formatting when HTML tags don't suffice. The general form looks like this: .classSelector {property1: value1; property2: value2}
To create a class selector rule, use the Type: Make Custom Style (Class) radio button in the New Style dialog box (see Figure 10-5). The selector name must begin with a period followed by a letter (Dreamweaver adds the period for you). After the initial letter, you can include other letters or numbers, but not spaces (avoid underscores as well). Then, using the Style Definition dialog box's options, you might define the following style to be applied to subheadings. (Dreamweaver writes the code for you.) .subhead2 { font-family: Verdana, Arial, Helvetica, sans-serif;
font-size: 12px; font-weight: bold; line-height: 14px}
By definition, any selector starting with a period (.) is a class
selector. When you define a class selector, its name appears in the
Set Class submenu within the contextual menu associated with the Tag
Selector, as seen in Figure 10-16. Class selectors
also appear in, and can be applied using, the CSS Styles panel, the
Text <p class="subhead2">Hello my honey</p> When a class selector is applied to a span of text where no block tag exists, Dreamweaver adds a <span> tag, like this: Hello my <span class="subhead2">baby</span> Class selectors are only one type of CSS style rule that Dreamweaver helps you to define. Let's examine some others. 10.4.2 Redefining HTML Tags (Type Selectors)CSS allows you to redefine the attributes of existing HTML tags using a type selector rule of the following form: typeSelector {property1: value1; property2: value2}
Type selectors are sometimes known as element selectors, but I'm going to call them type selectors throughout this chapter. Note that unlike class selectors, a type selector must match the name of an existing HTML tag and no period precedes it. To create a type selector rule, use the Type: Redefine HTML Tag radio button in the New Style dialog box and then select an HTML tag to redefine from the Tag field (see Figure 10-5). Again, use the Style Definition dialog box's option to set the style's properties. The following type selector rule sets the text style to be used within <p> tags. p { font-family: Arial, Helvetica, sans-serif;
font-size: 10px; font-variant: small-caps; color: #00FFFF}
Type selectors stored in the embedded stylesheet, like all embedded styles, can be edited in Code view and are listed in the Edit Style Sheet dialog box. Type selectors stored in external stylesheets, like all external styles, are accessed by selecting their parent stylesheet in the Edit Style Sheet dialog box and clicking the Edit button. 10.4.3 Using CSS SelectorsCSS allows extraordinary specificity and flexibility in the application of custom styles. First, we'll discuss a type of CSS selector, readily accessible via Dreamweaver's UI, known as pseudo-class selectors. We'll cover IDselectors after that. 10.4.3.1 Pseudo-class selectorsWe can use so-called pseudo-class selectors to change the appearance of hyperlinks created with the <a> tag. These selectors are different from other selectors we've seen so far because they are dynamic. They can be used to create rollover effects in browsers that support them. To customize the appearance of hyperlinks, use the Type: Use CSS Selector radio button in the New Style dialog box (see Figure 10-5) and then select one of the following four options from the Selector pop-up menu in the dialog box. If you want to define more than one of these pseudo-class selectors, you should do so in the order a:link, a:visited, a:hover, a:active. I list them in that order here, although they are listed alphabetically in the dialog box itself.
When you finish defining your style in the Style Definition dialog box, Dreamweaver dutifully creates a pseudo-class selector of the form: a:action {property1: value1; property2: value2}
where action is either link, visited, hover, or active. As with the type selectors that we saw earlier, pseudo-class selectors automatically affect all hyperlinks created with the <a> tag. Example 10-3 attempts to change the color of hyperlinks in various states. Example 10-3. Changing the color of hyperlinks<html><head><style type="text/css">
<!--
a:link { color: #FF0000 }
a:visited { color: #0000FF }
-->
</style></head>
<body bgcolor="#FFFFFF" text="#000000">
<a href="dummylink.html">This text uses a CSS selector.</a>
</body></html>
Example 10-3 instructs the browser to use red for unvisited hyperlinks and blue for visited links (which works in most browsers, including IE5 and NN4.7 on Windows). But don't go overboard, as support for the active and hover states is less consistent and can adversely affect the display of the visited and unvisited states. Consider the following set of styles: a:link { color: #FF0000 }
a:visited { color: #0000FF }
a:hover { color: #00FFFF }
a:active { color: #00FF00 }
These styles theoretically instruct the browser to use red for unvisited hyperlinks, blue for visited links, cyan for rollovers, and green for links being clicked. Unfortunately, practice diverges considerably from theory. Although IE5 displays unvisited links in red, rollovers in cyan, and visited links in blue (so far so good!), it doesn't consistently display clicked links in green, and sometimes displays visited links in green instead of blue. Furthermore, depending on the styles defined in the pages you link to, visited links occasionally don't respond to rollovers. NN4.7 properly displays unvisited links in red and visited links in blue, but ignores the active and hover states.
To clear the link history in IE5, use
Tools We can construct several other CSS selectors, including ID selectors. 10.4.3.2 ID selectorsSo far, we've seen class selectors, type selectors, and pseudo-class selectors. Another commonly used CSS style is the IDselector . An ID selector starts with a pound sign (#) and is used to format tags with a matching id attribute (just as class selectors format tags with a matching class attribute). The general form looks like this: #idSelector {property1: value1; property2: value2}
To create an ID selector rule, use the Type: Use CSS Selector radio button in the New Style dialog box (see Figure 10-5). Instead of choosing a spoon-fed pseudo-class selector from the Selector pop-up menu, specify an ID selector beginning with a pound sign (#) and a letter. After the initial letter, you can include other letters or numbers, but not spaces (avoid underscores as well). Your ID selector rule may look like this: #crucial {font-size: 48px; font-weight: bold; color:red}
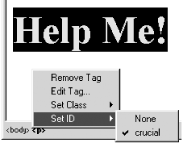
By definition, any selector starting with a pound sign (#) is an ID selector. When you define one, its name will appear in the Set ID submenu within the contextual menu associated with the Tag Selector, as seen in Figure 10-6. Figure 10-6. Setting the ID with the Tag Selector When an ID selector is applied to an element, Dreamweaver adds an id attribute to the HTML tag like this (hence the name "ID selector"): <p id="crucial">Help me please!</p> Here's a dirty little secret. You can create any type of selector using the Type: Use CSS Selector radio button in the New Style dialog box simply by entering an appropriate selector in the Selector field. For example, you can create a class selector by beginning your selector name with a period; you can create a type selector by entering the name of a valid HTML tag. (The radio buttons that Dreamweaver provides for making custom styles and redefining HTML tags are just a convenience.) Likewise, you can enter a pseudo-class selector such as a:link by hand instead of using the pop-up menu. A full discussion of the possible types of selectors is beyond the scope of this book. Consult Section 10.8.2 later in this chapter for a brief overview of the otherwise gory details. You'll see that class, type, ID, and pseudo-class selectors are only four of the CSS selectors you can employ. |
|
|