|
|
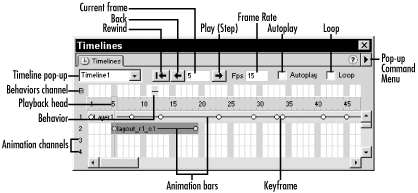
17.1 Timelines PanelEach frame of a timeline represents a moment in time, akin to a frame in a video; timeline frames have no relation to the HTML frames and framesets discussed in Chapter 4. Timelines are manipulated in the Timelines panel, shown in Figure 17-1. To open the Timelines panel, use
Window Figure 17-1. The Timelines panel A single HTML document can contain multiple timelines (use the Timelines pop-up menu in the Timelines panel to switch between them). The time axis runs from left to right; higher frame numbers represent later points in time. The playback head, shown in Figure 17-1 as a red rectangle and vertical line, indicates the current animation frame. You can animate objects over time by adding them to the animation channels in a timeline. The duration of each object animation is indicated by an animation bar, which is a subportion of an animation channel. Each animation bar contains an object plus instructions to change its properties, such as its position, over time. Because an animation bar might not span all frames of a timeline, an animation channel can contain more than one animation bar in series. Use the Rewind button (see Figure 17-1) to return to Frame 1 of the timeline. Use the Back and Play buttons to step through the animation. Click and hold the mouse down on these buttons to run the animation forward or backward. A pop-up command menu is also accessible by clicking the arrow at the upper-right corner of the Timelines panel. 17.1.1 Comparison with Director Score and Flash TimelinesAlthough Dreamweaver timelines are similar to Macromedia Director's Score and Macromedia Flash's Timeline, there are some important differences. A single object cannot occupy two animation channels in the same frame. To display two copies of an object simultaneously, duplicate the object in your document and add the two instances to separate animation channels. If layers overlap, the one with the highest zIndex is drawn in front of other layers. Layers are always rendered in front of other page content, including images added directly to timelines. To change an image's rendering order, insert it into a layer and adjust the layer's zIndex using the Property inspector or the Layers panel.
When an animation completes, the object retains the attributes set in the last keyframe of its animation bar (it doesn't disappear automatically as it would in Director). To erase an object in Flash, create a blank keyframe; to hide a layer in Dreamweaver, set its visibility attribute manually or use the Show-Hide Layers behavior to do so. 17.1.2 Adding Objects to TimelinesLayers and images are the only object types that can be added to timelines. You can add an image or layer to a timeline in several ways:
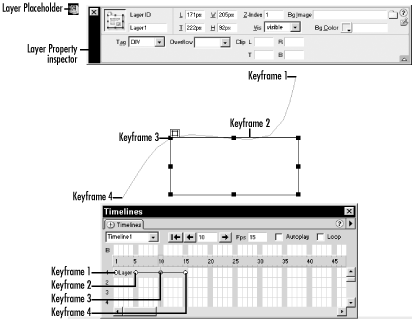
To add an element that is not an image or layer to a timeline, insert the element into a layer and then add the layer to the timeline instead. Even though images can be added directly to a timeline, placing them within a layer offers greater control. If you add an independent image to a timeline and later wrap that image in a layer, the image's original animation bar will disappear from the timeline. Simply add the layer containing the image to the timeline instead. You cannot add objects to a timeline in a document based on a template. Add the objects to the timeline in the template instead. 17.1.3 KeyframesA keyframe is a frame in which one or more object properties, such as a layer's position, are set explicitly (keyframes are indicated by white circles within an animation bar, as seen in Figure 17-1). The browser interpolates between keyframes to create so-called tween frames (short for "in-between" frames). By adding a series of keyframes and setting the position of the layer
at each one, you can create an animation path, as shown in Figure 17-2. (The Modify Figure 17-2. Animation path over time Adding an object to a timeline automatically creates a beginning and ending keyframe, which cannot be removed. To add more keyframes, select an animation bar, and then:
You can't add keyframes if more than one animation bar is selected. Keyframes are always added at the current position of the playback head (which automatically moves to the frame in which you clicked). To move a keyframe to a different frame (to change the time at which it occurs), drag it along the animation bar. 17.1.4 Manipulating Animation BarsAn animation bar represents both an object and its attribute changes over time. You can change the object used in an animation sequence by selecting an animation bar and then:
To change the duration of an animation bar:
To select multiple animation bars, use Shift-click. If the Timelines
panel is active, you can use Ctrl+A (Windows) or Cmd+A (Macintosh) to
select all animation bars in a timeline. (File You can even copy and paste
timelines between documents.
Dreamweaver will copy the animation sequence and the objects that it
refers to unless an object of the same name already exists in the
destination document. After copying an animation to a new document,
you can use the Modify To shift an animation in time, drag the entire animation bar forward or back (right or left) in the timeline. Remember that an object can't occupy two animation bars in the same frame simultaneously; Dreamweaver prevents you from dragging the animation bar if doing so would violate this constraint. |
|
|