17.2 Altering Object Properties
Timelines can modify the
width, height,
top, left,
z-index, and visibility
attributes of layers, but width and height changes work in
Internet Explorer only (they are ignored
by NN4 and Opera). Timelines can also modify the
src attribute of
images to create a slideshow. To change
other image attributes, such as to animate its position, place the
image within a layer (likewise for other HTML elements) and then
alter the layer attributes.
 |
Select a keyframe before modifying an
object's properties. You can modify one or more properties at
each keyframe using the Property inspector (or by moving or resizing
a layer in the Document window).
|
|
Table 17-1 explains how to set the attributes of
layers and images. The src attribute applies to
images only; the remaining properties apply to layers only.
Table 17-1. Setting properties of layers
|
src
|
Change the Src field in the Property inspector (applies to images
only).
|
|
visibility
|
Change the Vis field in the Property inspector. Layers appear on the
page even after their animation terminates, unless the visibility is
set to hidden. Also see the Show-Hide Layers behavior.
|
|
width
|
Change the W field in the Property inspector or use the resize
handles to resize the layer in the Document window. (Supported by
IE4+ only; has no effect in Netscape.)
|
|
height
|
Change the H field in the Property inspector or use the resize
handles to resize the layer in the Document window. (Supported by
IE4+ only; has no effect in Netscape.)
|
|
z-Index
|
Change the zIndex field in the Property inspector or change the Z
column value in the Layers panel.
|
|
top
|
Change the T field in the Property inspector or move the layer in the
Document window (drag the tab in the layer's upper-left
corner).
|
|
left
|
Change the L field in the Property inspector or move the layer in the
Document window (drag the tab in the layer's upper-left
corner).
|
17.2.1 Animating Layer Position
Section 17.2.1.1 shows how to change a
layer's
position over time.
17.2.1.1 Procedure 6
Create a layer using the Draw Layer tool
in the Objects panel's Common category (see Chapter 4 for details).
Add the layer to the timeline using Modify  Timeline Timeline  Add
Object to Timeline. Add
Object to Timeline.
Click on a keyframe, such as the ending keyframe, in the Timelines
panel (avoid double-clicking it, which selects an entire animation
bar).
In the Document window, select the layer and drag it to a new
location (use the tab in the layer's upper-left corner to drag
it).
A thin gray line marks the animation path for the layer. The layer
will animate between the two keyframes over time.
To create a more complex animation path, add one or more keyframes
and repeat Steps 3 and 4 for each intermediate keyframe.
If an animation bar contains two keyframes, the animation path is a
straight line. When using additional keyframes, the animation path is
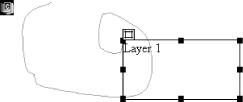
a Bézier curve as seen in Figure 17-2. To
alter the path, change the position of the layer in a keyframe,
adding keyframes as necessary. To create straight line paths, create
a series of separate animation bars, each with beginning and ending
keyframes only.
17.2.1.2 Recording an animation path
You can record an animation
path directly by selecting a layer and choosing
Modify  Timeline Timeline  Record Path
of Layer (or by choosing
Record Path from the contextual menu). When
you select Record Path, the Timelines panel opens. Drag the layer by
the tab in its upper-left corner using the left mouse button. Drag it
around the Document window along the desired path to create an
animation, as shown in Figure 17-3. (Dreamweaver
creates keyframes as needed to approximate the intended path.) Record Path
of Layer (or by choosing
Record Path from the contextual menu). When
you select Record Path, the Timelines panel opens. Drag the layer by
the tab in its upper-left corner using the left mouse button. Drag it
around the Document window along the desired path to create an
animation, as shown in Figure 17-3. (Dreamweaver
creates keyframes as needed to approximate the intended path.)

17.2.2 Changing Properties with the Properties Panel
You can also alter properties by selecting a keyframe and then
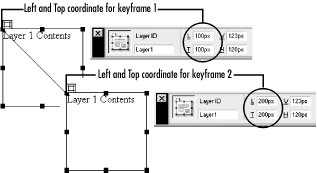
setting the new value in the Property inspector. Figure 17-4 shows how to set the Left and Top coordinates
for two keyframes of an animation using the
Property inspector.

 |
Property changes made when a
keyframe is selected affect that keyframe
only (although it causes tween frames to be recalculated). Select a
keyframe or create one, if needed, before changing an object's
properties. Property changes made when a tween frame is selected affect the entire
animation bar.
|
|
Changing the layer position while a tween frame is selected shifts
the entire path without altering its shape. For example, if you
select a tween frame and increase the Left coordinate by 50 pixels,
the entire animation path shifts 50 pixels to the right. Likewise,
changing a property without first selecting a keyframe changes the
property's setting for the entire timeline (the life span of
the document).
17.2.3 Working with Images
You can alter an
image's
src attribute over time, which changes the picture
displayed by changing the graphic file associated with the
<img> tag. Select a keyframe before
changing the src attribute in the Property inspector.
Changing the src attribute outside of a keyframe
changes it for the entire document's lifespan. All image files
should be the same size (if not, they will all be scaled to the size
of the image indicated in the Property inspector).
To move an image over time, place it in a
layer and animate the layer in a timeline.
To create the effect of images appearing and disappearing, insert the
images into layers and then change the layer visibility over time.
This technique is often more effective than changing a single
image's src attribute. Likewise, you can
simulate a change in both an image's graphic and position by
animating two different images in two different layers as follows:
Create a layer and insert the first image into it. Animate the first layer's position using a timeline as
described in Section 17.2.1.1.
In the last frame of the animation, hide the layer by using the
Property inspector to set its Vis property to hidden (or by using the
Show-Hide Layers behavior as described later).
Create a second layer and insert the second image into it. Animate the second layer's position so it begins where the
previous layer's animation ended.
Set the layer's visibility to hidden until reaching the frame
in which you want it to appear.
17.2.4 Animation Rate
A timeline's frame
rate
controls
animation
playback speed and can be changed in the
Fps field of the Timelines panel. The default frame rate is 15 frames
per second (fps). Lowering the frame rate below 6 or 8 fps may result
in jerky animation. Because animation is processor-intensive, higher
frame rates may not be achievable on lower-end machines. The target
frame rate is the maximum speed at which the animation will occur;
achieving the rate is not guaranteed. Each timeline can have a
different frame rate.
 |
Browsers are not optimized for animation.
For serious animation, especially when using audio and interactivity,
consider using Flash, Shockwave, or Synchronized Multimedia
Integration Language (SMIL).
|
|
Keep animations simple and don't
expect a high frame rate. If you must use browser animation, consider
these tips:
Keep animated elements as small as possible. Don't animate more than a few elements at a time. Preload images using the Preload Images behavior. Use the Show-Hide Layers behavior and the Set Text of Layer behavior
to create pseudo-animations. Likewise, change the layer background
color using the Change Property behavior.
Allow users to move layers using the Drag Layer behavior.
|

