3.5 Forms
HTML
forms provide a means of collecting information, such as customer
data, to be submitted to a server.
A form has three attributes available through the Property inspector
that control the interaction of the form with a processing program on
your server.
- Form Name
-
Any unique alphanumeric string. This attribute can be referenced by
scripts, which may perform different actions based on the entries in
the form.
- Action
-
Action to be taken when the Submit button on the form is clicked.
This attribute is usually the URL of a script written in Perl
(.pl or.cgi), Active Server Pages (.asp), ColdFusion (.cfm), or JavaServer Pages (.jsp), such as one of the following examples:
- /cgi-bin/formmail.pl
- http://someserver.scriptresources.com/cgi-bin/whatever.asp
- Method
-
The HTTP method—either GET or POST—used to submit the
form data. GET appends the form fields to the URL specified by the
Action attribute. GET is limited to ASCII data no larger than 8 KB
(the maximum size varies by browser, but is usually at least 1 KB).
The POST method sends the form data directly to the processing agent
specified by the Action attribute. POST does not impose any size
restriction and is required when using File Fields to upload files.
Furthermore, GET is insecure, whereas POST can handle nontext data
such as encrypted files.
To create a
form:
Provide some introductory text to explain the purpose of the form and
what will be done with the submitted data. Include a link to a
privacy policy statement. Depending on the content, you might need to
verify the user's age to comply with various laws.
Insert an HTML form into your document using Insert  Form. The
DW form area is designated by a red dashed border, extending from the
left to right margins; it expands as form elements are added to it.
(Use View Form. The
DW form area is designated by a red dashed border, extending from the
left to right margins; it expands as form elements are added to it.
(Use View  Visual Aids Visual Aids  Invisible Elements to ensure
visibility of the form boundary.) Invisible Elements to ensure
visibility of the form boundary.)
Specify the form attributes, especially Action, as described earlier
in this section.
Add one or more form objects within the red-dashed form area using
the options in the Insert  Form Objects menu or the icons in
the Objects panel's Forms category. Form Objects menu or the icons in
the Objects panel's Forms category.
Add text labels next to each of your fields to explain its purpose to
the user. Consider laying out the fields within a table for greater
control over formatting.
Include a Submit button to submit your form for processing. Typically, the form Action is the URL of a server-side script that
accepts the form data and (perhaps) returns an HTML page in response.
Ensure that your server is set up to process the form. Libraries of
server-side scripts are widely available from the resources cited in
the preface or can be created using UltraDev.
 |
Netscape Navigator browsers won't execute a script attached to
a form object, such as a button,
unless the form object is enclosed within a
<form>
tag. When you insert a form object into an HTML document, Dreamweaver
prompts you to add a <form> tag if none
exists. You should answer yes.
|
|
3.5.1 Processing Form Data
Although Dreamweaver provides you with behaviors that allow you to
validate form data (see Chapter 16), it
doesn't process information collected in a form, other than the
jump menu discussed in the next section.
For simple data collection and manipulation, you can use one of the
common CGI scripts or Java applets widely available from public
resources or your ISP (and you'll need permission to run
scripts on your ISP's server). See the scripting resources
cited in the preface.
Note that a page can contain multiple forms or a form might span
multiple pages. Forms that span multiple pages are typically
processed through a ColdFusion or ASP server that automatically
collates the information by writing it to a database as each page of
questions is completed. Dreamweaver UltraDev includes server-side
behaviors for advanced form processing with ASP, ColdFusion, and JSP.
3.5.2 Form Objects
DW4 provides access to all the form
elements available through HTML, as listed in Table 3-5. All of these elements can be inserted using
the Insert  Form Objects menu or the
icons in the Objects panel's Forms category (the latter can be
dragged to the desired location on the page). Form Objects menu or the
icons in the Objects panel's Forms category (the latter can be
dragged to the desired location on the page).
 |
Each form object on a page should have a unique name except
radio buttons
within the same group, which should share a common name. One
name/value pair is sent for each field in the form. Names should not
contain blank spaces (use
underscores
instead).
|
|
Table 3-5. Form objects
|
Text Field
|
Name, Char Width, Max Chars, Wrap, Type (Single Line, MultiLine,
Password), Initial Value
|
|
Button
|
Name, Label, Action (Submit Form, Reset Form, None)
|
|
Check Box
|
Name, Checked Value, Initial State (Checked, Unchecked)
|
|
Radio Button
|
Name, Checked Value, Initial State (Checked, Unchecked)
|
|
List/Menu
|
Name, Type (Menu, List), Height, List Values, Initially Selected,
Selections (Allow Multiple)
|
|
File Field
|
Name, Character Widths, Max Characters
|
|
Image Field
|
Name, Width (W), Height (H), Src, Alt, Align
|
|
Hidden Field
|
Name, Value
|
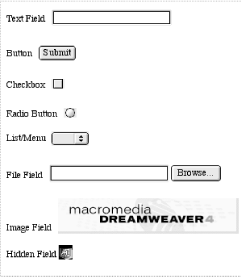
Although each form object creates a typical UI element, such as a
text-entry box, radio button, or checkbox (as shown in shown in Figure 3-17), each has its own quirks and caveats. Fancier
UI elements can be added using Dreamweaver extensions. For example,
the CourseBuilder extension, discussed in Chapter 23, offers graphically appealing radio buttons
and checkboxes.

 |
After inserting an object, set its properties in the Property
inspector. For example, to create a scrolling, multiline text area
(with the
<textarea>
tag), select a text field and then choose the Multiline radio button
in the Property inspector.
|
|
- Text Field
-
Text fields can
be used for single-line or
multiline
entries. Password fields mask the text entry with asterisks (on
Windows) or bullets (on Macintosh) and are always single-line fields.
Use the Num Lines option to specify the number of lines to display
(the field scrolls if the user enters more data). Set the Wrap option
to Virtual to allow text to wrap using "soft"
line-breaks. The Validate Form behavior validates text
fields only. Use a custom behavior to validate data entry such as
dollars, dates, or integers. Leave the Max Char field empty to allow
an entry of unlimited length.
 |
Don't use password-formatted text fields to collect
sensitive information such as credit card numbers. The data is not
encrypted when sent to the server, and is therefore not secure. For
secure passwords and transfers use UltraDev or one of the eCommerce
extensions available from the Dreamweaver Exchange (see Chapter 22).
|
|
- Button
-
By default, Dreamweaver creates a Submit button when you insert a button,
but you can change a
button's Label
and Action in the Property inspector. The Submit Form action submits
the form data for processing. Set the Action to Reset Form to create
a button that
resets other fields to their default values. Set the Action to None
when applying a custom behavior to the button (see Chapter 12 for details on applying behaviors). Assign a
custom text label to the button, such as "Do It," using
the Label field in the Property inspector.
- Check Box
-
Each checkbox
should have a unique Name and a different Checked Value, unlike radio
buttons within a group, which share the same Name (but also have
different Checked Values). The Name doesn't have to match the
separate text label (which you should add beside the checkbox to
indicate its purpose).
- Radio Button
-
Radio buttons within a group must have the same Name, but should have
different Checked Values. (Radio buttons in different groups must
have different Names.) Be sure to add a text label for the radio
button group and separate labels for each button within the group.
 |
Use Ctrl-drag (Windows) or Opt-drag (Macintosh) to quickly duplicate
a radio button or any other page
element.
|
|
- List/Menu
-
Use
List/Menu fields to create
pop-up menus or scrolling
lists. If using List as the Type, check
the Allow Multiple option to allow the user to select multiple items
in the list using Ctrl-click (Windows) or Cmd-click (Macintosh). Each
List Value consists of a label (shown to the user) and an optional
corresponding value (submitted to the server). If a value isn't
specified, it defaults to the same thing as the label.
- File Field
-
Use a File Field
to allow the user to attach a
file to be uploaded (it includes a
Browse button that opens a file browser when clicked). Ensure that
your server allows anonymous file uploads, or incorporate a password
into the URL used for the Action (which specifies the location of the
file to be uploaded). Leave the Max Char field empty to allow a
filename of unlimited length.
 |
The form submission method must be POST when using a File Field. To
ensure that files are properly encoded, you must hand-edit the
<form> tag in Code view to include the
ENCTYPE="multipart/form-data" attribute.
|
|
- Image Field
-
An Image Field
is used to insert an
image into a form. An
image can also be configured to act as
button, with greater graphical appeal. To
use an image as a submit button, insert the image and then change the
text in the name field of the Property inspector to the word Submit.
Only the Submit feature is supported without the use of a custom
behavior.
- Hidden Field
-
Use
hidden fields to transmit hidden data
provided by the web page instead of by the user. For example, specify
parameters required by generic server-side scripts, such as an email
address to which you will send the form contents. Hidden fields are
indicated by a shield icon if the Edit  Preferences Preferences  Invisible
Elements Invisible
Elements  Hidden Form Fields checkbox and the
View Hidden Form Fields checkbox and the
View  Visual Aids Visual Aids  Invisible
Elements menu item are enabled. Invisible
Elements menu item are enabled.
3.5.2.1 Jump menus
Jump menus provide a means of
associating URLs with options in a menu list. Jump
menus send users to the specified URL when they choose an option from
the menu. You can add a jump menu to your document by selecting
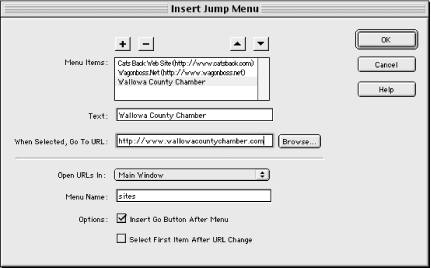
Insert  Form Objects Form Objects  Jump
Menu, which opens the Jump Menu dialog box shown in Figure 3-18. Jump
Menu, which opens the Jump Menu dialog box shown in Figure 3-18.

Use this dialog box to create your jump menu as follows:
Fill in the Text and the "When Selected, Go To URL"
fields for each document, image, or other resource to which you wish
to link.
Click the plus (+) button to create additional menu entries. When you have added all your menu items, select the target window
using the Open URLs In field. (This menu shows all frames plus the
Main Window as selection options.)
Type the name of the menu in the Menu Name field. Enable the "Insert Go Button After Menu" checkbox to add
a Go button, which
activates the menu choice. (Otherwise, the new document loads as soon
as the menu selection is made.)
The "Select First Item After URL Change" checkbox resets
the menu after each jump. It is useful only when the jump menu opens
a URL in a separate frame. If the checkbox is disabled, the jump menu
displays the previously selected item instead of resetting.
Jump menus, with and without a Go button, are shown in Figure 3-19. A jump menu's properties can be edited
in the Property inspector.

See Chapter 16 for more details on jump menus.
3.5.3 Formatting Forms with Tables
Because
form objects can be difficult to
format neatly on a page, tables are often used to format them in
columns. Typically, the text labels are placed in one column and the
form fields themselves are placed in a second column. This placement
allows you to control the alignment of each object in your form,
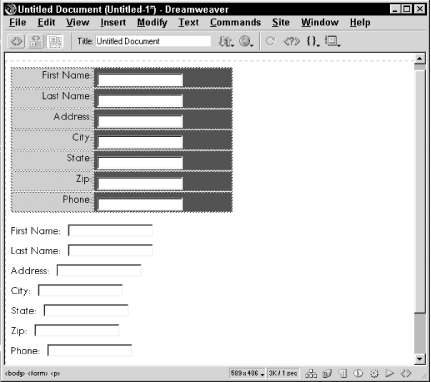
whether it is text, an image, or a form object. The top of Figure 3-20 shows a series of text labels and form fields
aligned in a table. The bottom of Figure 3-20 shows
the same items without the benefit of table alignment.

In this chapter, we have seen how to lay out
tabular data in Standard view and lay out
graphical data in Layout view. We've
also seen how to retrieve user responses using forms objects. In the
next chapter, we'll discuss Dreamweaver's options
associated with frames and layers. Layers can be used to position
items on a page or to position fields within a form.

|


