|
|
6.3 The Site WindowThe logical map of a web site determines how visitors find information, just as the directory structure determines where developers physically organize the files. Without a well-planned logical structure, a site's appeal and usefulness is compromised; without a well-planned physical structure, development takes longer than necessary and results in a less reliable site. There is only one Site window, but it has three different panes:
To display these panes, the Site window has three different modes:
Site Map and Files view and Site Map Only view are both variations of the Site Map view as controlled by the Site Map button in the Site window toolbar, also indicated in Figure 6-9 (click and hold the Site Map button to switch modes). The subsequent sections describe how to use and configure the Site window's various incarnations. 6.3.1 The Site Map and Files ViewDreamweaver represents a site's
logical interconnections using a graphical site
map. Open the Site Map
window (shown in Figure 6-8) using
Window Figure 6-8. The Site Map and Files view of the Site window showing a site map and local file list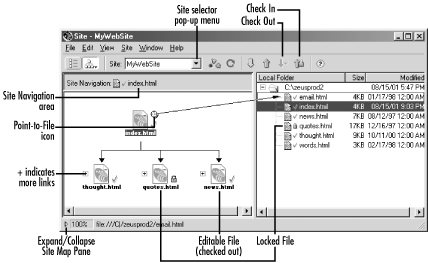 On the left side of the Site window is the Site Map pane showing the site map of a
small site; on the right side is the Local Files pane showing the
file directory structure of the same site. (You can't use Site
Map view until you have specified the home page for your site. Use
the Site Map Layout category of the Site Definition dialog box to do
so.) You can show the Local Files pane on the left side instead of
the right using Edit Although the two panes both represent the same site, the site map shows interconnections created by hyperlinks, independent of the document files' locations on the hard drive. Furthermore, some files in the Local Files pane may not be used within the site. Use the arrow button in the lower-left corner of the window (indicated in Figure 6-8) to show or hide the Site Map pane temporarily. Notice that selecting a file in one pane also selects it in the other pane. When a file is selected in the Site Map pane, a Point-to-File icon appears at its upper right. Click on the Point-to-File icon and a draggable arrow appears, as shown in Figure 6-8; you can create a link to a new document by dragging this arrow to point to a file in the Local Files pane. (You can't simply drag a file from the Local Files pane to the Site Map pane, or vice-versa). Figure 6-8 shows the Site Map window as it appears when File Check In/Check Out has been enabled in the Site Definition dialog box. The file shown with a lock icon isn't editable until it is checked out; checked out files are accompanied by checkmarks (see Figure 6-10). 6.3.1.1 Manipulating files and folders in the Local Files and Remote Files panesYou can manipulate files within the Local Files and Remote Files panes of the Site window in several ways. These options are available from the contextual menu that appears when you right-click (Windows) or Ctrl-click (Macintosh) on a document in the files list. Operations that can be performed from the contextual menu include:
To select one or more documents in the Local Files pane:
See Section 6.8.3 later in this chapter for ways to tell Dreamweaver to automatically select files based on a specific criterion. 6.3.2 The Site Map Only ViewLet's look at the Site Map in closer detail. Click and hold down the Site Map button on the Site window's toolbar, as shown in Figure 6-9, to switch between the Site Map and Files view and the Site Map Only view. Figure 6-9. Site Map Only view showing a site's logical structure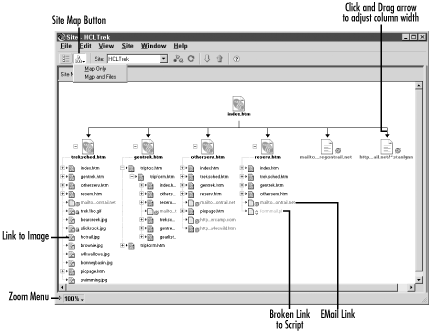 The pages that are linked from the home page are shown in the site map using large icons. Subsequent levels below that are indicated by a plus (+) icon to the left of a file. Click the plus (+) icon next to a file to show the hyperlinks within it (hyperlinks are shown in the order in which they appear in the HTML source code). Subsequent levels in the hierarchy are shown using smaller icons to prevent the site map from rapidly becoming too large. The site map shows only the hyperlinks implemented with the <a href> tag (corresponding to the Link field in the Property inspector) including both http: and mailto: links; it doesn't show hyperlinks implemented within complex objects such as Flash Text or Flash Button objects. The document icons next to each linked file indicate the file's type, if applicable. The secondary icons shown in Figure 6-10 indicate the type of file or link. Broken links are shown in red; links to email, scripts, and external sites are shown in blue; read-only (locked) files are indicated by a lock icon; files that are checked out are indicated by checkmarks. The lock and checkmark icons are used only when File Check In/Check Out is enabled. Figure 6-10. Interpreting icons in the Site Map window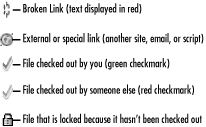 6.3.2.1 Manipulating documents and links in the Site Map windowYou can create and remove links within the Site Map window in several ways. These options are available from the contextual menu that appears when you right-click (Windows) or Ctrl-click (Macintosh) on a document in the Site Map pane:
The Open, Open With, Add to Favorites, Get, Check Out, Put, Check In, Undo Check Out, Preview in Browser, Check Links, and Design Notes commands in the contextual menu are the same as those available in the Local Files pane and discussed in the previous section. To select one or more documents in the Site Map pane:
6.3.2.2 Viewing and hiding pages in the Site Map windowThe
site map
ordinarily
displays HTML hyperlinks between
pages;
to show so-called dependent
files, such as GIF files embedded with the
<img>
tag, choose View To view a branch of the site map, select a page within the hierarchy and choose
View To hide extra links that you do not wish to see in your site map, select the file(s) you wish to hide and choose Show/Hide Link from the contextual pop-up menu. To view or hide all
links marked as
hidden, use View See Section 6.2.4 earlier in this chapter for settings that configure the Site Map view. Use the Zoom pop-up menu at the bottom of the Site window (as indicated in Figure 6-9) to enlarge or shrink the site map. 6.3.3 Renaming and Moving PagesThe site map can display either the title or filename of the
pages in your site; toggle between the two
alternatives using View To change the title or filename of a
page,
select the file, then pause briefly before clicking the title or
filename again; the text should become editable. This is a great way
to fix inappropriately titled documents quickly without having to
open each individually. If you double-clicked (i.e., clicked too
quickly), Dreamweaver opens the document instead of allowing you to
rename the file. A document can also be retitled (but not renamed) using the
Modify The Local Files pane always shows filenames and not page titles. Another way to rename a file is to right-click (Windows) or Ctrl-click (Macintosh) on the file and choose Rename from the contextual menu that appears. If you change a file's three-letter extension while renaming it, servers will no longer recognize the file's type (Dreamweaver does not provide a warning when you change a file's extension the way the Windows File Explorer does). You can move files in the Local Files pane by dragging them into a different folder. Dreamweaver will prompt you to update all links to or from this document to ensure their integrity. You should choose to update the links in most cases.
You can also use the Cut, Copy, and Paste commands under the Edit menu to copy and move files in the Site window, but moving files in this way will likely break existing links and should therefore be avoided. After renaming or moving files, be sure to refresh both the Local and Remotes Files panes using F5. Dreamweaver is not smart enough to rename the remote version of a file when you rename the local version. Instead, it attempts to upload the new file and, optionally, delete the old file when synchronizing the local and remote versions of the site. (See the Delete Remote Files Not on local Drive checkbox in the Synchronization dialog box.) 6.3.4 A Site's File StructureA site's physical structure should be laid out to make life easy for the site's designers and maintainers, just as the navigational structure aids the site's visitors. With multiple developers working on a site, the directory structure and file-naming convention must be agreed upon. Here are some hints for structuring your site and naming your files:
6.3.5 The Site Files ViewDreamweaver can show you the physical directory structure of both the
local site and the remote copy on the server using the
Site Files
view, as seen in Figure 6-11. Switch to the Site
Files view using Window Figure 6-11. The Site Files view showing the Local Files pane on the right and the Remote Files pane on the left You can sort the file list in either pane by clicking on the column headings; click the column heading again to reverse the sort order. To move a
document within a site, simply drag and
drop it into the new location. You can drag files between the remote
and local panes, but if you drag and drop a file into the wrong
directory in the other pane, you will often break existing links. You
are better off using
Put
(upload),
Get
(download), or the Site The position of the Local Files and Remote Files panes can be
swapped using Edit After transferring files between the local and remote sites, be sure to refresh the file listings. To refresh the Local Files pane:
To refresh the Remote Files pane:
To refresh both the Local Files and Remote Files panes:
|
|
|
