There are times in application programming when the developer inherits a database schema that will not change radically throughout the lifetime of the database. SQL views allows the developer to implement new schema without having to change the underlying structure of the database. In effect, it allows the developer and user to view the data from a different perspective.
A view, as its name suggests, is a way of presenting part of the database to a user that fits his or her needs and requirements. A view includes data derived from selected columns and rows from one or more database tables. You can think of a view as a “virtual table,” but no data is actually stored in this virtual table. The content of a view is defined by a query. The set of data that the view represents is reconstituted by the DBMS (database management system) each time a query refers to the view.
Views provide developers with various solutions to some common application development and data management problems. In this section we will go over some common uses of views.
As with normal tables, security restrictions can also be applied to views (virtual tables). Views can be used to restrict access to the database that different classes of users have. Groups of users can be granted access to only those views that reflect their processing needs. Using views this way, access can be restricted both vertically and horizontally—that is to say, restrictions on columns and rows. That way, the confidentiality of certain data can be protected.
| Note |
Permissions on both tables and views are granted for the whole object. Restrictions cannot be applied per row, only per column. However, the view definition itself can restrict which columns and rows are returned as the result set. |
Let’s consider a payroll system as a simple example. The administrator can create views for all users so that they can see only the employee details, such as Name, Surname, Jobtitle, and DepartmentID, but without confidential details, such as Salary (restrictions on columns). Another view could also be created for a particular user that shows all the details but only for that user (restrictions on rows). Using views that way also insulates the tables from unauthorized modification.
Views can also help SQL programmers to break down a complex query into sets of smaller, simpler queries. Each view would represent a step closer to what the programmer actually wants. The simpler views can be used in subsequent views and SELECT statements to get a step closer to the desired result.
Views can also be used to represent information in a way that is more meaningful to the user. Columns can be combined and data can be formatted using various T-SQL functions, such as cast and convert. For example, a view can be used to combine Name and Surname columns into a single Fullname column. A Datetime column can be converted to a string or formatted to display long date format to avoid ambiguity.
| Note |
Long date format displays the full name of the month and also a four-digit year. For example, 1/2/01 becomes January 02, 2001, assuming the standard we are using is U.S. If we were using the British standard, the date would be February 01, 2001. |
Views can also be used to denormalize the data before presenting it to the user. Normalized tables, though efficient for data storage, are not very intuitive to humans. By using views, data can be presented in a more intuitive way from multiple tables. Instead of showing foreign keys, the value of the referenced table is shown to the user. For example, in the Northwind database that we used throughout this book, instead of showing ProductID from the Order Details table, ProductName from the Product table would be shown instead. You can also use views to present summary data to the user by using aggregate functions and GROUP BY, CUBE, and ROLLUP.
There are several ways that views can be implemented in SQL Server. With experience, you can learn to build views using different techniques according to the situation you are in. The main tool for building views is the New View tool in Enterprise Manager. The New View window can be accessed by right-clicking on the View node in the console tree and selecting New View from the pop-up menu.
From within the tool, you have the option of designing the view graphically from the diagram pane and further refining it in the grid pane, or you can type the desired query in the SQL pane. Changes in any of the three are reflected in the other two. You will find that a combination of the three would best suit your needs.
| Tip |
You can also use the New View window to generate template queries that you can use elsewhere in your application. Use the Diagram pane to design the skeleton of your query, and then copy and modify the resulting SQL to suit your needs. |
It is also possible to create a view from the Query Analyzer using SQL scripts. This technique is usually used when deploying a new database. The database structures, including views, are generated into SQL script files from the development database. The script is then imported using SQL Analyzer on the new server. When the script is run against an empty database, the database structure is then recreated in the new database.
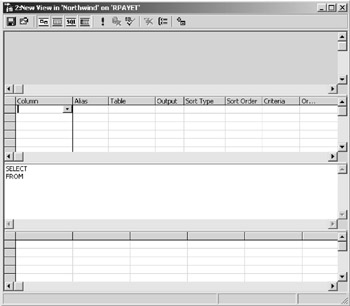
The New View, or the Design View, window is the graphical tool provided in Enterprise Manager for the creation and modification of views. You can modify an existing view by right-clicking on it in Enterprise Manager. From the pop-up menu, choose Design View to bring up the Design View window. As shown in Figure C-2, the Design View window contains a toolbar.
| Note |
The New View and Design View window are the same, except one is used for creating new views and the other is used for modifying an existing view. |
The toolbar has the following buttons (refer to Figure C-2) from left to right:
Save: Saves the view. If the view is new, a dialog will pop up, allowing you to enter the name of the view.
Properties: Opens a dialog box that allows you to set additional properties and options for the view. These include comments, encryption, schema binding, and with check option.
Show/Hide diagram pane: Toggles the diagram pane on and off
Show/Hide Grid pane: Toggles the grid pane on and off
Show/Hide SQL pane: Toggles the SQL pane on and off
Show/Hide Results pane: Toggles the results pane on and off
Run: Runs the query in the SQL pane and displays results in the results pane
Cancel Execution and Clear results: Can cancel the query that is running (if any) and clear the results pane. It is only active when there is a query running or the results pane is not empty.
Verify SQL: Verifies that the query in the SQL pane is a valid query
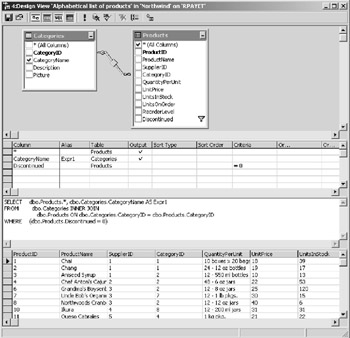
Remove Filter: Removes filter on specified columns. This is only active when a column with a filter is selected in the diagram pane. In Figure C-2, the Discontinued column in the Products table has a filter.
Use ‘Group by’: Sets the Group by option so that you can use GROUP BY in the query. An additional column named Group by is added to the grid pane.
Add Table: Adds a table to the diagram pane
The diagram pane shows a graphical layout of the view. This includes tables and links between related tables. Selected columns are also shown with a check mark next to the column heading. Right-clicking the pane background brings up the pop-up menu from which you can add new tables to the view. Right-clicking the tables and links brings up context-sensitive menus where you can set different options.
The grid pane shows the selected columns in a grid format. From the grid pane, you can set additional options, such as Alias (name of the column in the view), Sort Type (Ascending or Descending), and Criteria (filter criteria). The section is converted into the WHERE clause of the SELECT statement).
You can type the SQL query directly into the SQL pane. Any new tables referenced or any joins made will be reflected in the diagram and grid panes.
The results pane is used to display the result of running the SQL query. You can run the query by using the Run button on the toolbar.
Although it is easier to design views using the Design View tool in Enterprise Manager, it is at times necessary to use T-SQL to express complex views or special view attributes.
The syntax for creating, changing, and deleting a view is shown below.
Creating a view:
CREATE VIEW [ < database_name > . ] [ < owner > . ]
              < view_name >
[ ( < column > [ ,...n ] ) ]
[ WITH < view_attribute > [ ,...n ] ]
AS
< select_statement >
[ WITH CHECK OPTION ]
Changing a view:
ALTER VIEW [ < database_name > . ] [ < owner > . ]
             < view_name >
[ ( < column > [ ,...n ] ) ]
[ WITH < view_attribute > [ ,...n ] ]
AS
< select_statement >
[ WITH CHECK OPTION ]
Deleting a view:
DROP VIEW < view_name > [ ,...n ]
| Note |
Arguments between [ ] are optional. |
< view_name >: The name of the view. View_name must follow the same convention as identifiers. The name can also include spaces, but in such a case, it must be enclosed between [ ].
< column >: The name to be used for a column in the view. Specifying column name in CREATE VIEW is only required when a column is derived from a computed field or when there are columns in the SELECT part that have the same name (usually due to table joins that have columns with the same name). Column names can also be assigned in the SELECT statement. Specifying the view owner is optional.
,...n: n is a placeholder indicating that multiple options can be specified.
< view_attibute >: View attributes can include ENCRYPTION, SCHEMABINDING, and VIEW_ METADATA.
ENCRYPTION: SQL Server stores the text for creating views in system table columns. This attribute option instructs SQL Server to encrypt the system table columns containing the text of the CREATE VIEW statement. This prevents the view from being published as part of the SQL Server replication. It also prevents the database user from being able to see the text for the CREATE VIEW statement.
SCHEMABINDING: This attribute binds the view to the schema. When used, select_statement must include the owner for any object referenced (owner.table_name, owner.view_name). Tables and views referenced in select_statement cannot be dropped (deleted) unless the bound view is dropped first. However, the referenced tables can be altered as long as the change does not affect the view definition.
VIEW_METADATA: Instructs SQL Server to return metadata information about the view, instead of metadata for base tables, to DBLIB, ODBC, and OLEDB APIs. This happens when clients using DBLIB, ODBC, or OLEDB APIs request browse-mode metadata. Browse-mode metadata are additional metadata returned by SQL Server to client-side DBLIB, ODBC, or OLEDB APIs, allowing client-side APIs to implement updateable client-side cursors. With the VIEW_METADATA option, the browse-mode metadata returns the view name, as opposed to the base table names, when describing columns from the view in the result set.
| Note |
When the VIEW_METADATA option is set, all columns (except for timestamp) of the view are updateable, as long as the view has INSERT or UPDATE INSTEAD OF triggers. Updateable views and triggers are discussed later in this chapter. |
<select_statement>: This is the SELECT statement or SQL query that defines the result set of the view. The SELECT statement can include references to tables, as well as other views. This can be any SQL SELECT statement, including multiple SELECT statements separated by the UNION operator; however, there are certain restrictions. The SELECT statement of a CREATE VIEW cannot include the following:
COMPUTE or COMPUTE BY clauses
ORDER BY clause, unless there is also a TOP clause in the select list
The into keyword
References to temporary tables or temporary table variables
| Warning |
SQL Server allows a query expression to reference a maximum of 1,024 columns. |
WITH CHECK OPTION: Ensures that all data modification executed against the view adhere to the criteria (usually set in the WHERE clause) set within select_statement. This ensures that the data modified remains visible through the view after the modification is committed.
| Warning |
CREATE VIEW will fail if a view with the same name exists in the database. Existing views can be modified using ALTER VIEW instead of CREATE VIEW. The syntax is the same for both. It is also possible to drop an existing view and recreate it using CREATE VIEW. |
Below is a sample script for creating the “Alphabetical list of products” view included with the Northwind database. Notice that the script first checks to see if the view already exists. If it exists, the view is then deleted using DROP VIEW.
/*Drop the view if it exists*/
IF EXISTS (SELECT * FROM sysobjects
           WHERE id = object_id(N'[Alphabetical list of
             products]')
             AND OBJECTPROPERTY(id, N'IsView') = 1)
           DROP VIEW [Alphabetical list of products]
GO
/*Create the view.*/
CREATE VIEW [Alphabetical list of products] AS
SELECT Products.*, Categories.CategoryName
FROM Categories INNER JOIN Products ON
            Categories.CategoryID = Products.CategoryID
WHERE Products.Discontinued = 0
| Note |
Since the name of the view contains spaces, it must be enclosed in [ ]. |
Now that you know the syntax and tools for creating views, let’s look at some examples of how to create views of your own. These scripts were designed for use with the Query Analyzer tool. You must connect to the Northwind sample database before you execute the scripts. You can also use the New View window if you like. Just copy the query (the SELECT part only) into the SQL pane. The other pane will be automatically adjusted.
In this example, we are going to create a view from the Order table. As it is, the Order table is normalized. Although this is an efficient way to store data, it is not very intuitive for a user. So, we are going to present the user with a denormalized version of the table. Since the Order table represents the header of an order, we are going to call our view “Order Header Query.” The script for creating the view is shown below:
/* Check if view already exists; if so, drop the view */
if exists
   ( select * from sysobjects
     where id = object_id(N'[Order Header Query]')
     and OBJECTPROPERTY(id, N'IsView') = 1 )
  drop view [Order Header Query]
GO

CREATE VIEW [Order Header Query]
/****************************************************
* Denormalized Order table to show values of linked *
* tables.                                           *
****************************************************/
AS
SELECT Orders.OrderID as [Order ID],
       Customers.CompanyName as [Customer Company Name],
       Employees.Title + ': ' +
         Employees.FirstName + ' ' +
         Employees.LastName as Employee,
       Orders.OrderDate as [Order Date],
       Orders.RequiredDate [Required Date],
       Orders.ShippedDate as [Shipped Date],
       Shippers.CompanyName AS [Shippers Company Name],
       Orders.Freight,
       Orders.ShipName as [Ship Name],
       Orders.ShipAddress as [Ship Address],
       Orders.ShipCity as [Ship City],
       Orders.ShipRegion as [Ship Region],
       Orders.ShipPostalCode [Ship PostalCode],
       Orders.ShipCountry as [Ship Country]
FROM   Orders INNER JOIN
       Customers ON Orders.CustomerID =
         Customers.CustomerID INNER JOIN
       Employees ON Orders.EmployeeID =
         Employees.EmployeeID INNER JOIN
       Shippers ON Orders.ShipVia = Shippers.ShipperID
First of all, the script checks and deletes a view with the same name if one already exists. Notice that the comment for the view is placed after the CREATE VIEW statement. This will ensure that the comment is kept as part of the view. Comments are important, especially for maintenance purposes.
In the query, column names are aliased to more user-friendly names, which include spaces. To use column names with spaces, the names must be enclosed in [ ]. For example, OrderID is aliased as [Order ID].
SELECT Orders.OrderID as [Order ID],
CustomerID is replaced with a column named Customers.CompanyName from the linked Customers table and is aliased as [Customer Company Name]. ShipVia is also replaced by Shippers.CompanyName aliased as [Shippers Company Name]. The linked tables are shown in Figure C-3.
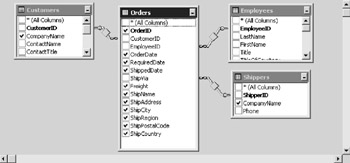
EmployeeID is replaced by a computed column, which combines three columns—Title, FirstName, and LastName—from the Employees table. Notice that colons followed by a space separate Title and FirstName. FirstName and LastName are separated by a space only.
       Employees.Title + ': ' +
         Employees.FirstName + ' ' +
         Employees.LastName as Employee,
As you can see, when denormalizing (usually required for reporting purposes), you can combine multiple columns for the linked table into one view column.
| Tip |
To make your code more readable, remember to indent and put each column on a separate line. If a computed column is long, use multiple lines, but indent the following line farther. |
Let’s now look at a more complicated example. This example will show you how to use views as a stepping-stone for queries. Suppose you were given the task of designing an ABC Sales by Customer query. An ABC report is usually a performance analysis report that shows the top ten and bottom ten of whatever column you are using for the performance analysis. In our case, we would use the sum of subtotals of orders for each customer. The query will show us our best and worst customers (in terms of sales). Usually in such cases, you would create two SELECT statements and then UNION the two, but because such a query requires the use of ORDER BY, UNION cannot be used. It must be done using two separate SELECT statements, as shown in Listing C-3:
/*ABC Sales by Customer query*/
/*Top 10 Customers*/
SELECT TOP 10
       Orders.CustomerID,
       Customers.CompanyName,
       SUM(
         CONVERT ( money,
                   (
                     [Order Details].UnitPrice *
                     [Order Details].Quantity
                   ) *
                   (
                     1 - [Order Details].Discount
                   ) / 100
         )
         * 100
       ) AS Subtotal
 FROM    [Order Details] INNER JOIN
         Orders ON [Order Details].OrderID =
           Orders.OrderID INNER JOIN
         Customers ON Orders.CustomerID =
           Customers.CustomerID INNER JOIN
         Employees ON Orders.EmployeeID =
           Employees.EmployeeID
GROUP BY Orders.CustomerID, Customers.
         CompanyName, [Order Details].OrderID
ORDER BY Subtotal DESC

/*Bottom 10 Customers*/
SELECT TOP 10
       Orders.CustomerID,
       Customers.CompanyName,
       SUM(
         CONVERT ( money,
                   (
                     [Order Details].UnitPrice *
                     [Order Details].Quantity
                   ) *
                   (
                     1 - [Order Details].Discount
                   ) / 100
         )
         * 100
       ) AS Subtotal
 FROM    [Order Details] INNER JOIN
         Orders ON [Order Details].OrderID =
           Orders.OrderID INNER JOIN
         Customers ON Orders.CustomerID =
           Customers.CustomerID INNER JOIN
         Employees ON Orders.EmployeeID =
           Employees.EmployeeID
 GROUP BY Orders.CustomerID, Customers.
            CompanyName,[Order Details].OrderID
 ORDER BY Subtotal ASC
Notice that the only difference between the two SELECT statements is the sorting order.
ORDER BY Subtotal ASC
and
ORDER BY Subtotal DESC
This is not ideal because we get two separate result sets. Let’s see if we can find a solution to the problem using views. The Northwind database already has a view called Order Subtotals. We shall use it to do our ABC views. You can double-click on the view to see the scripts that were used to create it, or you can use the Design View window.
| Note |
Double-click on the Order Subtotals view to bring up the View Properties window. Right-click on the view and choose Edit View from the pop-up to bring up the Design View window. |
| Warning |
Do not alter the views that came with the Northwind database. This might cause some of the scripts included in this book to fail. |
All we need to do now is create two additional views: Top 10 Customers and Bottom 10 Customers. Both will use the Order Subtotals window. Listing C-4 shows the required scripts.
/* Check if view already exists; if so, drop the view */
if exists
   ( select * from sysobjects
     where id = object_id(N'[Top 10 Customers]')
     and OBJECTPROPERTY(id, N'IsView') = 1 )
  drop view [Top 10 Customers]
GO

CREATE VIEW [Top 10 Customers]
/*********************************
* Show top best Customers in     *
* term of sales                  *
*********************************/
AS
SELECT TOP 10
       Orders.CustomerID,
       Customers.CompanyName,
       SUM([Order Subtotals].Subtotal) AS Subtotal
FROM   Customers INNER JOIN
       Orders ON Customers.CustomerID = Orders.CustomerID
         INNER JOIN
       [Order Subtotals] ON Orders.OrderID =
         [Order Subtotals].OrderID
GROUP BY Orders.CustomerID, Customers.CompanyName
ORDER BY [Order Subtotals].Subtotal DESC
GO

/* Check if view already exists; if so, drop the view */
if exists
   ( select * from sysobjects
     where id = object_id(N'[Bottom 10 Customers]')
     and OBJECTPROPERTY(id, N'IsView') = 1 )
  drop view [Bottom 10 Customers]
GO

CREATE VIEW [Bottom 10 Customers]
/*********************************
* Show top worst Customers in    *
* term of sales                  *
*********************************/
AS
SELECT TOP 10
       Orders.CustomerID,
       Customers.CompanyName,
       SUM([Order Subtotals].Subtotal) AS Subtotal
FROM   Customers INNER JOIN
       Orders ON Customers.CustomerID = Orders.CustomerID
         INNER JOIN
       [Order Subtotals] ON Orders.OrderID = [Order
         Subtotals].OrderID
GROUP BY Orders.CustomerID, Customers.CompanyName
ORDER BY [Order Subtotals].Subtotal ASC
Once these views have been created, we can then use them to create the new ABC Sales by Customer query.
/*ABC Sales by Customer*/
SELECT * from [TOP 10 Customers]
UNION
SELECT * from [Bottom 10 Customers]
As you can see, this query is much simpler than the one in Listing C-3. The problem has been broken down into simpler steps and is also the complete solution. In this case, the full solution is not possible without the views.
Views can be used as tables, and the underlying tables of the view can be updated through the view provided that:
The view contains at least one table in the FROM clause of the view definition. You cannot update a view that is based only on expressions.
No aggregate functions (AVG, COUNT, SUM, MIN, MAX, GROUPING, STDEV, STDEVP, VAR, VARP) or GROUP BY, UNION, DISTINCT, or TOP clauses are used in the select list. The only instance when an aggregate function allows an update is if the function is used within a subquery defined in the FROM clause and provided that the derived values from the function are not modified.
No derived columns are used in the select list.
Partitioned views using the UNION ALL operator can be updateable. Any views that do not meet these criteria can still be made updateable through the use of INSTEAD OF triggers. Triggers are explained in a later section.