| [ Team LiB ] |
|
7.4 Inserting and Updating DataReading and binding data is all very well, but for most applications, it's only part of what the application needs to do. Another important feature is the ability to insert new rows and/or update existing rows of data. As with reading data, the DataSet and SqlDataAdapter (or OleDbDataAdapter) classes come in handy. Another class that is extremely useful is the SqlCommandBuilder (or OleDbCommandBuilder) class, which is discussed later in this section. Example 7-6, while more complicated than previous examples, adds a relatively small amount of code to support adding and updating rows to the Pubs Titles table. Example 7-6. InsertUpdateTitles.aspx<%@ Page Language="VB" %>
<%@ Import Namespace="System.Data" %>
<%@ Import Namespace="System.Data.SqlClient" %>
<html>
<head>
<title>Insert/Update Example</title>
<script runat="server">
Dim Titles As New DataSet( )
Dim TitlesAdpt As New SqlDataAdapter( )
Sub Page_Load(Sender As Object, e As EventArgs)
If Not IsPostBack Then
GetTitleData("")
BindGrid( )
End If
End Sub
Sub Add_Click(Sender As Object, e As EventArgs)
Page.RegisterHiddenField("EditMode", "Add")
title_id.ReadOnly = False
Display.Visible = False
InsertUpdate.Visible = True
End Sub
Sub Cancel_Click(Sender As Object, e As EventArgs)
Response.Redirect("InsertUpdateTitles.aspx")
End Sub
Sub Edit_Click(sender As Object, e As DataGridCommandEventArgs)
GetTitleData("WHERE title_id = '" & e.Item.Cells(1).Text & "'")
title_id.Text = Titles.Tables(0).Rows(0)(0)
title.Text = Titles.Tables(0).Rows(0)(1)
type.Text = Titles.Tables(0).Rows(0)(2)
pub_id.Text = Titles.Tables(0).Rows(0)(3)
price.Text = String.Format("{0:c}", Titles.Tables(0).Rows(0)(4))
advance.Text = Titles.Tables(0).Rows(0)(5)
royalty.Text = Titles.Tables(0).Rows(0)(6)
ytd_sales.Text = Titles.Tables(0).Rows(0)(7)
notes.Text = Titles.Tables(0).Rows(0)(8)
pubdate.Text = Titles.Tables(0).Rows(0)(9)
Page.RegisterHiddenField("EditMode", "Update")
Display.Visible = False
InsertUpdate.Visible = True
End Sub
Sub BindGrid( )
TitleGrid.DataSource = Titles.Tables(0).DefaultView
TitleGrid.DataBind( )
End Sub
Sub GetTitleData(WhereClause As String)
Dim ConnStr As String = "Data Source=(local)\NetSDK;" & _
"Initial Catalog=Pubs;Trusted_Connection=True;"
Dim SQL As String = "SELECT * FROM titles " & WhereClause
Dim PubsConn As New SqlConnection(ConnStr)
Dim TitlesCmd As New SqlCommand(SQL, PubsConn)
TitlesAdpt.SelectCommand = TitlesCmd
Dim TitlesCB As New SqlCommandBuilder(TitlesAdpt)
' No need to open or close connection,
' since the SqlDataAdapter will do this automatically.
TitlesAdpt.Fill(Titles)
End Sub
Sub Submit_Click(Sender As Object, e As EventArgs)
Select Case Request.Form("EditMode")
Case "Add"
GetTitleData("")
Dim NewRow As DataRow = Titles.Tables(0).NewRow
NewRow(0) = title_id.Text
NewRow(1) = title.Text
NewRow(2) = type.Text
NewRow(3) = pub_id.Text
NewRow(4) = Convert.ToDecimal(price.Text.Replace("$", ""))
NewRow(5) = advance.Text
NewRow(6) = royalty.Text
NewRow(7) = ytd_sales.Text
NewRow(8) = notes.Text
NewRow(9) = pubdate.Text
Titles.Tables(0).Rows.Add(NewRow)
TitlesAdpt.Update(Titles)
Case "Update"
GetTitleData("WHERE title_id = '" & title_id.Text & "'")
Titles.Tables(0).Rows(0)(0) = title_id.Text
Titles.Tables(0).Rows(0)(1) = title.Text
Titles.Tables(0).Rows(0)(2) = type.Text
Titles.Tables(0).Rows(0)(3) = pub_id.Text
Titles.Tables(0).Rows(0)(4) = _
Convert.ToDecimal(price.Text.Replace("$", ""))
Titles.Tables(0).Rows(0)(5) = advance.Text
Titles.Tables(0).Rows(0)(6) = royalty.Text
Titles.Tables(0).Rows(0)(7) = ytd_sales.Text
Titles.Tables(0).Rows(0)(8) = notes.Text
Titles.Tables(0).Rows(0)(9) = pubdate.Text
TitlesAdpt.Update(Titles)
End Select
Response.Redirect("InsertUpdateTitles.aspx")
End Sub
</script>
</head>
<body>
<h1>Insert/Update Example</h1>
<form runat="server">
<asp:panel id="Display" runat="server">
<asp:datagrid id="TitleGrid"
oneditcommand="Edit_Click"
runat="server">
<columns>
<asp:editcommandcolumn
buttontype="PushButton" edittext="Edit"/>
</columns>
</asp:datagrid>
<asp:button id="Add"
text="Add New Title" onclick="Add_Click" runat="server"/>
</asp:panel>
<asp:panel id="InsertUpdate" visible="False" runat="server">
<table border="0">
<tr>
<td>Title ID</td>
<td>
<asp:textbox id="title_id"
readonly="True" runat="server"/>
</td>
</tr>
<tr>
<td>Title</td>
<td>
<asp:textbox id="title" runat="server"/>
</td>
</tr>
<tr>
<td>Type</td>
<td>
<asp:textbox id="type" runat="server"/>
</td>
</tr>
<tr>
<td>Publisher ID</td>
<td>
<asp:textbox id="pub_id" runat="server"/>
</td>
</tr>
<tr>
<td>Price</td>
<td>
<asp:textbox id="price" runat="server"/>
</td>
</tr>
<tr>
<td>Advance</td>
<td>
<asp:textbox id="advance" runat="server"/>
</td>
</tr>
<tr>
<td>Royalty</td>
<td>
<asp:textbox id="royalty" runat="server"/>
</td>
</tr>
<tr>
<td>Year-to-date Sales</td>
<td>
<asp:textbox id="ytd_sales" runat="server"/>
</td>
</tr>
<tr>
<td>Notes</td>
<td>
<asp:textbox id="notes"
textmode="MultiLine"
rows="5"
columns="20"
runat="server"/>
</td>
</tr>
<tr>
<td>Publishing Date</td>
<td>
<asp:textbox id="pubdate" runat="server"/>
</td>
</tr>
<tr>
<td>
<asp:button id="Submit"
text="Submit" onclick="Submit_Click" runat="server"/ >
</td>
<td>
<asp:button id="Cancel"
text="Cancel" onclick="Cancel_Click" runat="server"/ >
</td>
</tr>
</table>
</asp:panel>
</form>
</body>
</html>
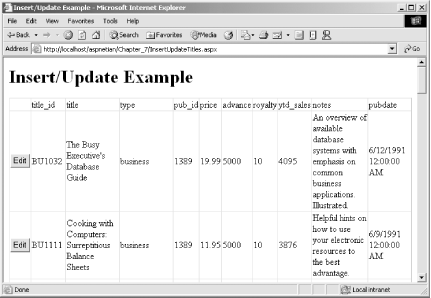
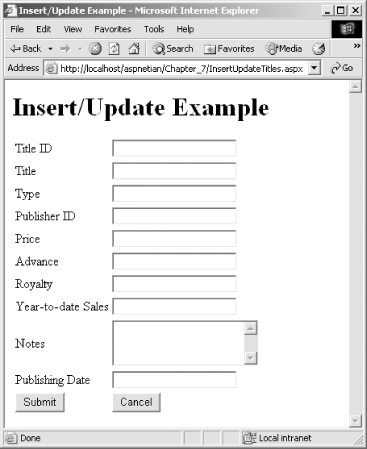
The discussion of the code begins with the <body> section of the page. This section contains a server-side <form> element, which provides support for page postbacks and adds automatic support for such things as control state management. Contained within the form are two Panel controls, which render as <div> elements on the client. Panel controls are very useful when you want to provide more than one set of user interface elements on a page, but only want to display one at a given time. Inside the first Panel control, which will display items from the Titles table, we declare a DataGrid control, to which we add a ButtonColumn control to provide access to the edit mode of the page and a Button control that will allow us to add a new item. To enable handling of the Edit button in the DataGrid, we set the DataGrid's onEditCommand attribute to the name of the event handler for the Edit button. The second Panel control contains the form fields that will be used to edit or add a new item, as well as Submit and Cancel buttons. It makes sense for the default mode for the page to be displayed, so we set the Visible property of the second panel control to False. Note that we also set the ReadOnly property of the title_id textbox to True to prevent this field from being edited for existing data, since the Title ID field is what uniquely identifies a title in the table. Turning to the code, note that the example declares both the DataSet and SqlDataAdapter classes at the page level so that they will be available to all procedures. In the Page_Load event handler, we check to see if the current request is the result of a postback. If not, we call the GetTitleData method (passing an empty string). The GetTitleData method, which allows us to pass a Where clause argument to be appended to the SQL string, uses the techniques demonstrated previously to retrieve the desired set of rows from the Titles table in the Pubs database. The main difference between Example 7-5 and the previous examples is that the code in Example 7-5 declares a new SqlCommandBuilder instance, passing it a SqlDataAdapter instance whose SelectCommand property is already set. Here's where ADO.NET magic really happens. The SqlCommandBuilder will automatically generate appropriate Insert, Update, and Delete commands for the Select statement set on the data adapter and populate the InsertCommand, UpdateCommand, and DeleteCommand properties of the SqlDataAdapter with these values. This step saves us the trouble of having to create these statements manually. If you want to construct Insert, Update, and Delete statements yourself or use stored procedures for these commands, you are free to do so. You can do so by creating separate SqlCommand objects with the desired properties and then setting the InsertCommand, UpdateCommand, or DeleteCommand property of the SqlDataAdapter to the newly created SqlCommand instance. Once we've filled the dataset with data from the Titles table, we call BindGrid from Page_Load. Calling BindGrid sets the DataSource property of the DataGrid control to the DefaultView property of the first table in the dataset, which returns a DataView containing all the data in the table. At this point, the output of the page should look like Figure 7-5. Figure 7-5. Display mode output of InsertUpdateTitles.aspx The user viewing the page has two options: click the Edit button for one of the rows or scroll down to the bottom of the page and click the Add New Title button (not shown in Figure 7-5). Clicking the Edit button invokes the Edit_Click event handler, which calls GetTitleData, passing a WHERE clause that causes it to retrieve only the selected row. Next, it sets the form fields in the second panel control to the values returned from GetTitleData, and then registers a hidden form field that indicates that we're updating a row (as opposed to adding a new row). This will become important later, when we submit our changes. Finally, we set the Visible property of the first panel to False and the second to True, which displays the form fields for editing. If the Add New Title button is clicked, we register a hidden form field (indicating that the Add mode is enabled), set the ReadOnly property of the title_id textbox to False (since we'll need a title ID for the new row), and then reverse the visibility properties of the panel controls again to display the blank form fields. At this point, the output of the page should look like Figure 7-6. Figure 7-6. Add mode output of InsertUpdateTitles.aspx In Edit or Add mode, if the user clicks the Cancel button, we simply call Response.Redirect and redirect back to the original page, essentially starting the whole process over again. If the user clicks Submit, we use a Select Case statement to evaluate whether we're adding a new row or updating an existing one. If we're adding a new row, we call GetTitleData, call the NewRow method of the first table object to create a new DataRow instance, and then set the item values of the new row to the values in the form fields. Once all values have been set, we add the row to the DataTable and (outside of the Select Case statement) call the SqlDataAdapter's Update method, which updates the backend database with the new row. If we're updating an existing row, we call GetTitleData with a WHERE clause for that specific row, set its items to the values in the form fields, and call Update again to save the changes to the backend database. Once we've called Update, we call Response.Redirect to redirect the user back to the original page, which again clears the decks and starts from scratch (with the new data, of course).
|
| [ Team LiB ] |
|