| [ Team LiB ] |
|
9.1 Authentication MethodsAuthentication is the process of positively identifying the person or program making a request. Authentication does not inherently grant access to resources (a function performed by authorization), but provides developers (or the runtime) with a known identity on which to base the decision of whether the request should be granted. In a classic ASP application, you had essentially two options for authenticating users: rely on IIS to authenticate users based on Windows accounts and later authorize these users based on NT Access Control Lists (ACLs); or roll your own authentication from the ground up to authenticate users against a back-end credentials data store (or potentially against Microsoft Active Directory). Each option had disadvantages. Windows authentication's most secure mode, Integrated Security, required all users to use Internet Explorer (and would not work over many proxy servers), while the roll-your-own option required an extraordinary amount of work to build and test. ASP.NET provides three built-in options for authentication:
All authentication options for ASP.NET are configured either at the machine-level using the machine.config file or at the application level using the web.config file. Appropriately, you configure the authentication settings using the <authentication> element, along with its associated attributes and children.
9.1.1 Windows AuthenticationAs mentioned earlier, Windows authentication provides much the same functionality in ASP.NET as IIS authentication did in classic ASP. IIS authenticates users based on Windows accounts stored either on the local server or on an associated domain controller, and then passes the identity of the authenticated user to the ASP.NET runtime, which can then use it for authorization. The main reason for choosing the Windows authentication provider is that it requires the least code to implement. Of the three modes of built-in authentication in ASP.NET, Windows authentication is the only one that requires you to configure IIS in addition to configuring the authentication settings in machine.config or web.config. As with IIS authentication in classic ASP, Windows authentication is primarily useful in situations in which one of the following conditions exists:
Typically, Windows authentication is used in conjunction with impersonation (see Section 9.1.1.1 for more information) to allow the ASP.NET process to make requests using the security context of the authenticated user. You can then restrict access to resources using NTFS Access Control Lists (ACLs) or grant database access by setting up the Windows account of the desired user as a login for the database in question. For more information about this technique, see Section 9.5 later in this chapter. ASP.NET Windows authentication works by obtaining the security context of the user from IIS (see Figure 9-1). The first step in configuring an application to use Windows authentication is to modify the IIS configuration settings to require one of the nonanonymous authentication methods. To do so, follow these directions:
While Basic authentication enables the use of Windows accounts for authentication in a wider array of scenarios, remember that Basic authentication sends the username and password in clear text. This can be an unacceptable risk, particularly if the application does not use Secure Sockets Layer (SSL) encryption to protect the communications. Before selecting Basic authentication as an option, make sure you understand the security ramifications of this choice and that you've taken the necessary steps to mitigate risks associated with this approach. Similarly, Digest authentication requires that passwords be stored in clear text on the domain controller where the accounts exist. If you decide to use Digest authentication, make sure that the domain controller is secured from network attacks and is physically secured to prevent unauthorized parties from accessing the passwords. Figure 9-1. Windows authentication process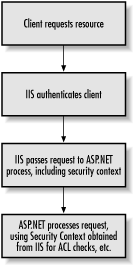 As shown in Figure 9-1, once a client making a request is authenticated by IIS, the request, along with the security context/identity of the authenticated user, is handed off to the ASP.NET worker process. From this point on, ASP.NET alone is in control. For ASP.NET to use the security context provided by IIS, the ASP.NET application must be configured for Windows authentication. This configuration is done by adding an <authentication> element to the web.config file for the application and setting its mode attribute to Windows, as shown in the following code snippet: <?xml version="1.0" encoding="utf-8" ?>
<configuration>
<system.web>
<authentication mode="Windows"/>
<!--
Other configuration elements
-->
</system.web>
</configuration>
Note that because the <authentication> element does not require any child elements for Windows mode, you can use a single tag with a closing / character rather than using a full closing tag. 9.1.1.1 ImpersonationImpersonation is the practice of having code run in the security context of a particular account. In ASP.NET, impersonation is used to allow code in an ASP.NET application to be executed in the security context of the authenticated user. By default, the ASP.NET worker process runs in the context of a special account called ASPNET. This account has very few privileges, so requests made for ACL-protected resources (such as files in the filesystem) will fail unless permissions are explicitly granted to the ASPNET account. This mechanism helps make ASP.NET applications more secure out of the box. One alternative to granting explicit permissions to the ASPNET account is to run the ASP.NET worker process in the context of the SYSTEM account, a highly privileged account that allows many types of requests to succeed without a need for impersonation. For example, since SQL Server, by default, allows access to anyone in the local administrators group, running the ASP.NET worker process as SYSTEM makes it possible to connect to a local SQL Server database using a trusted connection without using impersonation. While this may solve some permissions problems, in practice, running as SYSTEM is not a good idea, since it provides more privileges than are necessary for running most ASP.NET applications. One consequence of this is that any vulnerabilities that occur in IIS or the ASP.NET runtime may then potentially provide system-level access to those who exploit them. Running the ASP.NET worker process using the ASPNET account significantly reduces the risk of such an exploit.
In most Windows authentication situations, you should enable impersonation to allow the ASP.NET worker process to make requests using the security context of the authenticated user. In classic ASP, impersonation is enabled by default. You can enable impersonation in ASP.NET by adding the <identity> element to the web.config file for the application, with its impersonate attribute set to True, as shown in the following code snippet: <?xml version="1.0" encoding="utf-8" ?>
<configuration>
<system.web>
<authentication mode="Windows"/>
<identity impersonate="true"/>
<!--
Other configuration elements
-->
</system.web>
</configuration>
Once impersonation is enabled, you can use NTFS ACLs to authorize accounts for access to resources. For more information on this technique, see Section 9.2 later in this chapter. 9.1.2 Forms AuthenticationForms authentication is probably the most useful built-in ASP.NET authentication module because it provides a very flexible infrastructure for roll-your-own security scenarios. When an application is configured to use Forms authentication, requests for protected resources are redirected to a specified login page, unless the request is accompanied by an authentication token contained in a cookie. For more information on protecting resources when using Forms authentication, see Section 9.2, later in this chapter. 9.1.2.1 Logging inIn the login page, the site developer writes code to check the credentials entered by the user against a backend credentials store. This store can be a relational database such as SQL Server, an XML file, Microsoft Active Directory, or any other storage location of your choice. If the credentials match those stored in the backend credential store, the developer calls the RedirectFromLoginPage method of the FormsAuthentication helper class to send the user back to the page that they originally requested and to set either a session cookie or a persistent cookie containing the authentication token on the user's machine. Once the user is authenticated, he or she can access other resources in the same application without logging in again. To better illustrate the process by which Forms authentication operates, let's look at an example. In this example, which is based on live code I use to protect downloads on my company site, files in a specific subdirectory of an application are protected using Forms authentication. The example uses the following files:
To set up Forms authentication, the application is configured with the web.config file shown in Example 9-1, which is placed in the root of the application. Example 9-1. web.config file for Forms authentication<?xml version="1.0" encoding="utf-8" ?>
<configuration>
<location path="files">
<system.web>
<authorization>
<deny users="?"/>
</authorization>
</system.web>
</location>
<system.web>
<authentication mode="Forms">
<forms name=".ASPNETIAN"
loginUrl="Login.aspx"
protection="All"
timeout="60" />
</authentication>
</system.web>
</configuration>
The <authentication> element in Example 9-1 configures the application to use Forms authentication. Its child element, <forms>, provides a number of key security elements: a name for the Forms authentication cookie (.ASPNETIAN), the type of protection (encryption, validation, all, or none) for the authentication cookie, the timeout for the cookie (60 minutes in this case, the default being 30), and a login page to which to send unauthenticated users. Note that since the example uses Login.aspx, the default, we could omit this attribute.
The <authorization> element, which is tied to the files subdirectory through the use of the <location> tag, denies access to any nonauthenticated user. For a more complete discussion of the <authorization> element, see Section 9.2, later in this chapter. With this configuration in place, if a user does not already have an authentication cookie, a request for any files in the files subdirectory (presuming the file type is handled by ASP.NET) results in the user being redirected to the login page. What if the file type that you want to protect isn't handled by ASP.NET by default? In that case, you can follow these steps to add that type in the IIS configuration for the application:
Once all desired file types are mapped to the ASP.NET ISAPI handler,[1] any request made for one of those file types in the files subdirectory results in the user being redirected to Login.aspx if they do not already have a Forms authentication cookie for this application. The code for Login.aspx is shown in Example 9-2.
Example 9-2. Login.aspx<%@ Page Language="VB" %>
<%@ Import Namespace="System.Data" %>
<%@ Import Namespace="System.Web.Security" %>
<html>
<head>
<title>Login Page</title>
<script runat="server">
Sub Login_Click(Sender As Object, e As EventArgs)
Dim LoginDS as DataSet
If Cache("LoginDS") Is Nothing Then
LoginDS = New DataSet( )
LoginDS.ReadXml(Server.MapPath("Users.xml"))
Cache.Insert("LoginDS", LoginDS, _
New CacheDependency(Server.MapPath("Users.xml")))
Else
LoginDS = Cache("LoginDS")
End If
If LoginDS.Tables(0).Select("Email='" & _
         Email.text & "'").Length > 0 Then
Dim LoginRow( ) As DataRow = LoginDS.Tables(0).Select("Email='" _
& Email.text & "'")
If LoginRow(0).Item("Password").ToString = _
FormsAuthentication.HashPasswordForStoringInConfigFile( _
Password.Text, "SHA1") Then
FormsAuthentication.RedirectFromLoginPage( _
Email.Text, Persist.Checked)
Else
Message.Text = "Incorrect Password!"
End If
Else
Message.Text = "Email not found. Have you " & _
"<a href='register.aspx?page=" & _
Server.UrlEncode(Request.RawUrl) & "'>registered</a>?"
End If
End Sub
</script>
</head>
<body>
<form runat="server">
<table border="0">
<tr>
<td>Email: </td>
<td><asp:textbox id="Email" runat="server"/></td>
</tr>
<tr>
<td>Password: </td>
<td><asp:textbox id="Password"
textmode="Password" runat="server"/></td>
</tr>
<tr>
<td>Persist Authentication Cookie?</td>
<td><asp:checkbox id="Persist"
checked="False" runat="server"/></td>
</tr>
<tr>
<td><asp:button text="Submit"
onclick="Login_Click" runat="server"/></td>
<td><input type="reset" value="Cancel" runat="server"/></td>
</tr>
</table>
<asp:label id="Message" forecolor="Red" runat="server"/>
</form>
</body>
</html>
The tag-based section of Login.aspx is fairly straightforward and presents the user with textboxes in which to input an email address (used for a login ID) and password. The tag-based section also specifies a checkbox that allows users to persist the authentication cookie (so they won't need to login again from their machine). To make coding a little easier, the example adds @ Import directives for both the System.Data and System.Web.Security namespaces. Thus, you can access their members without explicitly using the namespace prefix. In the Login_Click event handler, the example declares a local DataSet variable and populates it either from the ASP.NET cache or the Users.xml file (see Example 9-5), which contains the credentials of registered users. If the dataset is populated from the XML file, we then insert the dataset into the cache for later retrieval (which eliminates the need to read the file, if it has not changed). The call to Cache.Insert sets up a file dependency on the Users.xml file. If that file changes, the cached dataset will be ejected from the cache and the new data will be loaded from the file on the next login request. This allows us to take advantage of the performance advantages of caching, but still ensure that we're always dealing with fresh data. Once we have a dataset containing all current users, we ensure that the email entered by the user is contained in the table, using the DataTable's Select method: If LoginDS.Tables(0).Select("Email='" & _
Email.text & "'").Length > 0 Then
If the email exists, we get a DataRow containing the credentials associated with that user. We can then compare this hashed password in the dataset with a hashed version of the password entered by the user, which is returned by the HashPasswordForStoringInConfigFile method of the FormsAuthentication class (using the HashPasswordForStoringInConfigFile method means we don't ever store the actual password, making it less likely that our application can be compromised). If the two versions of the password match, we redirect the user back to the page she requested by calling the RedirectFromLoginPage method of the FormsAuthentication class. RedirectFromLoginPage automatically redirects the user to the page specified by the ReturnUrl query string argument. This argument is automatically appended when the user is initially redirected to Login.aspx. RedirectFromLoginPage also sets the .ASPNETIAN cookie containing the Forms authentication token. The following code snippet illustrates this process: Dim LoginRow( ) As DataRow = LoginDS.Tables(0).Select("Email='" _
& Email.text & "'")
If LoginRow(0).Item("Password").ToString = _
FormsAuthentication.HashPasswordForStoringInConfigFile( _
Password.Text, "SHA1") Then
FormsAuthentication.RedirectFromLoginPage(Email.Text, _
Persist.Checked)
Else
Message.Text = "Incorrect Password!"
End If
If the email address exists, but the password is incorrect, we set the Text property of the Message Label control to inform the user. If the entered email address does not exist, we set the label text to a message that includes a link to a registration page so that the user can self-register. Note that the link includes a query string argument named page, which Register.aspx uses to redirect the user back to Login.aspx with the original ReturnUrl query string argument intact. Registration is handled by the Register.aspx page, shown in Example 9-3. Example 9-3. Register.aspx<%@ Page Language="VB" %>
<%@ Import Namespace="System.Data" %>
<%@ Import Namespace="System.Web.Security" %>
<html>
<head>
<title>Registration Page</title>
<script runat="server">
Sub Register_Click(Sender As Object, e As EventArgs)
If Page.IsValid Then
Dim LoginDS as New DataSet( )
LoginDS.ReadXml(Server.MapPath("Users.xml"))
If LoginDS.Tables(0).Select("Email='" & _
Email.text & "'").Length = 0 Then
Dim NewUser As DataRow
NewUser = LoginDS.Tables(0).NewRow( )
NewUser("Email") = Email.Text
NewUser("Password") = _
   FormsAuthentication.HashPasswordForStoringInConfigFile( _
   Password.Text, "SHA1")
LoginDS.Tables(0).Rows.Add(NewUser)
LoginDS.WriteXml(Server.MapPath("Users.xml"))
Response.Redirect(Request.QueryString("Page"))
Else
Message.Text = "User with email: <i>" & Email.Text & _
"</i> already exists. Please choose another email address. "
End If
End If
End Sub
</script>
</head>
<body>
<form runat="server">
<table border="0" cellspacing="10">
<tr>
<td>Email: </td>
<td><asp:textbox id="Email" runat="server"/></td>
</tr>
<tr>
<td>Desired Password: </td>
<td><asp:textbox id="Password"
textmode="Password" runat="server"/></td>
</tr>
<tr>
<td>Confirm Password: </td>
<td><asp:textbox id="PasswordConfirm"
textmode="Password" runat="server"/></td>
</tr>
<tr>
<td><asp:button text="Submit"
onclick="Register_Click" runat="server"/></td>
<td><input type="reset" value="Cancel" runat="server"/></td>
</tr>
</table>
<asp:comparevalidator id="comparePasswords"
controltovalidate="Password"
controltocompare="PasswordConfirm"
display="dynamic"
text="Passwords must match!"
operator="Equal"
runat="server"/>
<asp:requiredfieldvalidator id="requireEmail"
controltovalidate="Email"
display="dynamic"
text="Email address required!"
runat="server"/>
<asp:requiredfieldvalidator id="requirePassword"
controltovalidate="Password"
display="dynamic"
text="Password required!"
runat="server"/>
<asp:label id="Message" runat="server"/>
</form>
</body>
</html>
The tag-based portion of Register.aspx is similar to Login.aspx, except that the example adds a textbox (for confirmation of the desired password) and the following three validation controls:
If we want to provide even more validation measures, we could also add a RegularExpressionValidator to ensure that the provided email address is valid (or at least in the correct format for a valid email address). However, the previously mentioned validators are sufficient at least to ensure that the user enters something. In the Register_Click event handler, we first test to ensure that the page is valid (i.e., that all validation controls on the page report are valid). This test avoids wasting processor time to perform work on invalid data. If the user's browser supports DHTML, the page will not even be submitted until the validation control's requirements have been met, thanks to the ability of these controls to perform client-side validation (in addition to the server-side validation that is always performed). If the page is valid, we declare a local DataSet variable and populate it from the Users.xml file. Then we check to make sure that the email address the user entered does not already exist in the file. If it does, we use the Text property of an ASP.NET Label control to ask the user to choose another email address. If the email address does not exist in the file, we create a new DataRow, populate it with the user's chosen email address and a hashed version of the password,[2] add the new row to the dataset, and save the dataset back to the XML file, as shown in the following code snippet. Note that this technique does not control concurrency, so if someone modified the contents of the XML file between the time this code read from the file and when it writes to the file, those changes would be overwritten:
Dim NewUser As DataRow
NewUser = LoginDS.Tables(0).NewRow( )
NewUser("Email") = Email.Text
NewUser("Password") = _
FormsAuthentication.HashPasswordForStoringInConfigFile( _
Password.Text, "SHA1")
LoginDS.Tables(0).Rows.Add(NewUser)
LoginDS.WriteXml(Server.MapPath("Users.xml"))
Once we've written the new user's information to Users.xml, we redirect the user to the page specified by the page's query string argument, as shown in the following line of code: Response.Redirect(Request.QueryString("Page"))
Once the user is registered, they should be able to log in successfully. But what about logging out? Although the need for such a mechanism might not be immediately obvious, it is valuable in some instances. 9.1.2.2 Logging outConsider an application that deals with sensitive information or is likely to be used from public computers. In such cases, you might want to provide the user with some way to log out to prevent others from accessing private information or accessing application resources using the user's account. In Forms authentication, this is quite simple. You call the static SignOut method of the FormsAuthentication class, as Example 9-4 illustrates. You would redirect users to Logout.aspx to accomplish the logout. You could also create a user control containing a button that, when clicked, calls the SignOut method and add that user control to all secured pages of your application. Example 9-4. Logout.aspx<%@ Page Language="VB" %>
<%@ Import Namespace="System.Web.Security" %>
<html>
<head>
<title>Logout Page</title>
<script runat="server">
Sub Page_Load(Sender As Object, e As EventArgs)
FormsAuthentication.SignOut( )
Message.Text = "You have been logged out."
End Sub
</script>
</head>
<body>
<asp:label id="Message" runat="server"/>
</body>
</html>
Example 9-5 shows the contents of the Users.xml file. This example shows how simple an XML file for this purpose can be. Example 9-5. Users.xml<?xml version="1.0" standalone="yes"?>
<Users>
<User>
<Email>andrew@aspnetian.com</Email>
<Password>816010E041FA485C6E2383C649343D3A0CAD4D25</Password>
</User>
</Users>
9.1.3 Passport AuthenticationThe Passport authentication module enables ASP.NET applications to take advantage of Microsoft's Passport universal sign-in infrastructure to authenticate users. The Passport system allows each user to have a single password and login (the email address associated with their Passport account) for multiple web sites or applications. This can greatly simplify the login process from the user's perspective, as well as reduce the administrative overhead associated with maintaining user accounts (such as having to send forgetful users their password via email). To enable Passport authentication in ASP.NET, you need to download and install the Passport SDK. See http://www.passport.com/business for instructions on where and how to obtain the SDK.
Once you've installed the SDK, you need to configure Passport according to the accompanying instructions. Finally, you need to configure the ASP.NET application to use Passport authentication, as shown in the following code snippet: <?xml version="1.0" encoding="utf-8" ?>
<configuration>
<system.web>
<authentication mode="Passport">
<passport redirectUrl="someLocalpage.aspx"/>
</authentication>
<!--
Other configuration elements
-->
</system.web>
</configuration>
Note that the <passport> element and the redirectUrl attribute are optional and are used to specify an internal URL to redirect to if the users making the request have not signed in using their Passport accounts. If the <passport> element is omitted, users who have not logged in using their Passport account will be redirected to a login page on a Passport login server. |
| [ Team LiB ] |
|
