Recipe 2.5 Display Multiple Pages of Information on One Form
2.5.1 Problem
You have a large number of
fields that you need to display on a form. If you place them all on
the form at once, it looks too complicated. You need some way to
group them by category and display only the ones that correspond to
each category as the user works through all the groups.
2.5.2 Solution
Access 97 introduced the native Tab
control, which is useful for organizing information into multiple
pages. Simply organize your fields into categories, creating one page
on the Tab control for each category.
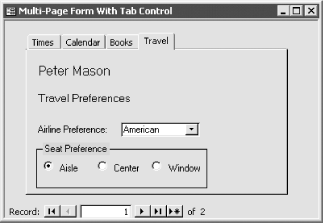
Load 02-05.MDB and open frmMain. This
sample form (shown in Figure 2-8) contains a Tab
control. By clicking on a tab, you cause one of the four possible
pages of the form to be displayed in the Tab control section.

To create
your own version of a multipage form, follow these steps:
Create the table and/or query on which you want to base your form
(tblSample in 02-05.MDB). Make sure your
data includes a primary key (ID in tblSample). Open your form (frmMain in 02-05.MDB) in
design view. Insert a Tab control on the form. Set at least the properties shown in Table 2-3 for
the form itself.
Table 2-3. Form property values for the main form, frmMain|
|
RecordSource
|
tblSample (or the name of your table or query)
| |
AllowAdditions
|
No
| |
ViewsAllowed
|
Form
| |
RecordSelectors
|
No
|
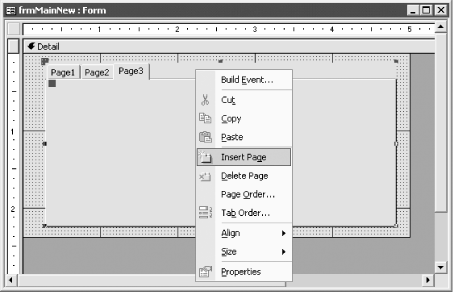
Right-click
on the Tab control to add two more tabs, so that there are a total of
four. Figure 2-9 shows the Tab control with the
right-click menu options. Note the other Tab control options that are
also available from the right-click menu. Give each tab one of the
following captions: Times, Calendar, Books, and Travel.

Add controls to each tab on the Tab control. Note that as you select
each tab, the background turns dark. This will cause the controls
dropped on that page to appear only on that page. To create a control that appears on all
of the pages, drag the control from the Field List to the form, not
the Tab control. If you then drag it from the form to the Tab
control, none of the tabs will be selected. This will cause the
control to appear on all of the pages. The Name text box will be
visible on every page of the Tab control. Set the Cycle property of the form to
Current Page, so that you won't move from record to
record by tabbing around the form. (See The Solution in Recipe 2.3 for more information on the Cycle property.)
To move from page to page on the Tab control, press Ctrl-Tab.
Ctrl-Shift-Tab will move you backward from page to page on the Tab
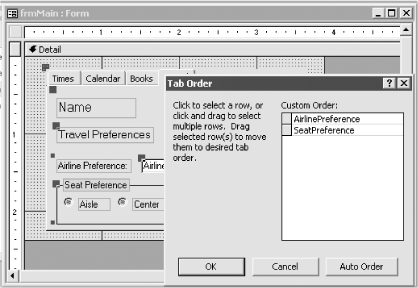
control. Use
the View  Tab Order dialog to set the tab order for the
controls on your form. To set the tab order inside of the Tab
controls, right-click on the page of the Tab control where you want
to set the tab order, and choose Tab Order. This will load the dialog
shown in Figure 2-10, where you can change the tab
order for the individual controls on that tab page. Tab Order dialog to set the tab order for the
controls on your form. To set the tab order inside of the Tab
controls, right-click on the page of the Tab control where you want
to set the tab order, and choose Tab Order. This will load the dialog
shown in Figure 2-10, where you can change the tab
order for the individual controls on that tab page.

2.5.3 Discussion
There are three other methods that you can use to create multipage
forms, but each of these methods requires more work than using the
Tab control:
You can create a continuous form with page
breaks in between the pages. If you open the form in dialog view, the
user will be prevented from maximizing the form. You can write code
utilizing the GoToPage method of the form to navigate from page to
page. You can use multiple subforms,
placing each of the subforms on the main form and setting all but one
of them to be invisible. In the AfterUpdate event of the option
group, you can make the current subform invisible and the new one
visible. This method can be cumbersome because working with long
multipage forms can be awkward. This method also consumes more system
resources than the method shown in this solution. You can create one subform
control and, in reaction to pressing buttons in the option group,
change the SourceObject property of the subform control. This is a
very "neat" solution, because
there's only one subform on the main form (as
opposed to four in the previous alternative). The drawback here is
that changing the SourceObject property is quite slow.
 |


