| [ Team LiB ] |
|
Recipe 2.6 Provide Record Navigation Buttons on a Form2.6.1 ProblemYou'd like to provide some mechanism for allowing users to move from row to row on a form, but you think the navigation buttons Access provides are too small and unattractive. Also, you can't control when the user can or can't move to another row. 2.6.2 SolutionAccess provides navigation buttons for you to use on forms, allowing you to move easily from row to row. However, you can neither move nor resize these buttons, and you can't change anything about their appearance. You can create your own buttons, place them on a form, and have each button use the GoToRecord macro action. Unfortunately, this has two drawbacks:
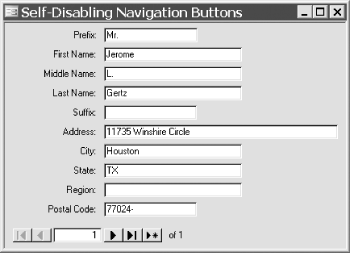
To avoid errors, you must use VBA. This solution demonstrates the steps you can take to add the appropriate code to your application so that navigation buttons will move you safely from row to row and shows how to disable the navigation buttons when they are unavailable. The form frmNav in 02-06.MDB (see Figure 2-11) works this way. You can load it and give it a try before attempting to build your own. Use the navigation buttons to move from row to row (there are only a few rows in the table so far). Note that, as you move around in the table, the appropriate buttons become enabled and disabled. Also try using the PgUp and PgDn keys. You'll see that the appropriate buttons still become disabled as necessary. Try entering a row number into the text box in the navigation controls; when you leave the text box, you will move to the selected row number. Figure 2-11. The frmNav form Follow these steps to include this functionality in your own applications:
2.6.3 DiscussionThis solution actually has three parts. The first part deals with the record navigation (Steps 1 through 8), the second part handles disabling the unavailable buttons (Steps 9 through 11), and the third part controls the direct movement to a specific row (Step 12). For each of the five buttons, you've attached code that will call a common procedure whenever you press the button, thus reacting to the Click event. For each button, the subroutine you call calls a procedure that handles all the motion. Clicking on the first button calls this code: Public Sub acbMoveFirst(frm As Form)
HandleMovement frm, acFirst
End Sub
which calls the HandleMovement procedure: Private Sub HandleMovement(frm As Form, intWhere As Integer) ' It's quite possible that this will fail. ' Knowing that, just disregard any errors. On Error Resume Next DoCmd.GoToRecord , , intWhere On Error GoTo 0 End Sub Every subroutine that calls HandleMovement passes to it a reference to a form and an Access constant that indicates to what row it wants to move (acFirst, acPrevious, acNewRec, etc.). HandleMovement disables error handling, so Access won't complain if you try to move beyond the edges of the recordset. HandleMovement then uses the GoToRecord macro action to go to the requested row. The second, and most complex, part of this solution handles enabling/disabling the buttons, depending on the current row. In Step 9, you attached a subroutine call to the form's Current event. This tells Access that every time you attempt to move from one row to another, Access should call this procedure before it displays the new row of data. This procedure, then, can do the work of deciding where in the recordset the current row is and, based on that information, can disable or enable each of the five navigation buttons. It also fills in the current row number and updates the display of the total number of rows. A discussion of the full acbHandleCurrent code is beyond the scope of this solution (you can find the fully commented code in basMovement). As part of its work, however, the code must determine whether the current row is the "new" row. The new row is the one you get to if you press the PgDn key until you're on the last row of data and then press the key once more (if your data set allows you to add rows). Access's NewRecord property tells you if you're on the new row. (See the Solution in Recipe 6.2 for more information on using this property.) To enable cmdNew once you've entered some data on the new row, the form's KeyPress event calls acbHandleKeys, as shown here. This code checks each keystroke, and if cmdNew isn't enabled and the form is dirty, the code enables cmdNew. Public Sub acbHandleKeys(frm As Form)
Dim fEnabled As Boolean
fEnabled = frm.cmdNew.Enabled
If Not fEnabled And frm.Dirty Then
frm.cmdNew.Enabled = True
End If
End Sub
To match the functionality of the standard Access navigation controls, the sample form reacts to the AfterUpdate event of the txtCurrentRow text box by moving to the row you've specified. The event procedure calls the acbMove subroutine, which does all the work. This procedure, shown later, does the following:
By equating the form's bookmark (a binary value, indicating the current row, whose exact contents are of no interest) and the recordset's bookmark, you make the form display the row that is current in the underlying recordset. If there is no current row (that is, if you've asked to go beyond the final row of data), an error occurs, and the code moves you directly to the new row on the form. The source code for acbMove is: Public Sub acbMove(frm As Form, ByVal lngRow As Long)
' Move to a specified row.
On Error GoTo HandleErr
Dim rst As DAO.Recordset
' Get a pointer to the form's recordset.
Set rst = frm.RecordsetClone
' Move to the first row, and then hop to
' the selected row, using the Move method.
rst.MoveFirst
If lngRow > 0 Then
rst.Move lngRow - 1
End If
' Finally, make the form show the
' same row as the underlying recordset.
frm.Bookmark = rst.Bookmark
rst.Close
Set rst = Nothing
ExitHere:
Exit Sub
HandleErr:
' If an error occurs, it's most likely that
' you requested to move to the row past the
' last row, the New row, and there's no bookmark
' there. If that's the error, just move
' to the New row programmatically.
Select Case Err
Case acbcErrNoCurrentRow
DoCmd.GoToRecord , , acNewRec
Resume Next
Case Else
MsgBox Error & " (" & Err & ")"
Resume ExitHere
End Select
End Sub
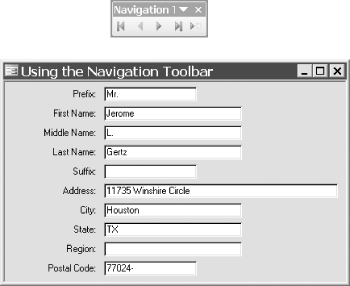
The code provided in basMovement makes it easy for you to move this functionality from one application to another just by hooking the correct form and control events. You can get similar results by creating your own toolbar and using the record navigation buttons that Access provides. A toolbar you create will control whatever form happens to be the current form. Figure 2-12 shows a form/toolbar combination in action. You'll need to decide for yourself which technique you like best. The toolbar approach is simpler, but it is difficult to move toolbars from one database to another, and they do clutter up the work area. You also have little programmatic control over the toolbars. Figure 2-12. A record navigation toolbar can replace navigation buttons on the form The sample form updates the display of the total number of rows in lblTotalRows every time you move from row to row. When you first open the form, Access may not yet know how many rows will be in the recordset, and the value returned in the recordset's RecordCount property may be inaccurate. You can move to the last row when you first open the form, forcing Access to find out how many rows there will be, but this can be slow if your form's recordset contains a large number of rows. Access continues to calculate as you use the form, and eventually it will supply the correct value in the RecordCount property of the form's recordset. The compromise is that the total number of rows may be incorrect until you use the form for a few seconds. If this bothers you, you can add to the form's Open event code that works like this: Dim rst As DAO.Recordset Set rst = Me.RecordsetClone rst.MoveLast For small recordsets, this will be fast but also unnecessary, because the RecordCount property will already be accurate. For large recordsets, this might take a few seconds to calculate and will make opening your form seem slower. 2.6.4 See AlsoFor more information on using DAO in Access databases, see How Do I Use Data Access Objects (DAO) in New Databases? in the Preface. |
| [ Team LiB ] |
|