| [ Team LiB ] |
|
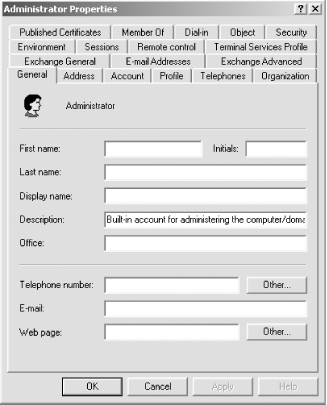
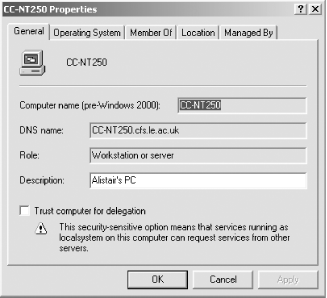
24.2 Customizing the Active Directory Administrative Snap-insFor those who have worked with Windows NT domains, you are undoubtedly familiar with two GUI tools: User Manager (usrmgr.exe) and Server Manager (srvmgr.exe). User Manager allows administrators to manipulate the properties of users and groups, while Server Manager can manipulate computer accounts. In Active Directory, a Microsoft Management Console (MMC) snap-in called Active Directory Users and Computers (ADUC) has taken the place of both these tools. While ADUC is built primarily to manage users, groups, and computers as the previous User Manager and Server Manager did, you can actually use it to manage any type of object within a Domain Naming Context. You can create an entire hierarchy of Organizational Units, user accounts, computer accounts, groups, printers, and so on and manage them with ADUC. The tool, however, is limited in what it provides "out of the box." While ADUC can display a lot of attributes for objects, you cannot view every attribute, as you can with ADSI Edit. Figure 24-3 shows the various groupings of attributes (e.g., Organization) that can be viewed by clicking the appropriate tab. Each tab represents a property page, which contains a logical grouping of attributes to display. Figure 24-3. Numerous property pages for a user object Now compare Figure 24-3 with Figure 24-4, which shows the property pages for a computer object. Figure 24-4. Significantly fewer property pages for a computer obj Figure 24-4 contains considerably fewer property pages. A computer object inherits from the user class and contains a few additional attributes of its own. So a computer could potentially have more information set on it than even a user object, but those attributes could not be viewed with the default ADUC. In many cases, you may want to modify ADUC to display additional attributes, perhaps even ones you've created. Continuing the schema extension example from the beginning of the chapter, let's say that you decide you want the myCorp-LanguagesSpoken attribute to be displayed in ADUC so others can view the languages a user speaks. Fortunately, the Active Directory snap-ins are largely customizable by modifying one or more attributes in Active Directory. You can also extend the functionality of a snap-in using WSH, VB, or any other COM-based language. The rest of the chapter is devoted to reviewing the components behind the Active Directory administrative snap-ins and how you can modify them to meet your needs. These components include:
24.2.1 Display SpecifiersDisplay specifiers are objects stored in Active Directory that contain information on how to display and manage objects for a specific object class through the Active Directory snap-ins. These display specifiers are held in the Configuration Naming Context under the DisplaySpecifiers container. Within the DisplaySpecifiers container, there is a container for each supported locale, in a path similar to this: LDAP://cn=409,cn=DisplaySpecifiers,cn=Configuration,dc=mycorp,dc=com The preceding container contains the display specifiers for the U.S./English locale of 409. If you wanted to create or manage display specifiers for a different locale, you just create a new container with the relevant hexadecimal code for the locale and populate it with the relevant display specifier objects. For example, 409 in hex represents 1,033 in decimal, and 1,033 is the U.S./English locale. If we created 809 (2,057 in decimal), we would get the U.K./English locale, and if we created 40C (1,036 in decimal), we would get the French locale. The currently installed locale values can be found in the registry at HKLM\SYSTEM\CurrentControlSet\Control\ContentIndex\Language. Having display specifiers per locale enables you to support a wide variety of languages for a geographically disperse client base. Each of the locale-specific containers contains a series of objects of the displaySpecifier class. The object names are in the form of ObjectClass-Display. The user class has one called User-Display, the computer class has one called Computer-Display, and so on. To extend the interface for a specific object class for a particular language, you just need to modify the appropriate attributes on the displaySpecifier object that represents the class in that container. Here's a simple example. The classDisplayName attribute exists on all displaySpecifier objects. Let's say we use the ADSI Edit tool from the Support Tools to open up the Group-Display object and change this attribute from Group to Moose. If we right-click on any container in the ADUC tool, a context menu normally appears, allowing us to create a new user, group, or Organizational Unit (among other things). After making the edit and reopening ADUC, it allows us to create a new User, Moose, or Organizational Unit. The way that the Group class was displayed in the interface has been changed. If we wanted to change the display specifier for the French locale as well as or instead of the U.S./English locale, we would go to (or create) the 40C container and apply the change to the Group-Display object. Let's now review some of the other customizations you can make. 24.2.2 Property PagesYou can see the array of property pages that exist for two objects in Figure 24-3 and Figure 24-4. You can add property pages to these and display your own here. For this to work, though, the property page has to exist as a Component Object Model (COM) object that supports the IShellExitInit and IShellPropSheetExt interfaces. This means that the property page has to be created first in Visual Basic, Visual C++, or something similar. Creating the object is the hardest part. Actually telling the system to use it is easy. Once the property page COM object exists, it will have a Universally Unique Identifier (UUID). You then use ADSI Edit to go to the display specifier object representing the class that you wish to modify and alter the adminPropertyPages or shellPropertyPages attributes. These attributes are multivalued and store data in the following form: 2, {AB4909C2-6BEA-11D2-B1B6-00C04F9914BD}
1, {AB123CDE-ABCD-1124-ABAB-00CC4DD11223}
The first item represents the order number in which the sheets should appear. The second represents the UUID. A third optional parameter can be used to store extended information, such as data passed to the property page as it is displayed. To add your own property page to a class, you edit either the Shell or Admin property page attribute, depending on whether you want the default (shell) or administrator UI to be modified, and add in a line like the preceding form. It really is that simple. You can even modify the existing pages, if any exist, and resequence them to your liking. 24.2.3 Context MenusWhen you right-click an object in the ADUC tool, a context menu pops up. You can add your own entries to this context menu. Context menu items are held in the shellContextMenu attribute for the default UI and adminContextMenu attribute for the admin UI in each displaySpecifier object. Items that should appear in both go into the contextMenu attribute. The items that you add to the context menus can launch an application or create an instance of a COM object. The data takes the following form in the relevant attributes: 1,Extra &Data..., E:\MYPROG.EXE
2,&Extended Attributes...,C:\MYSCRIPT.VBS
3,{DB4909C2-6BEA-11D2-B1B6-00C04F9914BD}
Notice that the last item is a COM object. It is denoted by its UUID. The COM object must have been created to support the IShellExtInit and IContextMenu interfaces. Extra data can be passed to the COM object by including it as a third parameter on the line. The former two items are much more important to administrators. Here you can see that we added two extra items to the menu. These items are an executable program and a VBScript script. Any type of application is valid. The second parameter is the string you want to appear on the context menu. Use of an ampersand (&) character before a letter denotes that letter as the menu selector. Thus, when the menu is being displayed, typing "d" selects the first option, and "e" selects the second. Being able to add scripts and programs to a context menu is a very powerful capability. Couple these scripts and programs with ADSI, and you have a way of extending the snap-ins Microsoft provides to deliver completely customized functionality based on your business or organizational needs. For example, let's say that you wish to extend the schema and include a new, optional myCorp-LanguagesSpoken attribute for the User class. You can go to the User-Display object for the appropriate locale and modify the Context-Menu attribute (so it is available to both users and administrators) to include an ADSI script that displays that attribute in a message box. The following code is all that is needed: Set wshArgs = WScript.Arguments
Set objUser = GetObject(wshArgs(0))
MsgBox objUser.Get("myCorp-LanguagesSpoken"),,"Languages Spoken"
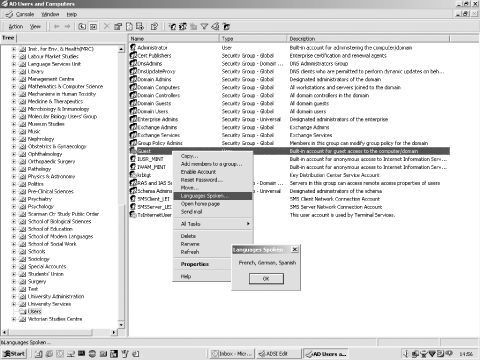
The script does nothing more than bind to the object's ADsPath that is passed in as an argument to the program, and print out the attribute in a MsgBox with an appropriate title, as shown in Figure 24-5. Figure 24-5. Looking at the languages spoken for a user The Guest user object was right-clicked, which popped up a context menu that includes Languages Spoken. You can see that it is actually the string "&Languages Spoken..." being displayed if you look at the text in the bottom left-hand corner of the window. When we click the item or press the L key, a dialog box generated by the script is displayed on the screen. Normally the dialog box and the context menu would not be displayed together, but we have done so in this screen to show you the process. You could also write a script or program that allowed you to modify the LanguagesSpoken attribute and have it appear only on the administrator's context menus. Then you can use the ADUC tool to manage your users and this extra attribute, without ever needing to actually develop an entirely new interface if you don't want to. 24.2.4 IconsWhen you look at a container of objects in ADUC, it shows you an icon for each object appropriate to the specific object class for that object. The icons for Organizational Units look different than those for containers, users, and printers, for example. The icon can actually be used to represent different states of that object. For example, if you disable a user or computer object, the icon is changed to indicate that the object is disabled. All in all, 16 different state icons can be defined for any object class. The first three represent the states closed (the default state), open, and disabled; the last 13 are currently undefined and left for your own use. To modify the icon for an object class, simply use the Icon-Path attribute to store multivalued data of the following form: 0, c:\windows\system32\myicon.ico 1, c:\windows\system32\myicons.dll, 0 2, c:\windows\system32\myicons.dll, 2 3, c:\windows\system32\myicons.dll, 7 This sets the first four icon values. Remember that 0 is closed, 1 is open, and 2 is disabled; 3 through 15 are undefined. The first one uses a proper icon file with an ICO extension and so doesn't need a third parameter. The last three use the first (0), third (2), and eighth (7) icons from MYICONS.DLL, using an index for the set of icons held in the DLL, starting at 0. The icon path has to exist on the local machine for any client to properly display the icon. Remember to take that into account, since you may need to deploy the icon files to all clients in an enterprise if they are to display the icons properly. 24.2.5 Display NamesAs shown earlier, you can alter the way that both class and attribute names appear within a GUI. If you want to change the class name, change the text in the classDisplayName property of the relevant displaySpecifier object. If you want to change what attributes names appear as, then you need to modify the multivalued attribute attributeDisplayNames. Attribute values take the form of a comma-delimited string as follows: mobile,Mobile Number physicalDeliveryOfficeName,Office Location extensionAttribute1,My First Extended Attribute The first value is the LDAP name corresponding to the attribute in the schema, and the second is the name that it is to be displayed as. Note that you shouldn't insert a space between the comma and the second value unless you want the name to be preceded by a space. 24.2.6 Leaf or ContainerWhen you view objects in the ADUC, some display as containers and some display as leaf objects. Most objects that you are concerned with actually act as containers, even if you see them displayed as leaf objects. Take a printer on a computer, for example. If that printer is published as a printQueue object to Active Directory, the object is located as a leaf object within the computer object that it is published on. The computer object acts as a container for any print queues that it publishes. User, computer, and group objects by default do not display themselves as containers. ADUC in fact has an option on the View menu to change this, called "View users, groups, and computers as containers." However, all objects get treated in this fashion, and you can modify any object's default setting by going to the displaySpecifier and changing the Boolean value of treatAsLeaf to true or false as required. 24.2.7 Object Creation WizardWhen you create a user, group, or Organizational Unit, ADUC presents a simple wizard to allow you to specify the relevant data for that object. It is possible for administrators to modify the default behavior in one of two ways. Administrators can replace the existing wizard entirely, if one exists, or they can just add extra pages to the wizard. Only one wizard can ever exist, so you either create a new one or modify the existing one. Let's say that you made the myCorp-LanguagesSpoken attribute a mandatory attribute for the User class. This forces you to define a value for myCorp-LanguagesSpoken for all new users at creation time. As the existing User creation wizard does not allow data to be input for this attribute, you can replace the entire wizard with a new one of your own, or you can place a new page into the wizard to receive data on this attribute. With property pages we need to create new wizards or creation wizard extensions (extra pages to existing wizards) as COM objects that support the IDsAdminNewObjExt interface. New wizards that replace the default wizards in use by the system are known as primary extensions, and they replace the core set of pages that would be used to create the object. Primary extensions support creation wizard extensions; you can define a primary extension for all users, for example, and later add a couple of extra pages using a creation wizard extension if you require. If you are replacing the wizard entirely with a primary extension, modify the creationWizard attribute of the relevant displaySpecifier object to hold the UUID of the COM object. If you are just providing creation wizard extensions, you specify the order that the pages should appear, followed by the UUID in the createWizardExt multivalued attribute. The format is the same as for property pages. |
| [ Team LiB ] |
|