| [ Team LiB ] |
|
24.5 AppleScript StudioAppleScript Studio is a free development environment from Apple allowing you to write Cocoa applications using the AppleScript language. It would require an entire book to discuss AppleScript Studio adequately, so this section just explains how AppleScript Studio works, talks about its learning curve, and provides a brief illustration of AppleScript Studio in action. To begin at the beginning, we must be clear on what Cocoa is. 24.5.1 CocoaCocoa is the name of a massive application framework included as part of Mac OS X. This framework knows how to do all the things that an application might typically wish to do. For example, it can put up windows, and in them it can display many different kinds of interface widgets for interacting with the user. It also provides very strong text capabilities and good graphics capabilities. Cocoa is a really great application framework, and makes it quite easy to write sophisticated, powerful applications. Cocoa applications can also be relatively small, because much of the work is done by the framework, which is part of the System and not present in the application itself. 24.5.2 How AppleScript Studio Relates to CocoaCocoa is very big, and to use it fully one should learn the Objective-C language and study the framework as a whole. Objective-C is not hard, but the framework is big, and the effort involved is more than some will wish to make. Furthermore, AppleScript users are in rather a special position; you might easily have a script that works already, but would be enhanced by adding some user interface that is more sophisticated than AppleScript on its own is able to provide. So you don't want to learn all of Cocoa; you just want to leverage your existing script into a Cocoa application. AppleScript Studio provides a way out of these difficulties, making it possible for the user to wrap a Cocoa interface around AppleScript functionality with relative ease. Cocoa is full of interface widgets and classes and objects, and it works through predefined messages that the programmer's code must be prepared to send and to receive in order to interact with the framework. For example, suppose there's a button in a window. If the programmer wants that button to change from being enabled to being disabled, there's a specific message that the programmer's code must send to the button; the connection between the programmer's code and the button is called an outlet, and it is up to the programmer to define this outlet and to know about the specific message that must be sent to change the button's enabled state. If the programmer wants to know when the user presses this button, the programmer's code must be prepared to receive a particular message that the button will send; the connection between the button and the programmer's code is called an action, and it is up to the programmer to define this action and to know what sort of information will arrive when the button is pressed. Furthermore, many events that take place over the lifetime of an application trigger other kinds of events that the programmer's code can register to receive, through mechanisms called delegation and notification. This is all very big stuff, and the documentation for it requires a lot of space on your hard drive. AppleScript Studio itself, however, is quite small and light. It simplifies the programmer's view of Cocoa tremendously. In part, this is because it provides direct access to only a fraction of Cocoa's full power. But this is a deliberate design decision on the part of the Apple folks, and it's a good thing; if AppleScript Studio were too big and complicated, your eyes would glaze over and you'd never use it. The link between AppleScript and Cocoa is accomplished behind the scenes by means of special glue code—you talk to AppleScript, and AppleScript turns what you say into Objective-C and passes it on to Cocoa. This linkage between AppleScript and Cocoa is often referred to as a bridge. So we may say that the Apple folks have bridged AppleScript to a certain area of Cocoa. Furthermore, in the area where the Apple folks have bridged AppleScript to Cocoa, they have made Cocoa a lot easier to use than if you did it through Objective-C. You don't have to know about outlets and actions and delegation and notification, because that's all taken care of for you by AppleScript Studio and the bridging code. The consequence is that if your aims are restricted in the right way, if what you want to do with Cocoa from AppleScript lies within the scope of what is bridged, you can actually write a Cocoa application much more quickly and easily with AppleScript Studio than an Objective-C programmer could. 24.5.3 How Much Cocoa to LearnIn theory, it is perfectly possible to use AppleScript Studio without knowing any Cocoa at all. You simply confine yourself to the AppleScript language and to what the AppleScript Studio manual and dictionary tell you about the sorts of things you can say, and you can build a Cocoa application. However, if you don't know any Cocoa at all, you might still be a little mystified about what's happening, and about how to achieve the effects you envision for your interface. In my opinion, therefore, the best way to climb the AppleScript Studio learning curve is to know at least some Cocoa. You will have a better sense of what's going on in AppleScript Studio, and you'll be able to use it with greater facility, the more you know about Cocoa itself. I'm not saying you should learn all of Cocoa; I'm merely suggesting that you should acquire some familiarity with the location of the Cocoa documentation on your hard drive, and that you might wish to have on hand a couple of good Cocoa books. Furthermore, if you do know some Cocoa, you can do much more with AppleScript Studio than if you don't. That's because it's quite possible to find your programming desires banging up against a region where AppleScript is not bridged to Cocoa. At that point, you're going to find yourself in difficulties; and you can solve these difficulties only by giving up some of your desires, or else by learning some Cocoa and crossing the bridge yourself. You can do this by calling from AppleScript into Cocoa explicitly, perhaps even writing some of your application's code in Objective-C. Many AppleScript Studio users seem to feel daunted or even insulted by the fact that there are areas of Cocoa that AppleScript Studio does not hand them on a silver platter. They think that AppleScript Studio should be "pure," and that they should not need to get their hands dirty by using any Objective-C or even knowing what Cocoa is really up to behind the scenes. In my view, though, it's better to get things done with AppleScript Studio than to waste time and energy complaining about it; and that's just what knowing some Cocoa has allowed me to do. You don't have to adopt my philosophy in this matter, but I offer it for what it's worth. 24.5.4 Where and What Is AppleScript StudioAppleScript Studio is like Los Angeles: it isn't actually anywhere. It isn't the name of a thing or a place; it's the name of a collection of things used in a certain way. So now we're going to talk about what those things are. 24.5.4.1 The Developer ToolsStep one in finding AppleScript Studio is to make sure it is present in the first place. If you haven't installed the Developer Tools, it isn't. The Developer Tools are on the mysterious extra CD that comes with some Mac OS X installers; but it is crucial to have the latest version, so the best way to get the Developer Tools is from Apple's site. First, you need to become a member of the Apple Developer Connection. You can join at the Online level, which is free (see http://developer.apple.com/membership/online.html). Then follow the links to the ADC Member Site and find the latest version of the Developer Tools. You can download them, if you have the bandwidth. Alternatively, it is possible to request the latest Developer Tools CD for a small fee. Then run the installer. The Developer Tools must be installed on your Mac OS X startup disk. 24.5.4.2 Interface BuilderIn /Developer/Applications is an application
called Interface
Builder .
This is the program you will use to design your
application's interface. Basically, you will draw
the interface you want. You can experiment with Interface Builder if
you like; start it up, choose the Cocoa Application starting point
and press the New button, and presto, you've got a
window. Press 24.5.4.3 XcodeAlso in /Developer/Applications is an application called Xcode (formerly known as Project Builder). This is the heart of the Cocoa development process. It is where you edit your code; it is also where you turn your code into an actual application. You can use Xcode whether you are writing a Cocoa application or an AppleScript Studio application, and it supports many other kinds of project as well. What makes your project an AppleScript Studio application, in particular, is that you say so when you create the project. The fact that you design your interface in one application but edit your code and build the application in another is a tricky aspect of the Cocoa development experience, and takes some getting used to. For the most part the two applications communicate with one another in a reliable manner, but it's easy to confuse yourself, and it's possible to confound the connection between Interface Builder and Xcode. It is best to work on only one project at a time, to have both Interface Builder and Xcode running, and to hide whichever of them you're not using at that moment. 24.5.4.4 AppleScript Studio documentation and examplesThe documentation for AppleScript Studio is in /Developer/Documentation/AppleScript. It consists of two books. One is an extended tutorial, well worth going through with your hands on the computer; it's in Conceptual/StudioBuildApps. The other is a reference manual, in Reference/StudioReference. You should probably skim the reference manual once at the outset and then be prepared to consult it pretty much constantly as you work. There are also lots of AppleScript Studio examples in /Developer/Examples/AppleScript Studio, which explore and demonstrate just about all aspects of using AppleScript Studio to drive the user interface. Cocoa itself is documented starting in /Developer/Documentation/Cocoa. In the Conceptual/ObjectiveC folder is a splendid book about the Objective-C language. The file Cocoa.html is the major gateway to the Cocoa documentation. Among other things, it functions as a table of contents to a large number of highly readable, topic-oriented documents. These will prove helpful even to the AppleScript Studio programmer. For example, if you want to understand what a button really is, the different ways it can appear and behave, how it fits into the class architecture, and what it has to do with controls and cells, you'd click the "User Experience" link and from there you could read the "Buttons" document and the "Controls and Cells" document. The nitty-gritty Cocoa reference material appears in Cocoa.html under "API Reference." The part you're likely to be interested in is the link that says "Application Kit Reference for Objective-C." This is where you would come to find out about all the Cocoa methods to which a built-in class responds. For example, if you wanted to know about buttons in the way that a Cocoa programmer knows about them, you'd go to "Application Kit Reference" and then "NSButton" (the Cocoa name for the button class) and read through this document, along with the chain of documents listed at the top about the classes from which NSButton inherits, namely NSControl, NSView, NSResponder, and NSObject (because anything they can do, NSButton can do too). You can also get to this document directly; it's in Reference/ApplicationKit/ObjC_Classic/Classes. Before you dismiss out of hand the idea that you, an AppleScript programmer, would ever want to read any of the Cocoa reference documentation, consider that, in general, everything you do with AppleScript Studio is a bridged version of something you could do with Cocoa, so that the Cocoa reference can function as a guide to what you're really doing. For example, the discussion of setState: in the Cocoa "NSButton" documentation is much clearer on what button "state" is all about than is the AppleScript Studio reference. 24.5.4.5 The dictionaryThe bridge between AppleScript and Cocoa is implemented partly through files located in /System/Library/Frameworks/AppleScriptKit.framework/Resources. Of these, the most important to you will be AppleScriptKit.asdictionary. This is the dictionary through which you will access the bridge terminology, the vocabulary that will allow you to talk to Cocoa. To examine it, just double-click it in the Finder, and it will open for reading in the Script Editor. (You don't have to find the dictionary like this every time; it also appears within your AppleScript Studio project in Xcode, as shown in Figure 24-2.) You'll see that this dictionary is full of exactly the terms that the AppleScript Studio reference document is all about. Your job as an AppleScript Studio programmer is to harness these terms. This is how your AppleScript code will communicate with interface items, and how interface items and other Cocoa classes will communicate with your AppleScript code. To understand what's going on in AppleStudio you will in general be using a combination of this dictionary, the AppleScript Studio reference documentation, and Interface Builder. The dictionary alone is inadequate for understanding how to communicate with Cocoa. As I mentioned earlier, Cocoa works in part through sending action messages, delegation messages, and notification messages to your code so that you can react to things that the user does, and to other things that happen during the lifetime of your application. In the dictionary, all these types of messages get lumped together, along with the messages that you can send to Cocoa, as events. You can't tell, just from looking at an event listing in the dictionary, whether this is something you say or something Cocoa will say to you. If it's something Cocoa will say to you, you can't tell from the dictionary precisely who will say it and when, and why you might want to put yourself in a position to listen. Thus you need the help of the documentation, and also of Interface Builder, which shows you what messages can be sent and received in connection with each widget of your interface. 24.5.5 AppleScript Studio ExampleFor our example, we'll return to the code developed in Section 23.1. In that code, we allow the user to enter search terms; we then go online to tell the TidBITS search engine to look for those terms. We receive some HTML that lists the pages found, we parse the HTML, and we present the results to the user. We have already developed some AppleScript code and some Perl code that work together to accomplish this task. Now we will embed this code in an application as a way of presenting the user with a nice interface. This is the sort of purpose for which AppleScript Studio is particularly appropriate: we already have some working AppleScript code, and now we want to leverage it and make it more comfortable to use by putting a Cocoa interface in front of it. The finished application is shown in action in Figure 24-1; the user has just searched for all TidBITS articles written by a certain favorite author. Figure 24-1. Our AppleScript Studio application in action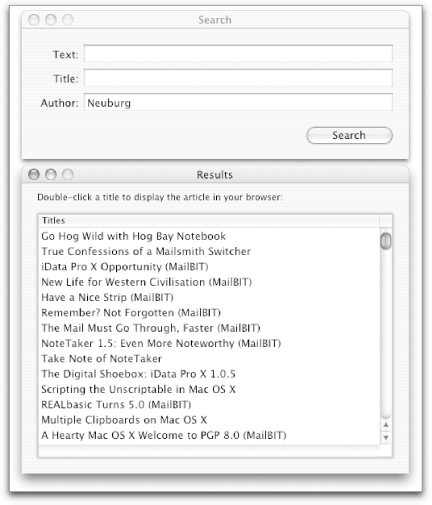 My goal in what follows is not to teach you AppleScript Studio, nor to provide a hands-on step-by-step tutorial, nor even to show you the entire learning and development process for this particular example. I wish simply to highlight some aspects of the solution that are significant and typical, so that you gain some understanding of the workings of the whole, and a sense for what sorts of effort are generally involved in using AppleScript Studio to wrap a Cocoa interface around a script. 24.5.5.1 Create the project The first step is to create the
project, in Xcode. Choose File 24.5.5.2 Incorporate extra bundle componentsA Cocoa application is a bundle, meaning it's a folder that looks (in the Finder) like a single file. This means that we can store inside the application any ancillary files that it may require, such as images, help documentation, and so forth, and the user will not come into direct contact with these ancillary files or even be aware that they exist. It happens that in this case we have such an ancillary file—the
Perl script. To incorporate the Perl script, choose Project
Figure 24-2. Project window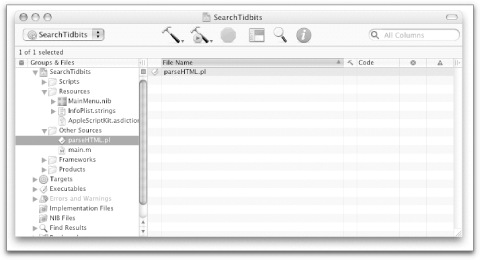 24.5.5.3 Create the interfaceThe next step is to create the interface. This is done by double-clicking MainMenu.nib in the project window (Figure 24-2). This opens Interface Builder; Interface Builder now knows it is dealing with an Xcode project, and coordinates its editing operations with Xcode. My design for the interface consists of two windows. The first, the Search window, contains an NSForm displaying three fields the user can search on (text, title, and author) and a Search button, along with a progress indicator to provide feedback while we're talking to the Internet. The design is shown in Figure 24-3; the square thing in the lower left is the progress indicator (I'll explain later why it looks this way). Figure 24-3. Search window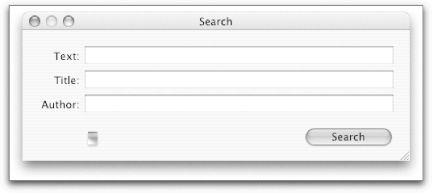 The second window, the Results window, contains a single-column table for displaying the titles of the found articles, along with some explanatory text telling the user what to do. The design is shown in Figure 24-4. Figure 24-4. Results window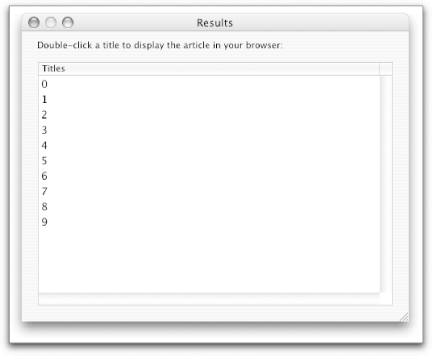 The last piece of the interface is the menus. Here I make two main changes. I remove the File menu and replace it with a Search menu consisting of a single menu item, New. And I add a Close menu item to the Window menu. The menu bar design is shown in Figure 24-5, displaying the Search menu. Figure 24-5. The menu bar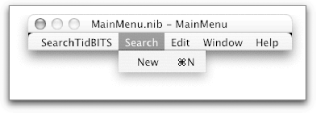 24.5.5.4 Add AppleScript names and handlersNow comes the really interesting part.
We will work in the AppleScript pane of the Interface Builder info window, which
is shown when you select an interface item and press
First, it lets you give the interface item an AppleScript name. This is the name that will be used in your AppleScript code to refer to the item by name when forming an element specifier. So, for example, although the Search window has a title "Search," this is merely a matter of its appearance; it is not something you can use as an element specifier. The key step is to select the window and give it an AppleScript name (I call it search) in the info window. This is shown in Figure 24-6. Figure 24-6. Info for the Search window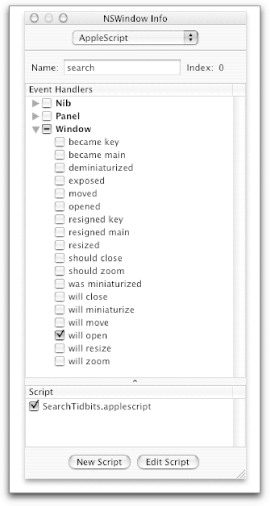 The other thing you do in the info window (also shown in Figure 24-6) is to explore and specify the notifications you wish to receive from this interface item. You'll recall that I said you'd be using Interface Builder to supplement the dictionary; I was referring to this. The Interface Builder info window lists the messages that the selected interface item is prepared to send to your code. As you design your application in Interface Builder, you select an interface item, look at the list of its events in the info window, look them up in the documentation, and think about which of them your code might need to receive. Then you use the checkboxes in the info window so that you do receive them. You check an event in the upper pane of the info window, and also check the name of the Xcode script file in the lower pane of the info window. In this example, we have only one script file, which has been created for us automatically; it is called SearchTidBITS.applescript. Checking the two checkboxes causes the correct handler to be created in the script when you save the Interface Builder file. So now I'm going to run through the interface items of my project, giving some of them names and deciding what notifications I want to receive from each of them:
24.5.5.5 The codeWe are now finished with Interface Builder, and it's time to work on our AppleScript code. To access the code, just click the Edit Script button in the info window in Interface Builder. This causes Xcode to come to the front and to open the script file for editing. As you can see, the handlers that we specified in Interface Builder have been created. The terminology for these events is defined by the AppleScriptKit dictionary, so no parentheses appear in the first line of the handler definitions: on will open theObject
(*Add your script here.*)
end will open
on launched theObject
(*Add your script here.*)
end launched
on choose menu item theObject
(*Add your script here.*)
end choose menu item
on clicked theObject
(*Add your script here.*)
end clicked
on double clicked theObject
(*Add your script here.*)
end double clicked
Our task in Xcode is now to fill these in, and to add any further handlers of our own. Let's take a tour of the final code. I'll comment on what each part of the code does and on the various points about AppleScript Studio that it demonstrates. Example 24-1 shows some top-level globals and the launched handler generated by the File's Owner object in Interface Builder. There is no particular reason for preferring script properties over global variables except as a matter of convenience: with script properties, I don't have to take any explicit action to initialize them. The globals L1 and L2 will be needed for maintaining state and communicating information between handlers. This use of globals is quite common in AppleScript Studio. It's true that as a rule I don't favor using globals for passing information around, but in the case of an application we have no choice, because different handlers will be called at different times, with our application lying idle in between, and during those idle periods we need a place to store information where the next handler to be invoked will be able to find it. The global perlScriptPath is really more like a script property, since I want to initialize it at startup and leave it alone after that, but I can't actually make it a script property, because in order to initialize it, I need to run some code after the application has started up. That code is what's in the launched handler. Example 24-1. Globals and launched handlerproperty textSought : ""
property titleSought : ""
property authorSought : ""
global perlScriptPath
global L1
global L2
on launched theObject -- app started up, do initialization tasks
set f to resource path of main bundle
set perlScriptPath to POSIX path of POSIX file (f & "/parseHTML.pl")
set perlScriptPath to quoted form of perlScriptPath
end launched
The launched handler will be called when the application starts up. Thus it is our earliest opportunity to perform initializations. The handler takes one parameter, theObject; this is the interface object that sent the event to our code. It happens that in this particular case I checked the launched event in Interface Builder for just one object, the File's Owner; so I know perfectly well what theObject is, and I don't bother with it. (In a moment we'll come to a spot in the code where we need to be more circumspect.) My launched handler initialization involves setting the value of the global perlScriptPath, which is the path to the Perl script inside our application bundle. I will want to call this Perl script later, so I'll need to know where it is so I can tell Perl about it. The path is not known in advance, because the application bundle could be anywhere on the user's hard drive. The application object provides a main bundle property representing the application on disk, whose resource path property is the path to the Resources folder inside the application bundle. That's where the Perl script will be when the application is built, so I can use this information to construct a Unix path to the Perl script. The path needs to appear in its quoted form because it will be used as a command-line argument in a do shell script command. Example 24-2 shows the on will open handler. This was created by the Search window, and will be called just before the window opens. Since I know this, I don't bother checking the value of theObject; I simply assume it is the Search window. Example 24-2. The on will open handleron will open theObject -- search window opening, set prog indic
set p to progress indicator 1 of theObject
call method "setStyle:" of p with parameter 1
call method "setDisplayedWhenStopped:" of p with parameters {false}
end will open
The purpose of this handler is partly practical and partly pedagogical. The practical side is that I want to adjust some features of the progress indicator before the window appears. I don't actually have to do this in code, but that's where the pedagogical side comes in: I wanted an excuse to show you how one bridges between AppleScript and Cocoa when the bridging has not been provided by the Apple folks as part of the AppleScriptKit dictionary. It's done with the call method command. This command allows just about any Objective-C method to be translated into AppleScript. In this case, we wish to use code to set the progress indicator to be a spinning progress indicator. AppleScript Studio has not provided the progress indicator object with any properties that let us do this. But in Objective-C Cocoa it's easy to do. Looking in NSProgressIndicator.html, we find that we would like to say the equivalent of this Objective-C code: [theProgressIndicator setStyle: NSProgressIndicatorSpinningStyle]; [theProgressIndicator setDisplayedWhenStopped: NO]; The two call method commands in Example 24-2 are the exact equivalents of these two lines of Objective-C. Now, I'm not saying that arriving at these equivalents requires no thought; but it isn't very difficult either. The AppleScript Studio documentation tells you what to do. If an Objective-C method has a colon in its name, that colon must appear in the name as quoted in the call method command; also, Objective-C method names are case-sensitive, so we must get the case right. The only slightly difficult part of translating these particular methods was arriving at the parameter value to represent the constant NSProgressIndicatorSpinningStyle. This is actually an integer value, and in order to pass it from AppleScript I had to find out what that integer is. To do so, I looked in the header file NSProgressIndicator.h; one convenient way to open this file is directly from the project window, as shown in Figure 24-7. Figure 24-7. Accessing headers from the project window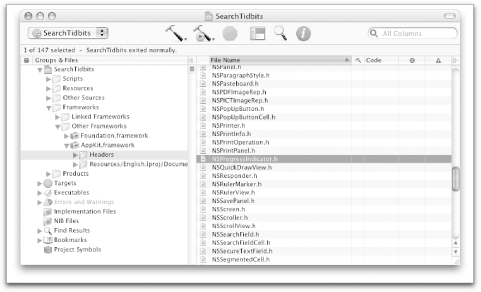 Example 24-3 shows the choose menu
item handler. This handler was generated both by our Search
Example 24-3. The choose menu item handleron choose menu item theObject
set which to (name of theObject)
if which is "newSearch" then
hide window "results"
show window "search"
tell matrix 1 of window "search"
set string value of cell 1 to ""
set string value of cell 2 to ""
set string value of cell 3 to ""
end tell
else if which is "closeWindow" then
hide window 1
end if
end choose menu item
Thus, in our choose menu item handler, we do two different things, depending which menu item it is. This is why we gave the menu items names—it was so that we could easily distinguish them at this point. If it's the newSearch menu item, we show just the Search window and empty the NSForm, ready for the user to enter new values for a new search. If it's the closeWindow menu item, we close the frontmost window. Example 24-4 shows the clicked handler. This is created by the Search button, and will be called when the user clicks it. This, obviously, is the heart of our application. To make the code clearer, I've broken the functionality out into some ancillary handlers. Example 24-4. The clicked handler and associated utilitieson clicked theObject
if name of theObject is "searchButton" then
startNewSearch( )
end if
end clicked
on startNewSearch( )
tell matrix 1 of window "search"
set textSought to string value of cell 1
set titleSought to string value of cell 2
set authorSought to string value of cell 3
end tell
urlEncodeStuff( )
doTheSearch( )
end startNewSearch
on urlEncode(what)
set text item delimiters to "+"
return (words of what) as string
end urlEncode
on urlEncodeStuff( )
set textSought to urlEncode(textSought)
set titleSought to urlEncode(titleSought)
set authorSought to urlEncode(authorSought)
end urlEncodeStuff
The clicked handler simply calls the startNewSearch handler. The startNewSearch handler copies the three user entries from the NSForm into the three script properties set aside for them, and calls urlEncodeStuff to URL-encode them in our simple-minded way (replacing any spaces with plus signs). It then calls the doTheSearch handler, which is shown in Example 24-5. In Example 24-5 we first have a handler, feedbackBusy, which is intended purely to provide some user feedback. The idea is that we're going to be talking to the Internet by way of curl, and while we're doing so, nothing is going to be happening. The user might think that the application is idle or broken. Therefore we spin the progress indicator and disable the Search button to give the user a sense that the application is busy and that he should keep his hands off while it does whatever it's doing. The handler is called with a boolean parameter telling whether to begin or end this feedback. Example 24-5. The doTheSearch handleron feedbackBusy(yn)
tell window "search"
if yn then
set enabled of button "searchButton" to false
start progress indicator 1
else
set enabled of button "searchButton" to true
stop progress indicator 1
end if
end tell
end feedbackBusy
on doTheSearch( )
set d to "'-response=TBSearch.lasso&-token.srch=TBAdv"
set d to d & "&Article+HTML=" & textSought
set d to d & "&Article+Author=" & authorSought
set d to d & "&Article+Title=" & titleSought
set d to d & "&-operator"
set d to d & "=eq&RawIssueNum=&-operator=equals&ArticleDate"
set d to d & "=&-sortField=ArticleDate&-sortOrder=descending"
set d to d & "&-maxRecords=2000&-nothing=MSExplorerHack&-nothing"
set d to d & "=Start+Search' "
set u to "http://db.tidbits.com/TBSrchAdv.lasso"
set f to "/tmp/tempTidBITS"
feedbackBusy(true)
try
do shell script "curl -s --connect-timeout 15 -m 120 -d " ¬
set r to do shell script ("perl " & perlScriptPath & " " & f)
feedbackBusy(false)
set L to paragraphs of r
set half to (count L) / 2
set L1 to items 1 thru half of L
set L2 to items (half + 1) thru -1 of L
displayResults( )
on error
feedbackBusy(false)
beep
end try
end doTheSearch
At last we come to doTheSearch. This should seem astoundingly familiar; it is almost unchanged from the first part of the code in Section 23.1. The main differences are as follows:
If all goes well, the Perl script has now parsed the HTML results from our curl call, and we proceed to the next step, which is to display the parsed results to the user. This is done by calling the displayResults handler, which is shown in Example 24-6. We have, at this point, two lists in global variables: L1 is a list of the URLs of the found articles, L2 is a list of their titles. We proceed to load L2 into the table view of the Results window, and then show the window. The code itself is almost exactly the same as the code we used to accomplish the same task in Section 2.6. Example 24-6. The displayResults handleron displayResults( )
set ds to make new data source at end of data sources
set tv to table view 1 of scroll view 1 of window "results"
set col to make new data column at end of data columns of ds ¬
repeat with aName in L2
set aRow to make new data row at end of data rows of ds
set contents of data cell "titles" of aRow to aName
end repeat
set data source of tv to ds
show window "results"
end displayResults
The chain of events started by the user pressing the Search button has now ended; the application is idle, and the user is confronted with the Results window containing a list of titles in its table view. If the user double-clicks a line of the table view, our on double clicked handler is called; it is shown in Example 24-7. We assume that theObject is the table view, and we find out the index of the row that the user clicked. We then, just as at the end of the original code in Section 23.1, use this index number to get the corresponding URL from L1, and hand this off to the open location scripting addition command to be opened in the user's preferred browser. Example 24-7. The on double clicked handleron double clicked theObject -- user double-clicked in results table
tell theObject
set r to clicked row
if r
24.5.5.6 Final stepsWhen you have designed and saved your
interface in Interface Builder, and when you have written your code
in Xcode, you can try out the application by choosing Build
Figure 24-8. Changing build styles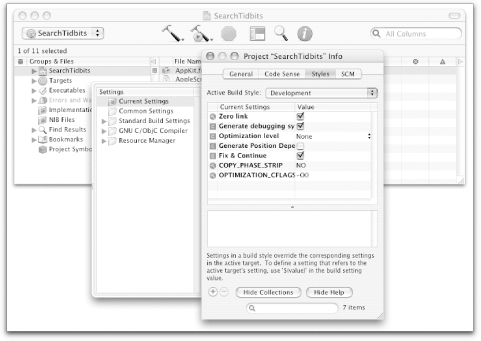 24.5.5.7 ScriptabilityA pleasant consequence of writing an AppleScript Studio application is that the resulting application is scriptable. It's as if the AppleScriptKit dictionary were your application's dictionary, so the way you talk to the application from outside (driving it from a script) is much the same as the way you talk to it from inside (writing the application's own code). This facility can be used to script your finished application, and it can also be used to explore your application during the development process; in other words, you can use the Script Editor together with Xcode as part of your arsenal of development tools. For example, suppose I've forgotten the AppleScript name of the Search button in the Search window. I could figure it out by looking in Interface builder, but another way would be to ask my running application, using the Script Editor: tell application "SearchTidbits"
get name of every button of window 1 -- {"searchButton"}
end tell
A problem is that you can't call handlers for events that are intended to be called by Cocoa; but you can sometimes work around this. For example, there's a perform action command that lets you tell a button to generate its call to the clicked handler. So, for example, the following code brings the Search window to the front, fills out the NSForm with a new search, and presses the Search button: tell application "SearchTidBITS"
activate
show window "Search"
tell window "Search"
tell matrix 1
set string value of cell 1 to ""
set string value of cell 2 to "Catch Conflict"
set string value of cell 3 to ""
end tell
perform action button "searchButton"
end tell
end tell
As of this writing, Apple is starting to expose the scripts inside an AppleScript Studio application by means of an interface item's script property, so the future may hold some interesting possibilities. Already one can say things like this: tell application "SearchTidbits"
set s to (get script of button 1 of window 1)
tell s
set its titleSought to "Catch Conflict" -- set a script property
urlEncode("ha ha") -- call a handler
end tell
set script of window 1 to 5
end tell
This amounts to dynamic development—we can actually alter features of a script inside an AppleScript Studio application while it is running. Observe that what we get when we obtain an item's script is a copy; that is why we must explicitly save the changed script back into our application. This is very exciting, but to explore it further would take us outside the scope of this book. |
| [ Team LiB ] |
|