| [ Team LiB ] |
|
2.6 ApplicationBy application I mean here an application you write yourself. There are various ways to incorporate use of AppleScript into an application, and various reasons why you might do so. Let's start with an applet. An applet is just a compiled script saved with a tiny application framework wrapped around it; you can make one in any script editor application. I can think of three main reasons for saving a script as an applet:
We have already seen that if you want a script to be a Startup Item, so that it runs automatically at startup, it has to be an applet. As another example, consider the toolbar and sidebar at the top and left side of a Finder window. You can put any item you like in these places; clicking an item opens it, in the sense of launching it, as if from the Finder. So items in the toolbar or sidebar cannot be mere compiled scripts if you want to run them; they must be applets (or droplets—dropping a file or folder onto a toolbar or sidebar droplet works just fine). Apple supplies a number of examples at http://www.apple.com/applescript/toolbar/. Moving up the ladder of complexity and sophistication, we arrive at another way you can create an application using AppleScript—with AppleScript Studio. AppleScript Studio itself isn't exactly an application; it's an aspect of two applications, Xcode (formerly known as Project Builder) and Interface Builder. AppleScript Studio allows you to use AppleScript as the underlying programming language inside what is effectively a Cocoa application, instead of the standard language, Objective-C. Thus you can combine all the power of Mac OS X-native windows and interface widgets with your knowledge of AppleScript to write a genuine application. Even more amazing, it's free. AppleScript Studio doesn't give you AppleScript access to everything that Cocoa can do, not by a long chalk; but if you have some AppleScript code and you want to wrap an interface around it, AppleScript Studio can be an easy and rapid way to do so. The result will look and act like an ordinary Cocoa application; it might not even be possible for users to tell that you wrote it with AppleScript.
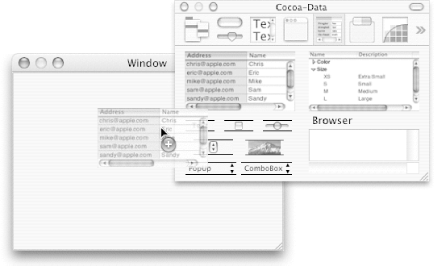
If you've never seen AppleScript Studio you might be wondering what I'm talking about, so here's a simple example of what it's like. (There's another example in Chapter 24.) We'll write an application that displays the names of your hard disks as the rows of a Table View widget. You start up Xcode and make a new project, designating it an AppleScript Application, and when the project window appears, find the MainMenu.nib listing and double-click it. You are now in Interface Builder, where you design your interface. Figure 2-12 shows me dragging a Table View into the main window; this is where the names of the disks will be displayed. Figure 2-12. Making an interface in AppleScript Studio After resizing the Table
View and the window, I set the Table View to have just one column,
and give the column a heading "Your
Disks". Then I name the column
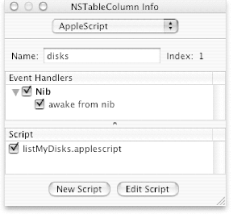
disks; to do so, I select the column, press
Figure 2-13. Creating a handler in AppleScript Studio I then press the Edit Script button at the bottom of the Info palette, and am thrown back into Xcode, where my script window opens with the awake from nib handler already created, waiting for me to add my code to it. Here it is: on awake from nib theObject
tell application "Finder" to set L to (name of every disk)
set ds to make new data source at end of data sources
set tv to table view 1 of scroll view 1 of window 1
set col to make new data column at end of data columns of ds ¬
with properties {name:"disks"}
repeat with aName in L
set aRow to make new data row at end of data rows of ds
set contents of data cell "disks" of aRow to aName
end repeat
set data source of tv to ds
end awake from nib
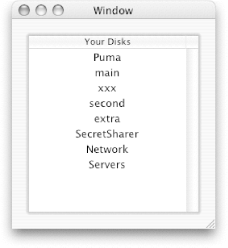
The first line of this script gathers the information from the Finder; the rest of the script is devoted to dealing with the interface. The script creates a kind of object called a datasource, populates it with the disk names gathered from the Finder, and attaches it to the Table View. The Table View automatically displays the contents of its data source. I can now build and run my application. Figure 2-14 shows what the application's window looks like when the application starts up; as expected, the names of my hard disks are displayed. Figure 2-14. A Cocoa application written with AppleScript Studio Another way you might find yourself incorporating AppleScript into an application you write yourself is when you're writing the application in some other programming language but want to avail yourself secondarily of AppleScript's special abilities. Typically this is because you need your application to function as a sender and have it drive some other application as a target. In REALbasic the way you incorporate AppleScript is to write and compile your AppleScript code elsewhere, and then save it as a compiled script and import this compiled script into your REALbasic project. (As of this writing, REALbasic can't read compiled script files saved by the Script Editor; until this is fixed, you need to save the compiled script in the older format, with the script data in the resource fork. Script Debugger can save the file this way.) Your REALbasic code can then call the compiled script. The script must have a run handler if you want to pass any parameters. Every parameter must be a string or an integer, and the result can only be a string. To illustrate, we'll write the REALbasic equivalent of the AppleScript Studio application developed a moment ago. First we create our AppleScript code and save it as a compiled script: on run {}
tell application "Finder"
name of every disk
end tell
end run
We drag the compiled script file into the REALbasic project window; now we can call the script using the name under which we saved it, which happens to be finderTest. Now, in REALbasic, we drag a ListBox into the main window and put this REALbasic code into its Open event handler: Sub Open( )
dim L as string
dim i,u as integer
L = finderTest( )
me.columnAlignment(0) = 2
u = countFields(L,", ")
for i = 1 to u
me.addRow nthField(L,", ",i)
next
End Sub
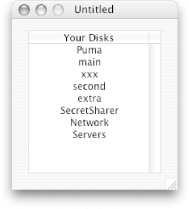
That handler is called automatically as the application starts up and the window opens. The call to finderTest( ) runs our AppleScript code; what's returned is like what was returned in the Microsoft Word example earlier, a string consisting of the disk names separated by a comma and a space. We parse that string to populate the ListBox. When we compile and build the application, the finderTest file is incorporated into it and no one ever knows we used AppleScript. Figure 2-15 shows the application running. Figure 2-15. A REALbasic application using AppleScript In Cocoa/Objective-C you have a choice of techniques for incorporating AppleScript through the NSAppleScript class. You can start with a string and compile and execute it, or you can start with a compiled script and execute that. I'll illustrate both techniques. Our application's interface looks just like the AppleScript Studio and REALbasic examples: it's a one-column NSTableView in a window. Our controller class, instantiated in the nib, is the NSTableView's datasource. It has one instance variable, an NSArray called diskList. Here's the Objective-C code for the controller class: -(int)numberOfRowsInTableView:(NSTableView*)tv {
if (!diskList) return 0;
return [diskList count];
}
-(id)tableView:(NSTableView*)tv
objectValueForTableColumn:(NSTableColumn*)c row:(int)r {
return [diskList objectAtIndex:r];
}
-(void)awakeFromNib {
NSAppleScript* scpt;
NSAppleEventDescriptor* result;
NSDictionary* error;
NSString* s;
NSMutableArray* arr = [NSMutableArray array];
s = @"tell application \"Finder\" to get name of every disk";
scpt = [[NSAppleScript alloc] initWithSource: s];
result = [scpt executeAndReturnError: &error];
if ([result descriptorType] == 'utxt')
[arr addObject: [result stringValue]];
else if ([result descriptorType] == 'list') {
int i,u = [result numberOfItems];
for (i=1; i<=u; i++)
[arr addObject: [[result descriptorAtIndex: i] stringValue]];
}
diskList = [[NSArray arrayWithArray: arr] retain];
}
The first two methods simply deal with the interface; they are the datasource routines that populate the NSTableView from the diskList array. The awakeFromNib method is where the action is. As the application starts up, our controller class will be instantiated and this awakeFromNib method will be called; its job is to populate the diskList array. We create our AppleScript code as a string, use this string to create a new NSAppleScript instance, and tell that instance to compile and execute the string. (At this point there should be some error checking, but I've optimistically omitted it.) The result is an NSAppleEventDescriptor, and now the question is what to do with it. To parse it properly, we should look to see what type it is: if it's just text (there was only one disk so the result is simply its name), we append that text to a local array; if it's a list, then we cycle through the items of that list, appending the text from each of those to our local array. The main trick here is to realize that list indexes in an Apple event are 1-based! Now we have an array of the names of the disks; we copy that array into diskList, and the datasource routines take care of displaying it in the NSTableView. The other way to do this, probably faster to execute, would be to compile the AppleScript code beforehand and incorporate the compiled script file into the project, rather as one does in REALbasic. Let's suppose the compiled script is called askFinder.scpt. (Now the problem is the other way around from the REALbasic example; if the script is to be saved with Script Debugger, you must be sure to specify that the script data should be in the data fork. The old-style compiled script using the resource fork won't work.) I'm sure you know how it goes: tell application "Finder"
return name of every disk
end tell
We add askFinder.scpt to our project, so it will be built into the application. The awakeFromNib code, after the declarations, now starts out a little differently, because we're initializing the NSAppleScript instance from a file, not an NSString: s = [[NSBundle mainBundle] pathForResource: @"askFinder" ofType: @"scpt"];
NSURL* url = [NSURL fileURLWithPath: s];
scpt = [[NSAppleScript alloc] initWithContentsOfURL: url error: &error];
The rest is as before. The built Cocoa application running looks absolutely identical to Figure 2-14. |
| [ Team LiB ] |
|