|
|
< Day Day Up > |
|
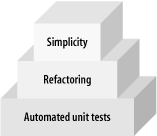
2.3 Your Safety NetAgile methods like XP have introduced new practices and philosophies into mainstream development that will change the way that you code forever. One of the practices that is gaining rapidly in popularity is unit test automation. Remember that refactoring is a foundation. In order to refactor, you've got to test all of the classes related to your refactored class. That's a pain. That's why unit testing is a fundamental building block for simplicity, because it provides the confidence to refactor, which enables simplicity, like the pyramid in Figure 2-3. Figure 2-3. Automated unit tests provide the foundation for simplicity You can see how these concepts build on one another. You're free to choose simple concepts because you can refactor if the simple solution is insufficient. You're free to refactor because you'll have a safety net. Automated tests provide that net. Chances are good that you're already using JUnit. If so, you can skip ahead to the next section. If you're not using JUnit, you need to be. JUnit is an automated testing framework that lets you build simple tests. You can then execute each test as part of the build process, so you know immediately when something breaks. At first, most developers resist unit testing because it seems like lots of extra work for very little benefit. They dig in their heels (like another Dr. Seuss character, saying "I do not like green eggs and ham"). I'm going to play the part of Sam I Am, the green-eggs-and-ham pusher, and insist that you give it a try. Automated unit testing is foundational:
In Green Eggs and Ham, Sam I Am asks the same question over and over because he knows that he's got something that may look repulsive, but is worthwhile. I know traditional software testing has beaten many of us down. It's usually difficult, and provides few tangible rewards. Don't equate JUnit with traditional testing. It has made believers out of thousands of Java developers. It'll rock your world. 2.3.1 Getting Started with JUnitI'm going to introduce JUnit and Ant. If you're already well-versed in the value of both together, you'll want to skip ahead to the section "Refactoring for Testability." In case you haven't seen JUnit before, I'm going to tell you just enough to get you started, so you'll be able to understand the other concepts in this chapter. If you want to learn more, check out the books and other sources in the bibliography. JUnit is a framework that lets you build simple test cases that test your code. JUnit test cases actually use your code and then make assertions about what should be true if the code is working properly. If the test fails, JUnit notifies you. I'll show you how to use JUnit in two ways:
You can learn JUnit best by example. We'll start with the development tool approach. Let's say that you have this simple Adder class, with one method called add that adds integers (Example 2-1). Example 2-1. Add two numbers together (Adder.java)public class Adder {
public static int add(int x, int y) {
return (x+y);
}
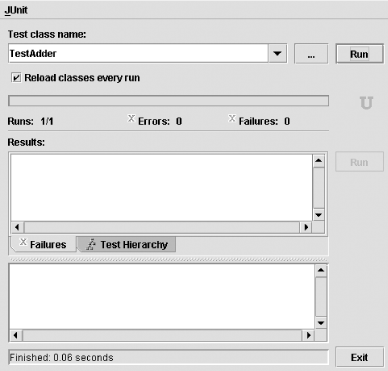
}If you weren't a JUnit programmer, you'd probably want to make sure that this class worked. You'd probably build a simple application, shoot out a couple of logging or print statements, or embed your tests into main. Most of that stuff gets used rarely at best, and discarded at worst. Turn it around and start saving that work. Install JUnit, and get busy. You can get the free download and installation instructions from http://junit.org. Once you've installed it, try a simple test case, like Example 2-2. Example 2-2. Build a JUnit test for Adder (TestAdder)import junit.framework.*;
public class TestAdder extends TestCase {
public TestAdder(String name) {
super(name);
}
public void testBasics( ) {
assertEquals(10, Adder.add(5,5));
assertEquals(0, Adder.add(-5, 5))
}
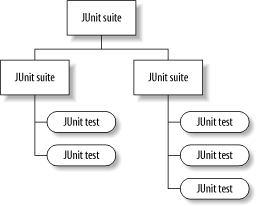
}Take a look at Example 2-2. You'll see the class name for the test, which subclasses from a JUnit TestCase. Next, you'll see a constructor and a simple test method called testBasics. The test makes two basic assertions about Adder. If Adder.add(5, 5) returns 10, and Adder.add(-5,5) returns 0, the test passes. To run the test, type java junit.swingui.TestRunner. You'll see the JUnit graphical user interface, like the one in Figure 2-4. You can then type the name of your test. Figure 2-4. This JUnit test runner shows the status of the tests Alternatively, you can run the test on the command line, like this: C:\home\project\src>java junit.textui.TestRunner TestAdder You can replace TestAdder with the name of your test. You'll see the results quickly: .Time: 0 OK (1 test) You'll see a "." character for each test that JUnit runs and a report of all of the tests that you ran. 2.3.1.1 Organizing testsAfter you've created a number of individual test cases, you may want to organize them in groups called test suites. A suite is a collection of tests, and they can be nested, as in Figure 2-5. These organizational techniques let you organize similar tests for strategy, behavior, or convenience. For example, you may not want to run all of your long-running performance tests with each build, so break them into separate suites. Figure 2-5. JUnit organizes test cases into suites You have a couple of options for building your suites. You may want to explicitly add each test to a suite in order to manually control what goes into each one. Most developers prefer an easier alternative: let JUnit collect all of the tests within a class automatically, through reflection. JUnit puts all of the methods that start with the word "test" into a suite. Add the following method to your test class: public static Test suite( ) {
return new TestSuite(TestAdder.class);
}After you've organized your tests into suites, you may want an easier way to invoke the tests. Many people prefer to have tests grouped into a main( ) method. You can do so easily, like this: public static void main(String args[]) {
junit.textui.TestRunner.run(suite( ));
}2.3.1.2 Initialization and clean upOften, within a test, you may want to do some set up work that's common to several tests, like initializing a database or a collection. Additionally, you may want to do some special clean-up work in code that's common to several tests. JUnit provides the setup and tearDown methods for these purposes. You can add these methods to your test class, substituting your initialization and clean-up code in the commented areas: protected void setUp( ) {
// Initialization
}
protected void tearDown( ) {
// Clean up
}2.3.1.3 AssertionsJUnit allows several kinds of assertions. Each of the following methods allows an optional descriptive comment:
Whenever you are asked to pass in two values to compare (the expected and the actual), pass the expected value first. 2.3.1.4 Exceptions and intentional failureUnder some circumstances, you may want to fail a test. You may have logic within your test that is unreachable under normal circumstances. For example, you might have an exception that you wish to test. Use a Java catch block, with other JUnit techniques: public void testNull( ) {
try {
doSomething(null);
fail("null didn't throw expected exception.");
} catch (RuntimeException e) {
assertTrue(true); // pass the test
}
}Those are the JUnit basics. You can see that the framework packs quite a punch in a very simple package. In the next couple of sections, I'll show how JUnit can change the way that you code in ways that you may not expect. For a complete and excellent treatise on JUnit, see "Pragmatic Unit Testing in Java with Junit" by Andrew Hunt and David Thomas, the Pragmatic Programmers (http://www.pragmaticprogrammer.com). 2.3.2 Automating Test Cases with AntI cut my programming teeth in an era when a build guru was a full-time job. The build was a dark, foul-smelling place where working code went to die. Integration was another circle of Hell. For me, it's not like that anymore, but many of my clients fear builds, so they avoid integration until it's too late. If you want to shine a little light into those dim recesses, you need information. That means that you've got to bite the bullet and integrate regularly. Ant makes it much easier for developers and teams to build at any moment. You are probably already using Ant, and I won't bore you with another primer here. I will, however, show you how to plug JUnit into Ant. To extend Ant for JUnit, most developers use a separate target called test. Here, you'll build the target test cases and copy them to a common directory. Next, you'll run the test cases with a special task, called JUnit. Here's the JUnit test underneath the test class that I used for our examples: <junit showoutput="on" printsummary="on"
haltonfailure="false" fork="true">
<formatter type="brief" usefile="false"/>
<formatter type="xml"/>
<batchtest todir="${test.data.dir}">
<fileset dir="${test.classes.dir}">
<include name="**/*Test.class"/>
</fileset>
</batchtest>
<classpath>
<fileset dir="${lib.dir}">
<include name="**/*.jar"/>
<include name="**/*.zip"/>
</fileset>
<pathelement location="${build.classes}"/>
<pathelement location="${test.classes.dir}"/>
</classpath>
</junit>This example tells Ant that you're using JUnit. You can have JUnit halt the build upon failure, but sometimes it's useful to get a test report with more than one failure (in order to gather more information), so we opt not to halt on failure. The batchtest parameter means that you want JUnit to run all tests in a given directory. Next, tell JUnit to create a report with another custom task called JUnitReport. This Ant task is optional, but quite useful for teams or larger projects. Here's the Ant task that we use for examples in this book: <junitreport todir="${dist.test.dir}">
<fileset dir="${test.data.dir}">
<include name="TEST-*.xml"/>
</fileset>
<report format="frames" todir="${dist.test.dir}"/>
</junitreport>Now, you can see more of the power of JUnit. Your build is suddenly giving you a striking amount of information. Sure, you'll know if your code compiles. But now you'll also be able to get a thorough sniff test of runtime behavior! You'll be able to point to the test cases that break, right when you break them. You're changing your worldview ever so slightly. A successful build becomes one that compiles and runs successfully. If you've never tried it, you have no idea how powerful this paradigm shift can be. These two tools, Ant and JUnit, form the secret recipe to avoiding integration Hell. All you need to do is keep the build working and make sure the test cases pass every day. Don't let them get too far out of sync. You'll find that integration becomes a tiny part of your everyday rhythm. My guess is that you'll like these green eggs and ham much better than you ever thought you would. 2.3.3 Refactoring for TestabilityAfter using JUnit for a while, most people begin to write their test cases before the code. This process, known as test-driven development, changes the way that you look at programming in unexpected ways. The reason is that each new class that you create has more than one client: your test case, and your application, as in Figure 2-6. Figure 2-6. Testing improves the design of your application by reducing coupling Since you'll reuse classes that you want to test, you'll have to design in all of the things that improve reuse from the beginning. You'll naturally spend more time up-front separating the concerns of your classes, but you'll need to do less rework moving forward. 2.3.3.1 Reuse and testabilityTo find out how to accomplish test-driven development, let's listen to the experts. In Hunt and Thomas's book Pragmatic Unit Testing they present the following example of a method that sleeps until the top of an hour: public void sleepUntilNextHour( )
throws InterruptedException {
int howLong;
// calculate how long to wait here...
thread.sleep(howlong);
return;
}This code is probably not going to be very testable. The code doesn't return anything, and does nothing but sleep. If you think about it, the operating system call to sleep is probably not going to break. If anything, it's the calculation of how long to sleep that's going to give you trouble. The refactored code looks like this: public void sleepUntilNextHour( )
throws InterruptedException {
int howlong = milliSecondsToNextHour(new Date( ));
thread.sleep(howlong);
return;
}We've taken a method with poor testability and built a likely target for tests: milliSecondsToNextHour. In the process, we have also increased the likelihood that the code can be reused. The method milliSecondsToNextHour will work with any date and time, not just the current one. 2.3.3.2 CouplingMike Clark is a noted author, the creator of JUnitPerf (an open source JUnit testing framework for building performance tests), and a JUnit expert and contributor. He strongly believes that unit tests will reduce the coupling in your code. For instance, if you want to be able to test the persistent classes of your application without actually wiring into a database, you'll probably want to cleanly separate the persistence layer and data source, so that it's not intrusive. Then you can test your class with a simpler data source, like a collection. If you write your test cases first, you'll get pretty immediate feedback when you try to couple things too tightly. You won't be able to build the right set of tests. For the most part, that means separating concerns as clearly as possible. For example, testing could drive the following design decisions:
Figure 2-7. Testability improves a design with only a single producer and consumer to a design that breaks out an order and handler In each of these cases, a need for better testability drives a better design. With practice, you'll find that each individual component of a system is ever-so-slightly more complex, but the overall system will fit together much more smoothly, improving your overall simplicity tremendously. |
|
|
< Day Day Up > |
|