|
|
|
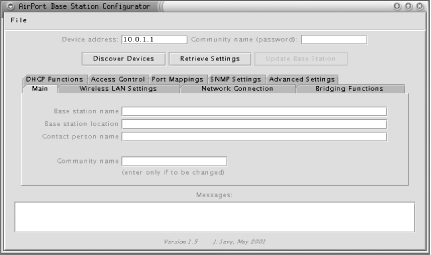
4.3 Access Point Management SoftwareIf you have a Mac handy, you are in luck. The AirPort Admin utility that ships with the AirPort is excellent. As with their entire product line, Apple has gone out of their way to make the whole AirPort system easy to set up, even for beginners. If you don't own a Mac, you have a couple of options. It turns out that the innards of the Graphite AirPort are virtually identical to the Orinoco RG-1000 (previously, the Lucent Residential Gateway). That means that the RG configuration utility for Linux (called cliproxy) also works fine with the AirPort. Unfortunately, as the Lucent product family has been sold and resold several times in the past couple of years (the same product line has been called Lucent, Orinoco, Agere, Avaya, and Proxim, and probably a couple of others that I've missed), the cliproxy utility seems to have disappeared from the Proxim web site. Copies of it are still floating around on various message boards; it is a tremendously useful utility if you can find it. Jon Sevy has done extensive work with the AirPort, and has released an open source Java client that configures the AirPort (both Graphite and Snow) and the RG-1000. You can get a copy from http://edge.mcs.drexel.edu/GICL/people/sevy/airport/. He has also compiled a tremendous amount if information on the inner workings of the AirPort, and has many resources online at this site. Since his utility is open source, cross-platform, and works very well, we'll use it in the following examples. Figure 4-1 shows the main screen of the Java Configurator. Figure 4-1. The AirPort Java Configurator To use the Java Configurator application, you'll need a copy of the Java Runtime Environment. Download it from http://java.sun.com/, if you don't already have it. You can start the utility by running the following in Linux: $ java -jar AirportBaseStationConfig.jar & In Windows, start by double-clicking the AirportBaseStationConfig icon. The AirPort can be configured over the Ethernet port or over the wireless network. When the application window opens, you can click the Discover Devices button to auto-locate all of the APs on your network. When you find the IP address of the AP you want to configure, type it into the Device address field, then type the password into the Community name field. If you're unsure about the IP address or the password, the AirPort ships with a default password of public, and an IP address of 10.0.1.1 on the wireless interface (it picks up the wired IP address via DHCP; use Discover Devices to find it if you're configuring it over the Ethernet). Once you've entered the correct information, click the Retrieve Settings button. The very first thing you should change is the Community name, on the first panel. Otherwise, anyone can reconfigure your AirPort by using the public default! While you're there, you can set the name of the AirPort (which shows up in network scans), the location, and contact information. These fields are entirely optional, and have no effect on operations. You should also choose a Network name, under the Wireless LAN Settings tab. This is also known as the ESSID, and will identify your network to clients in range. If you're running a "closed" network, it needs to be known ahead of time by any host attempting to connect, as described in the following section. |
|
|
|