|
|
< Day Day Up > |
|
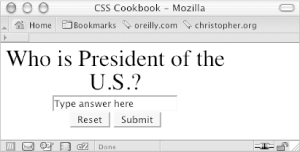
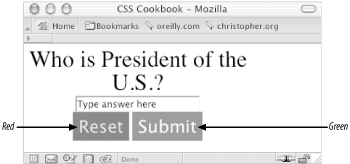
Recipe 5.4 Creating Form ButtonsProblemYou want to stylize the color, padding, borders, and rollover effects for Submit and Reset buttons on a form. Figure 5-7 shows a form without styles applied to the buttons, and Figure 5-8 shows the form with stylized buttons. Figure 5-7. The form buttons without styles applied Figure 5-8. The form buttons with styles applied SolutionFirst use a class selector to design the buttons: <form action="simplequiz.php" method="post"> <label for="question">Who is president of the U.S.? </label> <input type="text" name="question" id="textfield" value="Type answer here" /><br /> <input name="reset" type="reset" value="Reset" class="buttonReset" /> <input type="submit" name="Submit" value="Submit" class="buttonSubmit" /> </form> Then use CSS to stylize the buttons: .buttonReset {
color: #fcc;
background-color: #900;
font-size: 1.5em;
border: 1px solid #660;
padding: 4px;
}
.buttonSubmit {
color: white;
background-color: #660;
font-size: 1.5em;
border: 1px solid #660;
padding: 4px;
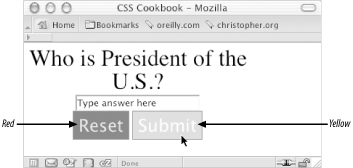
}DiscussionYou also can stylize buttons using the ubiquitous rollover state. To create rollovers for buttons, use a JavaScript function: <script language="JavaScript" type="text/javascript">
function classChange(styleChange,item) {
item.className = styleChange;
}
</script>Next, add two additional CSS rules, one for the rollover state for the Reset button and another for the Submit button: .buttonResetRoll {
color: white;
background-color: #c00;
font-size: 1.5em;
border: 1px solid #660;
padding: 4px;
}
.buttonSubmitRoll {
color: white;
background-color: #cc0;
font-size: 1.5em;
border: 1px solid #660;
padding: 4px;
}After the function is in place and the extra CSS rules are set up, place the events in the button markup so that you can toggle between the off and on states of the form buttons (see Figure 5-9): <form action="simplequiz.php" method="post">
<label for="question">Who is president of the U.S.?</label>
<input type="text" name="question" id="textfield"
value="Type answer here" /><br />
<input name="reset" type="reset" id="reset" value="Reset"
class="buttonReset"
onMouseOver="classChange('buttonResetRoll',this)"
onMouseOut="classChange('buttonReset',this)" />
<input type="submit" name="Submit" value="Submit"
class="buttonSubmit"
onMouseOver="classChange('buttonSubmitRoll',this)"
onMouseOut="classChange('buttonSubmit',this)" />
</form>Figure 5-9. A rollover state created through CSS and JavaScript As noted earlier, until Internet Explorer for Windows supports attribute selectors, you'll need to use class selectors to set button styles that can be seen in all browsers. Using attribute selectors to write CSS rules for the form buttons doesn't require the extra markup in the HTML element that comes from using class selectors. For example, the attribute selector syntax for the buttons using only CSS would look something like this: input[type="reset"] {
color: #fcc;
background-color: #900;
font-size: 1.5em;
border: 1px solid #660;
padding: 4px;
}
input[type="submit"] {
color: white;
background-color: #660;
font-size: 1.5em;
border: 1px solid #660;
padding: 4px;
}You also can use the width property to determine the horizontal size of the button; however, Internet Explorer 4.x for Windows doesn't recognize the CSS width property on the form property. See AlsoThe CSS 2.1 specification for attribute selectors at http://www.w3.org/TR/CSS21/selector.html#attribute-selectors. |
|
|
< Day Day Up > |
|