| [ Team LiB ] |
|
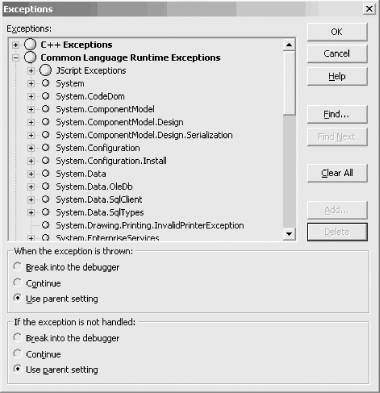
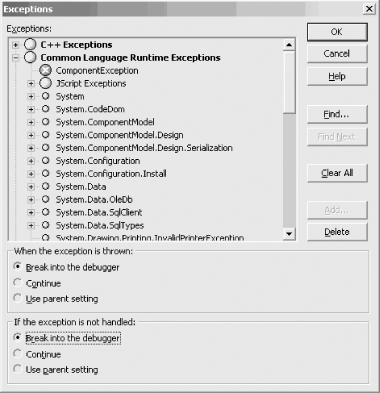
Recipe 5.15 Breaking on a First Chance ExceptionProblemYou need to fix a problem with your code that is throwing an exception. Unfortunately, an exception handler is handling the exception, and you are having a tough time pinpointing where and when the exception is being thrown. Forcing the application to break on an exception before the application has a chance to handle it is very useful in situations where you need to step through the code at the point where the exception is first being thrown. If this exception was thrown and not handled by your application, the debugger would intervene and break on the line of code that caused the unhandled exception. In this case, you can see the context in which the exception was thrown. However, if an exception handler is active when the exception is thrown, the exception handler will handle it and continue on, preventing you from being able to see the context at the point where the exception was thrown. This is the default behavior for all exceptions. SolutionSelect Debug Figure 5-1. The Exceptions dialog box DiscussionUsing the Exceptions dialog box, you can target specific exceptions or sets of exceptions for which you wish to alter the default behavior. This dialog has three main sections. The first is the TreeView control, which contains the list of categorized exceptions. Using this TreeView, you can choose one or more exceptions or groups of exceptions whose behavior you wish to modify. The next section on this dialog is the frame with the caption "When the exception is thrown." This frame contains three radio buttons that control the behavior when the exception is first thrown. At this stage, the exception is considered a first chance exception. The "Break into the debugger" radio button forces the debugger to intervene when a first chance exception of the type chosen in the TreeView control is thrown. The "Continue" radio button allows the application to attempt to handle the first chance exception. The "Use parent setting" radio button uses the configuration of the parent of this exception when handling it as a first class exception. The third section on this dialog is the frame with the caption "If the exception is not handled." This frame contains the same three radio buttons as the previous frame. These radio buttons control the behavior when an unhandled exception is thrown by the application. At this stage, the exception is considered a second chance exception. The radio buttons operate in the same manner as with the previous frame. This dialog contains two helpful buttons, Find and Find Next, to allow you to search for an exception rather than dig into the TreeView control and search for it on your own. In addition to these buttons, there are three buttons, Clear All, Add, and Delete, which are used to add and remove user-defined exceptions. For example, we can create our own exception, as we did in Recipe 5.13, and add this exception to the TreeView list. You must add any managed exception such as this to the TreeView node entitled Common Language Runtime Exceptions. This setting tells the debugger that this is a managed exception and should be handled as such. To add a user-defined exception to the TreeView, click the Add button and the dialog box shown in Figure 5-2 appears. Figure 5-2. Adding a user-defined exception to the TreeView Type the name of the exception—exactly as its class name is spelled—into the Name field of this dialog box. Do not append any other information to this name, such as the namespace it resides in or a class name that it is nested within. Doing so will cause the debugger to fail to see this exception when it is thrown. Clicking the OK button places this exception into the TreeView under the Common Language Run-time Exceptions node. You can then modify the way this exception will be handled using the radio buttons at the bottom of the Exceptions dialog box. The Exceptions dialog box will look something like the one in Figure 5-3 after you add and modify this user-defined exception. Figure 5-3. The Exceptions dialog box after adding a user-defined exception to the TreeView The Delete button deletes any selected user-defined exception that you added to the TreeView. The Clear All button deletes any and all user-defined exceptions that have been added to the TreeView. |
| [ Team LiB ] |
|