DekGenius.com
Previous Section Next Section

12.5 JavaScript

Dreamweaver works with JavaScript in a variety of ways. In addition to using JavaScript behaviors, you can link to scripts in external .js files, edit .js files directly, and debug JavaScript code.

12.5.1 Adding Scripts to Documents

When you apply behaviors using the Behaviors panel, Dreamweaver adds the JavaScript to the <script> tag within the <head> tag. (All scripts used throughout a site are listed in the Scripts category of the Assets panel.) If you apply the same behavior twice within the same document, Dreamweaver is smart enough not to duplicate the JavaScript code within the <script> tag. You can even modify the JavaScript functions by hand in Code view, provided you don't change a function's name, Dreamweaver won't overwrite your changes even if you reapply the same behavior.

12.5.1.1 The Insert Script dialog box

The Insert figs/U2192.gif Invisible Tags figs/U2192.gif Scripts menu command opens the Insert Script dialog box where you can enter scripts by hand. The Script button in the Objects panel's Invisibles category opens the same dialog box. See Section 2.7.3 in Chapter 2 for more details.

12.5.1.2 Call JavaScript behavior

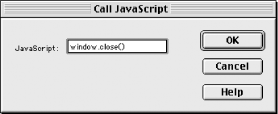
The Call JavaScript behavior is used to execute a line of JavaScript code. That line can include a call to a custom function or a built-in function such as window.close(). Figure 12-4 shows the exceedingly simple dialog box that lets you enter your parameters for the Call JavaScript behavior.

Figure 12-4. The Call JavaScript parameters dialog box
figs/dwn_1204.gif

Other behaviors have more complex parameters, but Dreamweaver always writes the HTML code for you. If you apply the Call JavaScript behavior to an image, the resulting HTML code might be:

<img src="mybutton.jpg"  onMouseDown="MM_callJS('window.close(  )')">

However, if you choose the onClick event, which cannot be applied to an <img> tag, instead of the onMouseDown event, Dreamweaver automatically wraps the <img> tag in a null link, such as in:

<a href="javascript:;" onClick="MM_callJS('window.close(  )')">
  <img src="mybutton.jpg"></a>

Similarly, to apply a behavior to text, you must first wrap the text of interest in an <a> tag with a null link (href="javascript:;"). Using a null link prevents the document from changing when the link is clicked (using # for your link causes some browsers to jump to the top of the current document).

12.5.2 Using External JavaScripts

Applying a behavior in Dreamweaver adds the JS code directly to your HTML document, which can be inefficient. Although Dreamweaver is smart enough not to duplicate JS code within a single document, it duplicates the code if you use the same behavior on more than one page. To add scripts to a web page based on a template, place scripts in an external .js file and link to it from the template.

Instead, you can link to external JavaScript (.js) files, which are downloaded only once and subsequently read from the browser cache thereafter. This technique avoids duplication and makes it easy to update your scripts across your entire site. You should set your server's MIME type for .js files to application/x-javascript (ask your webmaster for help setting MIME types).

To insert a reference to an external JavaScript (.js) file:

  1. Write your JS code, or simply copy the code inserted by Dreamweaver's behaviors into a new .js file (copy the JS code between the <script> tags, but exclude the tags themselves).

  2. Save your .js file to a folder within your site (you might create a folder called javascript within your root folder for this purpose).

  3. Use Insert figs/U2192.gif Invisible Tags figs/U2192.gif Script to create a <script> tag. Dreamweaver inserts it within the <body> tag by default, which is also legal. You can use Code view to insert scripts within the <head> tag instead.

  4. A gold shield icon in the Document window represents a script in the document (use View figs/U2192.gif Visual Aids figs/U2192.gif Invisible Elements to ensure that the icon is visible). If you place your script in the document head instead, a script icon appears in the Head Content bar (View figs/U2192.gif Head Content).

  5. To open the Property inspector, double-click the script icon in either the Document window or Head Content bar.

  6. Change the src attribute in the Property inspector to point to your .js file. Use a Site Root Relative path. The result may look like this:

    <script language="JavaScript"
    src="/javascript/jump_menu_go.js"></script>

12.5.3 Editing JavaScript

Dreamweaver allows you to edit JavaScript that is embedded in your HTML document or stored in an external .js file.

12.5.3.1 Editing embedded JavaScript in the Script Properties dialog box

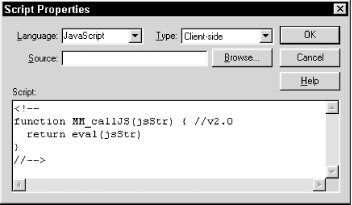
First, let's talk about scripts embedded within your document's HTML code. To open the Property inspector, double-click the script icon in either the Document window or the Head Content bar (as described in the preceding section). Click the Edit button in the Property inspector to open the Script Properties dialog box, shown in Figure 12-5.

This dialog box allows you to edit scripts directly. You should generally leave the script's Type set to Client-Side (server-side JavaScript is something else entirely). Unfortunately, this dialog box doesn't let you set the version of JavaScript for the language attribute, as you can with Insert figs/U2192.gif Invisible Tags figs/U2192.gif Scripts. Its only options are JavaScript and VBScript, but at least it won't alter an existing language attribute set to JavaScript1.1 or JavaScript1.2.

Figure 12-5. The Script Properties dialog box
figs/dwn_1205.gif

The language attribute has been deprecated in HTML 4.0, and may not be recognized by future browsers. Use type="text/Javascript" within your <script> tag to comply with HTML 4.0 and XHTML standards.

After editing your script, save your changes by clicking the OK button or discard changes using the Cancel button. Of course, you can also hand-edit your scripts in Code view or the Code Inspector; the Script Properties dialog box is just a convenient way to edit the <script> tag in isolation.

12.5.3.2 Editing external JS files in the Code view editor

Suppose your script tag contains a link to an external JavaScript (.js) or VBScript (.vbs) file, as set by the src attribute, such as:

<script language="JavaScript" src="checksize.js"> </script>

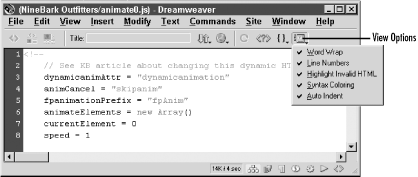
External code cannot be edited in the Script Properties dialog box; however, click the Edit button in the Property inspector to edit it in the Code view window, as seen in Figure 12-6.

Figure 12-6. Code view for external scripts
figs/dwn_1206.gif

The Edit button in the Property inspector opens Code view only if there are no embedded scripts within the HTML file. If you've used both linked and embedded scripts in the same HTML file, use the File figs/U2192.gif Open command to open the .js or .vbs file instead.

When using Code view to edit an external script, many of Dreamweaver's menu options are disabled. The options available in this mode are listed in Table 12-5.

Table 12-5. Menu options for manipulating JavaScript files

Menu option

Windows

Macintosh

File figs/U2192.gif New

Ctrl+N

Cmd+N

File figs/U2192.gif New From Template

Alt+F, W

N/A

File figs/U2192.gif Open

Ctrl+O

Cmd+O

File figs/U2192.gif Save

Ctrl+S

Cmd+S

File figs/U2192.gif Save As

Ctrl+Shift+S

Cmd+Shift+S

File figs/U2192.gif Design Notes

Alt+F, G

N/A

File figs/U2192.gif Exit

Ctrl+Q

Cmd+Q

Edit figs/U2192.gif Undo

Ctrl+Z

Cmd+Z

Edit figs/U2192.gif Redo

Ctrl+Y

Cmd+Y

Edit figs/U2192.gif Cut

Ctrl+X

Cmd+X

Edit figs/U2192.gif Copy

Ctrl+C

Cmd+C

Edit figs/U2192.gif Paste

Ctrl+V

Cmd+V

Edit figs/U2192.gif Select All

Ctrl+A

Cmd+A

Edit figs/U2192.gif Find and Replace

Ctrl+F

Cmd+F

Edit figs/U2192.gif Find Next

F3

F3

Edit figs/U2192.gif Indent Code

Ctrl+]

Cmd+]

Edit figs/U2192.gif Outdent Code

Ctrl+[

Cmd+[

Edit figs/U2192.gif Balance Braces

Ctrl+^

Cmd+^

Edit figs/U2192.gif Set Breakpoint

Ctrl+Alt+B

Cmd+Opt+B

Edit figs/U2192.gif Remove All Breakpoints

Alt+E, V

N/A

Edit figs/U2192.gif Edit with External Editor

Ctrl+E

Cmd+E

Edit figs/U2192.gif Preferences

Ctrl+U

Cmd+U

View figs/U2192.gif Code

Alt+V, C

N/A

View figs/U2192.gif Code View Options figs/U2192.gif Word Wrap

Alt+V, O, W

N/A

View figs/U2192.gif Code View Options figs/U2192.gif Line Numbers

Alt+V, O, L

N/A

View figs/U2192.gif Code View Options figs/U2192.gif Highlight Invalid HTML

Alt+V, O, H

N/A

View figs/U2192.gif Code View Options figs/U2192.gif Syntax Coloring

Alt+V, O, S

N/A

View figs/U2192.gif Code View Options figs/U2192.gif Auto Indent

Alt+V, O, A

N/A

View figs/U2192.gif Show/Hide Panels

F4

F4

Text figs/U2192.gif Indent

Ctrl+Alt+]

Cmd+Opt+]

Text figs/U2192.gif Outdent

Ctrl+Alt+[

Cmd+Opt+[

    Previous Section Next Section