|
|
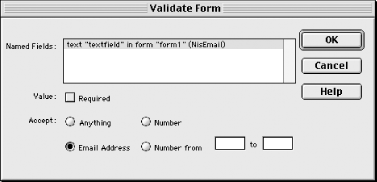
16.3 Using Form ControlsThe Validate Form, Jump Menu, and Jump Menu Go behaviors are used with forms, as first discussed in Chapter 3. 16.3.1 Form ValidationThe Validate Form behavior validates the type of data entered in form text fields (to use this behavior, the document must contain at least one form with at least one text field). Typically, you'll attach the behavior to the form's Submit button and trigger it using the onClick event (which is the same as attaching it to the Form itself and triggering it with the onSubmit action). Applying the behavior in the Behaviors panel opens the Validate Form dialog box, shown in Figure 16-3. Figure 16-3. Validate Form behavior parameters Table 16-2 explains the options in the Validate Form dialog box. The Notation column lists the abbreviations shown after each text field in the Named Fields list, which indicate the validation settings for that field. For example, the notation (RisMail) indicates a required email address and (NinRange3:10) indicates an optional number between 3 and 10.
If an error is found during validation, the browser displays an error message indicating the name of the text field and the nature of the problem.
You'll typically validate all text fields at once by applying the behavior to the Submit button. If the text fields are not validated successfully, the form's contents are not submitted to the server. (The user can remedy the situation and resubmit the form, however.) If you prefer to validate individual fields as the user enters data into the form, apply the Validate Form behavior to a text field and trigger it with the onBlur event. However, this method is not entirely reliable. If the validation fails, the browser does not force focus back onto the problematic field, and thus allows the user to continue with the rest of the form, even if a field is invalid. Therefore, you should validate the form data again when the Submit button is clicked. Validating other types of form objects, such as radio buttons, is usually unnecessary because most objects constrain user input by nature. But Dreamweaver doesn't offer a built-in way to require, for example, that a user select an option from a pop-up menu. For this and other more advanced forms of text field validation, such as limiting the number of characters in a text field, search the Dreamweaver Exchange for the keyword "validate." At the Exchange you'll find behaviors that do such things as validate phone numbers. Server-side scripts can also perform form validation and return an error message to the browser, if necessary. 16.3.2 Jump MenusIn
Chapter 3, we saw how to insert a jump menu by
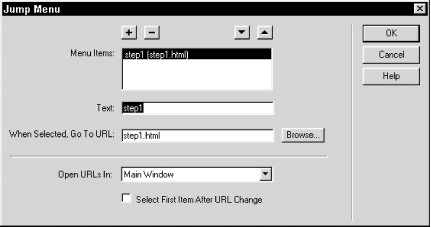
using Insert Understanding jump menus in this way allows us to create them by hand and edit existing ones. You can convert any List/Menu object into a Jump Menu by applying the Jump Menu behavior to it manually. (The Jump Menu behavior is available in the Behaviors panel only when a List/Menu object is selected.) When you apply or edit the Jump Menu behavior, Dreamweaver opens the Jump Menu dialog box, shown in Figure 16-4. Although it is very similar to the Insert Jump Menu dialog box seen in Figure 3-18, it lacks the Menu Name field and the Insert Go Button After Menu checkbox. Figure 16-4. Jump Menu behavior parameters Use this dialog box to modify the attributes of an existing Jump Menu (double-click an existing Jump Menu action in the Behaviors panel to edit its attributes). You can change a Jump Menu's name by selecting the corresponding List/Menu object and editing its name in the Property inspector (this name is used to associate a Go button with the menu). You can also edit the list values in a Jump Menu by clicking the List Values button in the Property inspector, as seen in Figure 16-5. List values can also be accessed by right-clicking (Windows) or Ctrl-clicking (Macintosh) on a List/Menu element and choosing the List Values option from the contextual menu. Figure 16-5. The Property inspector for List/Menu objects (jump menus) You can add a Go button to an existing menu by attaching the Jump Menu Go behavior to a button object. Actually, the Jump Menu Go behavior can be applied to any object, provided that a jump menu already exists within the document. To avoid confusion, you should apply the Jump Menu Go behavior to a button near the List/Menu that acts as the jump menu. To add a Go button to an existing jump menu that lacks a Go button:
Figure 16-6 shows the Property inspector as it appears when a Go button is selected. Figure 16-6. The Property inspector for button objectsFigure 16-7 shows the Jump Menu Go dialog box, which appears when the Jump Menu Go behavior is added or edited. Figure 16-7. The Jump Menu Go dialog box A web page (or a form) can contain more than one jump menu and more than one Go button. |
|
|