|
|
17.4 Controlling TimelinesDreamweaver provides behaviors to start, stop, and loop timelines. Each timeline can be started and stopped independently, and they can each have different frame rates (set using the Fps field in the Timelines panel). 17.4.1 Starting a TimelineYou can start a timeline automatically using autoplay or trigger it with another event, such as a button click. 17.4.1.1 Playing a timeline with autoplayTo start a timeline when the document loads, enable the Autoplay checkbox (see Figure 17-1) in the Timelines panel (if using multiple timelines, the autoplay mode can be set separately for each timeline). When you set a timeline to autoplay, Dreamweaver automatically attaches the Play Timeline action to the document's <body> tag and triggers it with the onLoad event. 17.4.1.2 Starting and stopping a timeline with an eventTo play a timeline, apply the Timeline By default, a timeline plays once and then stops. To stop a timeline
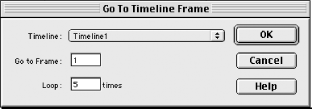
prematurely, apply the Timeline 17.4.2 Looping a TimelineTimelines can be played once (the default), played a limited number of times, or looped indefinitely. If you enable the Loop checkbox in the Timelines panel (see Figure 17-1), Dreamweaver adds the Go To Timeline Frame behavior to the frame following the last occupied frame of the timeline. The behavior causes the timeline to loop back to the beginning when it reaches its end. By default, the Go To Timeline Frame behavior causes the timeline to loop indefinitely. To edit the behavior's parameters, select the frame containing the behavior in the Behaviors channel of the Timelines panel. Then, open the Behaviors panel and double-click the Go To Timeline Frame action. This gesture opens the Go To Timeline Frame dialog box, shown in Figure 17-7, which lets you set the starting frame of the loop and specify how many times to repeat the loop. If the Loop field is left blank, the timeline will loop indefinitely. Figure 17-7. Go To Timeline Frame behavior parameters To change the loop's ending frame, move the behavior to a different frame of the Behaviors channel in the Timelines panel. Test your animation to ensure that it loops seamlessly (the animation doesn't stutter or jump when the timeline loops). The Go To Timeline Frame behavior can also be applied manually by
choosing Timeline |
|
|