|
|
2.1 Head ElementsThis section covers the tools that ensure proper usage of HTML elements within your document's <head> block. Dreamweaver 4 provides easy access to the <title>, description, and keywords elements (which provide information for search engines), and the <meta>, <base>, and <link> elements (which provide instructions to client and server software that interacts with your document). Prior to Version 4, Dreamweaver showed
<head> tags in Code view only. As of DW4,
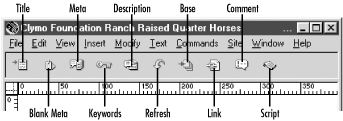
head content can be accessed using the Head Content bar, shown in
Figure 2-1, in Design view or Code and Design view.
The Head Content bar is opened using View Figure 2-1. The Head Content bar To edit the attributes of a head element in the Property inspector, double-click the element's icon in the Head Content bar. To delete an extraneous head element, select its icon from the Head Content bar and press the Delete key (or hand-edit the HTML in Code view). The <head> tags and their attributes are discussed in the following sections. Comment tags are discussed later in this chapter under Section 2.7. 2.1.1 Title TagThe <title> element's text is displayed in a web browser's title bar and is used as the default filename when saving the document to disk. Search engines also use the title to index your page. The <title> element can be set in the Page
Properties dialog box (Modify
2.1.2 Meta TagsDreamweaver can create four types of <meta> tags—content, keywords, description, and refresh—without hand-coding. (In Code view, you can create any <meta> element data you like.) All <meta> elements follow the general format: <head> <meta name="label" content="content associated with label"> <meta http-equiv="instruction-name" content="instructions"> </head> Do not treat the name and http-equiv attributes interchangeably. Use the http-equiv attribute, which is more widely read by both browsers and servers, to identify document languages and provide instructions for documents displayed using HTTP response message headers. Use the name attribute to provide information such as keywords and document descriptions, as shown in the following example: <meta http-equiv="Content-Type" content="text/html; charset=iso-8859-1"> <meta name="keywords" content="testing web site construction"> 2.1.2.1 Content attributeDreamweaver automatically adds a <meta> element that identifies the content type (usually text/html) and the character set (usually iso-8859-1) to each HTML document. The <meta> element shown in Figure 2-2 would appear in your HTML document as follows: <meta http-equiv="Content-Type" content="text/html; charset=iso-8859-1"> Figure 2-2. The Property inspector for the Meta element You can insert additional <meta> elements
using
Insert 2.1.2.2 Keywords attributeThe keywords element (<meta name="keywords">) provides a list of keywords that can be indexed by search engines (about 90 percent of web hits are generated from major search sites). Use the Insert Keywords dialog box
(Insert The keywords element in the <head> portion of your HTML document might appear as follows: <meta name="keywords" content="ranch raised horses, roping horses, rope horses, rodeo horses, barrel racing, team roping, bull dogging"> Modify existing keywords using the Property inspector (accessed via the Keywords icon in the Head Content bar) or by hand-editing the HTML.
Search engines often ignore secondary keywords elements. Worse, the secondary elements might be interpreted as trying to influence your search position unfairly, which would cause search services to remove your HTML document from the search results entirely. Delete an extraneous keywords element by deleting its icon from the Head Content bar (or by hand-editing the HTML). 2.1.2.3 Description attributeSearch engines use the description element (<meta name="description">) to determine a document's relevancy. However, unlike the keywords element, which is never displayed, the description element should provide a description that search engines can display along with the URLs found during a search.
Use the Insert Description dialog box
(Insert The description element in the <head> portion of your HTML document might appear as follows: <meta name="Description" content="Clymo Quarter Horses - foundation, ranch raised, rodeo, rope and arena horses." > Modify existing description elements using the Property inspector (accessed via the Description icon in the Head Content bar) or by hand-editing the HTML.
Delete an extraneous description element by deleting its icon from the Head Content bar (or by hand-editing the HTML). 2.1.2.4 Refresh attributeA refresh element will redirect a web browser to a new URL or refresh the current document after the specified delay. A refresh element is useful if an HTML page moves (to accommodate visitors with outdated bookmarks). It is also used to periodically refresh a page with updated data, such as stock quotes. To add a refresh element, open the Insert Refresh dialog box
(Insert Figure 2-3. The Insert Refresh dialog box
To go to another URL immediately, specify 0 for the Delay (specify a longer delay to allow a user to read the current page before loading a new page). Specifying a 15-second delay after which about.htm should be loaded creates the following <meta> tag: <meta http-equiv="refresh" content="15;URL=about.htm"> Specifying that the current document should refresh after 60 seconds creates the following <meta> tag. <meta http-equiv="refresh" content="60"> Avoid refreshing the current page more than every 30 seconds. 2.1.3 Base TagThe optional <base> tag defines the base folder (reference point) from which all document-relative links in a document should be interpreted. For example, the following <base> tag causes any document-relative URL to be resolved relative to http://clymo-quarter-horses.com: <base target=_blank href="http://clymo-quarter-horses.com"> Based on this information, a link that referenced rainy.htm would load the document http://clymo-quarter-horses.com/rainy.htm. The target=_blank attribute opens the document in a new blank window (target defaults to _self). See Section 4.1.3 in Chapter 4 for details on the target attribute. In the absence of the <base> tag, document-relative URLs are resolved relative to the folder containing the current web page. To insert a <base> tag, use the
Insert Base dialog box
(Insert
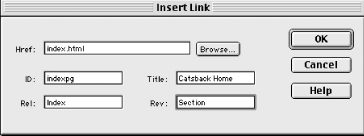
Delete an extraneous <base> tag by deleting its icon from the Head Content bar (or by hand-editing the HTML). 2.1.4 Link TagA <link> tag refers to another document, such as a cascading stylesheet or a document in a different language. It should not be confused with <a> tags, which are used to create hyperlinks. Use the Insert Link dialog box (Insert Figure 2-4. The Insert Link dialog box Specify the fields for your <link> tag, as described in Table 2-1.
The Rel and Rev attributes use the following keywords to define the relationship between the two documents:
For example, to link to a cascading stylesheet, you can set the Href to point to the .css file and set Rel to stylesheet. Of course, there are easier ways to create <link> tags for external stylesheets, as described in Chapter 10. Selecting Insert |
|
|