2.4 Text Formatting
Dreamweaver
supports the entire gamut of HTML page- and object-formatting
elements. This section describes how to format paragraphs, fonts, and
lists, plus how to create horizontal rules and set page properties.
Chapter 10 discusses the augmentation of these
elements with CSS properties. The HTML Styles panel, discussed in
Chapter 11, can also be used to set text formatting
properties.
2.4.1 Paragraph Formatting (Alignment and Styles)
Table 2-9 lists
paragraph
and text formatting options. These options also work on other
objects, such as
images, that are embedded within a
paragraph. Many of these options can also be set via the Property
inspector. See Table 2-11 for character formatting
commands.
Table 2-9. Paragraph formatting and alignment options
|
<blockquote>
|
Text  Indent Indent
|
Ctrl+Alt+]
|
Cmd+Opt+]
|
|
Removes <blockquote>
|
Text  Outdent Outdent
|
Ctrl+Alt+[
|
Cmd+Opt+[
|
|
<div>
|
Text  Paragraph Format Paragraph Format  None None
|
Ctrl+0 (zero)
|
Cmd+0 (zero)
|
|
<p>
|
Text  Paragraph Format Paragraph Format  Paragraph Paragraph
|
Ctrl+Shift+P
|
Cmd+Shift+P
|
|
<h1>...<h6>
|
Text  Paragraph Format Paragraph Format  Heading 1. . . Heading 1. . .
Heading 6
|
Ctrl+1. . .
Ctrl+6
|
Cmd+1. . .
Cmd+6
|
|
<pre>
|
Text  Paragraph Format Paragraph Format  Preformatted Text Preformatted Text
|
Alt-T, F, R
|
N/A
|
|
align="left"
|
Text  Align Align  Left Left
|
Ctrl+Alt+Shift+L
|
Cmd+Opt+Shift+L
|
|
align="center"
|
Text  Align Align  Center Center
|
Ctrl+Alt+Shift+C
|
Cmd+Opt+Shift+C
|
|
align="right"
|
Text  Align Align  Right Right
|
Ctrl+Alt+Shift+R
|
Cmd+Opt+Shift+R
|
 |
Use Preformatted Text
(<pre>) to display
verbatim text,
such as a programming code example, in Courier. Use tables instead of
preformatted text to align tabular
data.
|
|
2.4.2 Horizontal Rules
Horizontal
rules
(horizontal lines used as visual separators on your page) are
inserted by using the Insert Horizontal Rule icon in the
Objects panel's Common category, or by selecting
Insert  Horizontal Rule. Horizontal Rule.
While a rule is selected, the Property inspector offers these
formatting options:
- Width (W)
-
Specifies the horizontal length of the rule in either pixels or as a
percentage.
- Height (H)
-
Specifies the vertical height (thickness) of the rule in pixels or as
a percentage.
- Alignment
-
Specifies the horizontal alignment of the rule across the page or
within the left and right edges of an object containing the rule,
such as in a table cell. Options are left, right, center, or default
(which uses the browser's setting, usually left).
- Shading
-
Specifies whether shading should be used to make the rule appear
three-dimensional.
You can set the color of a horizontal rule by setting the color
attribute in a CSS rule that customizes <hr>
elements, as described in Chapter 10 (not supported
in NN4).
 |
You can simulate a vertical rule by placing a tall, thin
graphic in a table column and placing other elements in columns to
either side of it.
|
|
2.4.3 Date and Time
To insert today's
date into your web page, use the
Date icon in the
Common category of the Objects panel (see Figure 1-4). In the Insert Date dialog box (not shown)
you can choose from a variety of date formats. You can optionally
include the time and day of the week. By default, Dreamweaver inserts
today's date, but if you enable the Update Automatically on
Save checkbox, Dreamweaver inserts code similar to the following:
<!-- #BeginDate format:Am1 -->August 27, 2001<!-- #EndDate -->
Dreamweaver updates the date automatically each time the file is
saved. This feature conveniently alerts your visitors of the day that
a page on your site was last updated. Use JavaScript, as shown in
Chapter 15, to display today's date. To
insert a date other than today's date, just enter the text by
hand.
2.4.4 Font Formatting
Table 2-10 lists the default font selections, accessible
under Text  Font or from the Font list in the Property
inspector. These fonts, or near equivalents, are available under most
operating systems. If you select an option that specifies multiple
fonts, such as "Verdana, Arial, Helvetica, Sans Serif,"
the visitor's web browser uses the first available font from
the list. For example, the browser uses the Verdana font if it is
available. If not, it falls back to Arial and then to Helvetica. If
none of the chosen fonts are available, the default sans serif font
will be used to display the indicated text. Font or from the Font list in the Property
inspector. These fonts, or near equivalents, are available under most
operating systems. If you select an option that specifies multiple
fonts, such as "Verdana, Arial, Helvetica, Sans Serif,"
the visitor's web browser uses the first available font from
the list. For example, the browser uses the Verdana font if it is
available. If not, it falls back to Arial and then to Helvetica. If
none of the chosen fonts are available, the default sans serif font
will be used to display the indicated text.
New paragraphs will inherit the font formatting from previous
paragraphs until a new font format is explicitly set.
Table 2-10. Default font options
|
Default browser font
|
Typically Times New Roman or Arial
|
|
Arial, Helvetica, sans serif
|
Proportional, sans serif font
|
|
Times New Roman, Times, serif
|
Proportional, serif font
|
|
Courier New, Courier, mono
|
Mono-spaced, serif font
|
|
Georgia, Times New Roman, Times, serif
|
Proportional, serif font
|
|
Verdana, Arial Helvetica, sans serif
|
Proportional, sans serif font
|
|
Geneva, Arial Helvetica, sans serif
|
Proportional, sans serif font
|
|
Edit font list
|
Add more fonts to menu
|
There are two basic types of font styles: serif and sans serif.
Characters in a serif font have serifs, the little
"feet" and "hats" that help a reader
distinguish similar letters. Sans serif fonts
(literally "without serif") lack these embellishments. In
print, sans serif font faces are typically used for headings and
subheadings, whereas serif fonts are used for the body text.
 |
Because serif fonts are harder to read on screen, you should use a
sans serif font for your web pages' body text. Consider using
serif fonts, which are more legible at larger point sizes, for
headings.
|
|
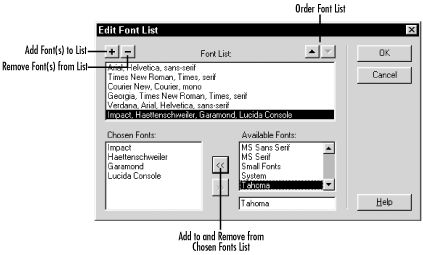
Fonts that are available locally or from a web server can be added to
the default font list using the Edit Font List dialog box, shown in
Figure 2-16. Access this dialog box using
Text  Font Font  Edit Font List or
via the Edit Font List option from the Font drop-down list in the
Property inspector. Edit Font List or
via the Edit Font List option from the Font drop-down list in the
Property inspector.

The default fonts are grouped by font
style. For example, Arial, Helvetica,
and Verdana are sans serif fonts, whereas Times, Georgia, and Times
New Roman are serif fonts. You can group your fonts by type, size, or
any other criterion. You can attempt to download a font or exercise
greater control over font substitution by incorporating the CSS
@font-face rule in your document, as described in
Chapter 10.
Table 2-11 shows how to apply standard HTML
character-formatting tags and
attributes in Dreamweaver. See Table 2-9 for
paragraph formatting commands.
Table 2-11. HTML text styles
|
<b>
|
Text  Style Style  Bold Bold
|
Ctrl+B
|
Cmd+B
|
|
<i>
|
Text  Style Style  Italic Italic
|
Ctrl+I
|
Cmd+I
|
|
<u>
|
Text  Style Style  Underline Underline
|
Alt-T, S, U
|
N/A
|
|
<s>
|
Text  Style Style  Strikethrough Strikethrough
|
Alt-T, S, S
|
N/A
|
|
<tt>
|
Text  Style Style  Teletype Teletype
|
Alt-T, S, T
|
N/A
|
|
<em>
|
Text  Style Style  Emphasis Emphasis
|
Alt-T, S, E
|
N/A
|
|
<strong>
|
Text  Style Style  Strong Strong
|
Alt-T, S, R
|
N/A
|
|
<code>
|
Text  Style Style  Code Code
|
Alt-T, S, C
|
N/A
|
|
<var>
|
Text  Style Style  Variable Variable
|
Alt-T, S, V
|
N/A
|
|
<samp>
|
Text  Style Style  Sample Sample
|
Alt-T, S, A
|
N/A
|
|
<kbd>
|
Text  Style Style  Keyboard Keyboard
|
Alt-T, S, K
|
N/A
|
|
<cite>
|
Text  Style Style  Citation Citation
|
Alt-T, S, O
|
N/A
|
|
<dfn>
|
Text  Style Style  Definition Definition
|
Alt-T, S, D
|
N/A
|
|
No formatting
|
Text  Paragraph Format Paragraph Format  None None
|
Ctrl+0 (zero)
|
Cmd+0 (zero)
|
2.4.5 Text Size
Dreamweaver can control the relative or absolute font size used to display
text (the default font size is typically 10
pt or 12 pt). You can specify absolute type sizes from 1 to 7 and
relative sizes from +1 through +4 or -1 through -3. Normal text is
equivalent to a 3, so a relative value of +1 indicates an absolute
size of 4 and a relative value of -1 indicates an absolute size of 2.
Table 2-12 provides a list of various HTML font
sizes and their approximate point sizes when displayed in a browser.
Table 2-12. Text sizes based on standard 12-pt default font
|
1
|
-2
|
8 pt
|
60%
|
|
2
|
-1
|
10 pt
|
80%
|
|
3
|
0
|
12 pt
|
100%
|
|
4
|
+1
|
14 pt
|
120%
|
|
5
|
+2
|
16 pt
|
140%
|
|
6
|
+3
|
18 pt
|
160%
|
|
7
|
+4
|
20 pt
|
180%
|
2.4.6 Text Color
The text color
pop-up palette, shown in Figure 2-17, lets you set
the color of the selected text. To limit yourself to
web-safe colors supported across all operating
systems, select the Snap to Web Safe option from the palette
options arrow menu.

There are several ways to adjust the color of a selected text object:
Type in the hexadecimal value of the color in the Property
inspector's Color field.
Select the color from the text color pop-up palette, opened using the
Text Color button in the Property inspector.
Apply a color from the Colors category of the Assets panel (see Chapter 6).
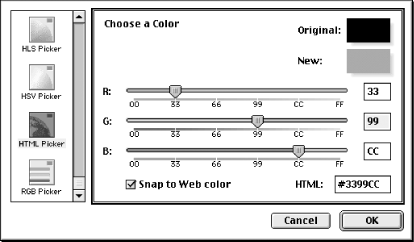
Select Text  Color and choose the color in the
Windows color selection pane (Figure 2-18) or the Macintosh color picker (Figure 2-19). Color and choose the color in the
Windows color selection pane (Figure 2-18) or the Macintosh color picker (Figure 2-19).


Use web-safe colorsto ensure consistent color
display on all platforms. The web-safe palette is a set of 216 colors
that are supported on both Macintosh and Windows. Color display on
Unix and Linux is still somewhat erratic, but the web-safe palette is
also the best choice for these operating systems. Web
Design in a Nutshell (O'Reilly) contains an
extensive discussion of the web color palette and color usage.
 |
Use the web-safe palette when creating graphics in such programs as
Fireworks or
Photoshop to avoid
dithering
(splotchy or freckled patches of color) when they're displayed
in a browser.
|
|
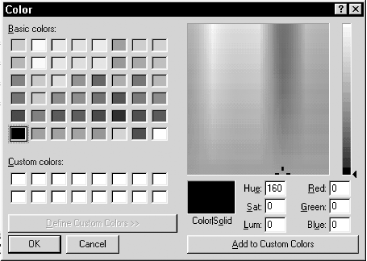
In the Windows color selection pane, you can select from 48 basic
colors that are part of a web color palette (i.e., web-safe
palette). Additional colors, 1 of up to 16 million, can be
selected from the graduated rainbow box to the right of the basic
color selectors seen in Figure 2-18. When you select
a color, the gradations of that hue are shown in the selection bar on
the far right of the Windows color selection pane. Click the Add to
Custom Colors button to define shades for easy access.
You can maintain sets of custom colors for each web site by adding them
to the Assets panel (discussed in Chapter 6) as follows:
If using Windows, right-click on any text that uses the desired
color. (Ctrl-click if using a Macintosh.)
Select Add to Color Favorites from the contextual menu that appears. The color will be available from the Colors category of the
Assets panel.
2.4.7 List Styles
Dreamweaver
can create numbered, bulleted, and definition-style lists. The
following list-formatting options are accessed from the Text  List submenu:
- None
-
Reverts text that was previously formatted as a list back to plain
body text.
- Ordered List
-
Creates a
numbered list.
- Unordered List
-
Creates a
bulleted list.
- Definition List
-
Creates a
definition-style list from alternating items in a text block. For
example, Item 1 is treated as a "term"; Item 2 is
indented and acts as Item 1's "definition," etc.
You can also format the selected text as a list using the
Ordered
List and Unordered List buttons in the Property
inspector (see Figure 1-5). You can remove list
formatting by selecting the text and untoggling the appropriate
button. You can also select a list type (using the buttons or menu
options) prior to entering your text; the text will be formatted
automatically as you type.
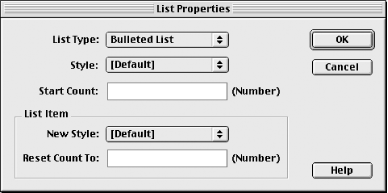
You can control the appearance of your list bullets or numbers using
the List Properties dialog box, shown in Figure 2-20. It is accessible via the
Text  List List  Properties
menu option, which is active only when the cursor or selection
occupies a single line in an ordered or unordered list (it is not
applicable to definition lists). Properties
menu option, which is active only when the cursor or selection
occupies a single line in an ordered or unordered list (it is not
applicable to definition lists).

The List Properties dialog box includes the options shown in Table 2-13.
Table 2-13. List Properties options
|
List Type
|
Selects a numbered, bulleted, directory, or menu list. The last two
list types are deprecated and should be avoided. (Directory lists
were glossary-style lists and menu lists were one-level bulleted
lists.)
|
|
Style
|
Select Roman, Arabic, or alphabetic (I, i, 1, A, or a) ordinals for
numbered lists. Select round bullets or hollow squares for bulleted
lists. Setting applies to all entries in the list (both preceding and
following the selected item).
|
|
New Style
|
Specifies the number style or bullet style for the currently selected
items and subsequent items whose New Style option is set to Default.
It does not affect items preceding the selected item.
|
|
Start Count
|
An integer specifying the starting value for the first ordinal in a
numbered list. Use an integer even if the Style setting is not
Arabic. For example, the number 3 is shown as III or iii in Roman
lists and is shown as C or c in alphabetic lists.
|
|
Reset Count To
|
Reset the item numbers in a numbered list, beginning with the
selected item. It does not affect the numbering of preceding items.
|
Creating a list using multiple styles of numbers can
be tricky. Section 2.4.7.1 creates a list that uses
traditional outline nomenclatureŚRoman numerals (I, II, III)
for the top level and capital letters (A, B, C) for the major
subheadings.
2.4.7.1 Procedure 1
Enter the text for the
list, without formatting, in the Design
pane of the Document window. Select the text for the list, and use
Text  List List  Ordered List to convert it to an ordered
(i.e., numbered) list. Ordered List to convert it to an ordered
(i.e., numbered) list.
Select the first item in the list (the entry to be designated I).
Choose Text  List List  Properties. Properties.
In the List Properties dialog box, set the Style to Roman Large. The
List Type should already be set to Numbered List and the Start Count
should default to 1 if left blank. Click OK.
Select the second item in the list (the entry to be designated A).
Use Text  Indent, Ctrl+Alt+] (Windows), or Cmd+Opt+]
(Macintosh) to indent the item. The numeral should default to 1. Indent, Ctrl+Alt+] (Windows), or Cmd+Opt+]
(Macintosh) to indent the item. The numeral should default to 1.
Choose Text  List List  Properties while this item is still
selected. Properties while this item is still
selected.
In the List Properties dialog box, set the Style to Alphabet Large.
The List Type should already be set to Numbered List and the Start
Count should default to 1 if left blank. Click OK.
Use the Text  Indent option to indent subsequent elements (B,
C, D, etc.). Indent option to indent subsequent elements (B,
C, D, etc.).
To create a third tier to the outline (such as i, ii, iii), indent
the text items twice and then repeat Step 6 using the Roman Small
style.
Repeat Steps 4 through 8 for items to be indented under Roman
numerals II, III, IV, and so on.
You must go through your list line by line, formatting the numbers
for each item in sequence. If you skip a line and corrupt the
numbering scheme, you must start over or correct the HTML code
by
hand.
|


