|
|
23.3 Configuring InteractionsCourseBuilder interactions are designed speed courseware development, but you must configure each interaction for your unique needs. If you select one of the Multiple Choice interactions, for example, you must specify a question and possible answers. Customize each interaction's options using the tabs at the bottom of the CourseBuilder Interaction dialog box (these tabs differ depending on the class of interaction selected from the Gallery tab). For example, the General tab of the MultCh_ImageChkboxes01 interaction, shown in Figure 23-10, lets you configure the Multiple Choice object. Figure 23-10. General tab for Multiple Choice interactions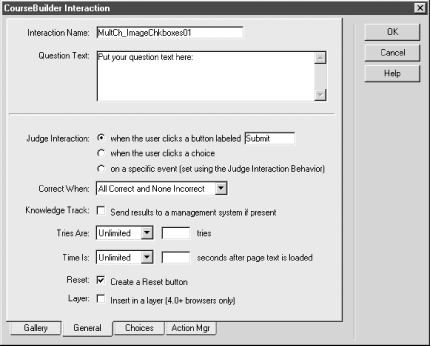 The General tab is present for all interactions, and the contents of the tab are highly similar for each class of interaction. The top of the General tab includes the interaction's name and some interaction-specific configuration options. For multiple choice questions, for example, specify the text of the question to ask. The lower portion of the General tab includes options that determine when the interaction is judged, what constitutes a correct answer, whether to send the results to a Knowledge Track system, how many attempts (tries) to allow the user, the time limit, whether to provide a reset button, and whether to place the interaction's contents within a layer (the last option is also available in the Property inspector). Other tabs in the CourseBuilder Interaction dialog box vary in scope and number for each type of interaction. For example, Multiple Choice interactions have a Choices tab, shown in Figure 23-11, that let you specify the multiple choice answers and other options. Figure 23-11. Choices tab for Multiple Choice interactions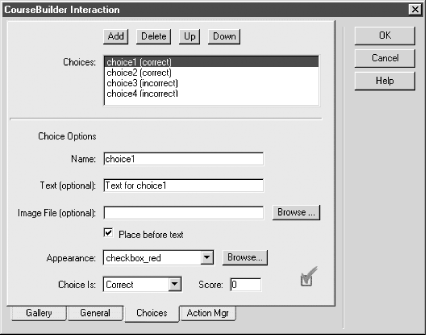 The other classes of interactions include tabs specific to their
requirements as described under Help 23.3.1 The Actions Mgr TabEach CourseBuilder interaction (including Action Manager objects) includes an Action Mgr tab similar to the one shown in Figure 23-12. The Action Mgr tab contains the Actions list that controls how the objects interact and how they are affected by different conditions. Figure 23-12. Action Mgr tab for Multiple Choice interactions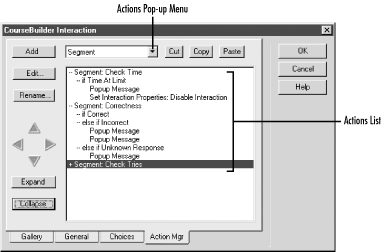 The Action list contains one or more segments, as seen in Figure 23-12, and segments are evaluated from top to bottom. Actions can be triggered by a user event (such as clicking a Submit button), a Judge Interaction event (as configured in an interaction's General tab), or a timer expiration event (when the user exceeds the allowed time).
Use the Expand and Collapse buttons in the Action Mgr tab to expand or collapse portions of the Actions list. Use the Cut, Copy, and Paste buttons to move or delete an item in the list. Use the Up and Down arrow buttons to move an item in the hierarchy. Use the Left and Right arrow buttons to indent or outdent a line item (i.e., change its position in the hierarchy). There are several supported action types as seen in Figure 23-12. The Actions pop-up menu includes entries for Segments, logical structures (Condition, Else, and Stop), behaviors (such as Popup Message), CourseBuilder actions (such as Judge Interaction), and Tracking actions (to submit data). To add a new item to the Actions list, select the action type from the Actions pop-up menu and click the Add button. 23.3.1.1 SegmentsSegments are containers for all other actions in the Actions list. Most interactions include three segments by default, which check the correctness of the user entry (Correctness), whether time has expired (Check Time), and whether the user has exceeded the allowed number of attempts (Check Tries). The Check Time and Check Tries segments are ignored if the General tab options specify unlimited tries and time. To add a segment, select Segment from the Actions pop-up menu and click the Add button. To open the Segment Editor, shown in Figure 23-13, select a segment from the Actions list (see Figure 23-12) and click the Edit button. Figure 23-13. Segment Editor In the Segment Editor, specify the segment's name. The Segment Evaluation field is typically set to Always Evaluate From The Beginning, except for Timer interactions, which use the State Transition option. 23.3.1.2 Logical structuresThree logical options—Condition, Else, and Stop—can be added by selecting one of them in the Actions pop-up menu and clicking the Add button.
Figure 23-14. Condition Editor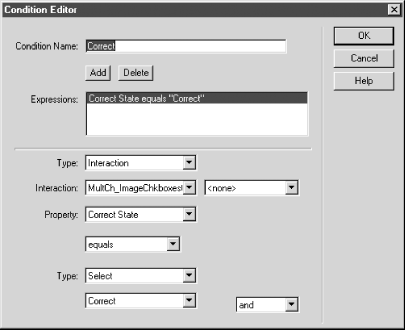 23.3.1.3 BehaviorsThe behaviors available in the Actions pop-up menu are the same ones available in the Dreamweaver Behaviors panel. To add a behavior, select its name from the Actions pop-up menu and click the Add button. By default, most interactions trigger the Popup Message behavior, which simply displays a message to the user. You'll typically replace the Popup Message behavior with something more interesting such as a Go To URL action. To replace a behavior in the Actions list (see Figure 23-12), delete it using the Cut button, and then insert a new behavior using the Add button. When you edit a behavior using the Edit button, Dreamweaver displays the behaviors parameters dialog box specific to that behavior (the same one used when editing a behavior in the Behaviors panel). For example, the Popup Message dialog box, shown in Figure 23-15, lets you edit a message displayed to the user. Figure 23-15. The Popup Message dialog box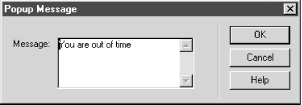 For more information on Dreamweaver's built-in behaviors, see Chapter 12. 23.3.1.4 CourseBuilder actionsThere are three CourseBuilder-specific actions—Judge Interaction, Reset Interaction, and Set Interaction Properties—which can be added by selecting one of them in the Actions pop-up menu and clicking the Add button. These actions initiate the judging of other CourseBuilder interactions, reset the state of an interaction, or set an interaction's properties. For example, use the Set Interaction Properties action to enable, disable, or change the state of other courseware elements. To open the Set Interaction Properties dialog box, shown in Figure 23-16, select a Set Interaction Properties item from the Actions list (see Figure 23-12) and click the Edit button. Figure 23-16. Set Interaction Properties dialog box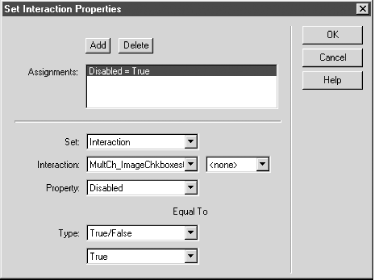 23.3.1.5 Tracking actionsTracking actions allow CourseBuilder to send data to a remote database or a computer-managed instruction (CMI) system such as IBM LearningSpace (formerly Lotus LearningSpace and Pathware). There are eight tracking-specific actions, including Send Core Data,
Send Interaction Info, Send Lesson Status, Send Objective Info, and
Send Score, which can be added by selecting one of them in the
Actions pop-up menu and clicking the Add button. These actions can be
used to communicate to a remote server running appropriate
middleware. See "Scoring and Data Tracking" under Help
We've covered a lot of territory in this book. You should now be well on your way to mastering Dreamweaver and developing sites with it efficiently. The appendixes collate reference material to help keep your development on track. Pay special attention to the development and deployment guidelines in Appendix C. Good luck! |
|
|