6.5 Using Design Notes
Design Notes allow you to track the
thoughts, difficulties, and solutions encountered by developers
working on a site. Enable the Maintain Design Notes option in the
Site Definition dialog box, as described earlier in Section 6.2.3. In a collaborative environment, all
team members should use Design Notes; without full participation, you
get only half the story regarding each file's status. (Enable
the Upload Design Notes for Sharing option when collaborating with
others.)
 |
Macromedia
SiteSpring
is a new, high-end product designed to facilitate collaborative web
site development. See
http://www.macromedia.com/software/sitespring/
for details.
|
|
To add a
Design Note or edit an existing one,
highlight the file to which the note applies and select
File  Design Notes. This opens the
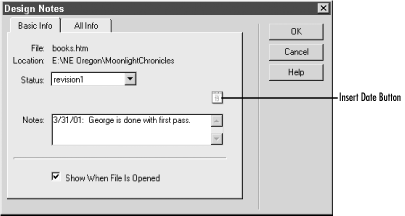
Design Notes dialog box shown in Figure 6-12. Design Notes. This opens the
Design Notes dialog box shown in Figure 6-12.

Design Notes can be attached to HTML files and asset files (such
as GIFs and JPEGs) in the Site Map pane, Local Files
pane, or Document window. Design Notes cannot be attached to some
items in the Site Map—namely broken links, external links, and
read-only (locked) files; nor can Design Notes be attached in the
Remote Files pane (use the Upload Design Notes for Sharing option to
post design notes to the server automatically).
 |
You can even attach Design Notes to
folders in the Local Files pane.
Attach notes about the entire site to the home page or a dummy file
maintained for this purpose.
|
|
Design Notes can be used informally, but if you structure your notes
using name/value
pairs, they can be a highly effective
site-management tool. Name/value pairs simply say, "This is the
name of the data I want to keep track of, and here is its particular
value." (Name/value pairs should sound familiar—they are
used similarly in URLs when submitting form data using the HTTP GET
method, as described in Chapter 2.) Luckily,
Dreamweaver provides some predefined name/value pairs for you and
also lets you define your own. Let's see how this concept
works.
6.5.1 Adding Basic Info to Design Notes
In the Basic Info tab of the Design Notes dialog box, Dreamweaver
provides three commonly needed name/value pairs.
- Status
-
Select the development status of the file related to this note from
the pop-up menu. This selection creates a name/value pair with the
name status and the value
draft, revision1,
revision2, revision3,
alpha, beta,
final, or needs attention.
- Notes
-
Enter notes of your choosing, such as "Problem fixed" or
"Waiting on Joe to provide artwork." Entering notes
creates a name/value pair with the name notes and
the value of the text specified in the box. Use the Insert Date icon,
indicated in Figure 6-12, to add today's date
to the notes. The date simply becomes part of the notes text; it does
not become a separate name/value pair.
- Show When File is Opened
-
Enable this checkbox to open the note automatically whenever the file
is opened. This creates a name/value pair with the name
showOnOpen and the value true.
6.5.2 Adding and Editing Customized Info in Design Notes
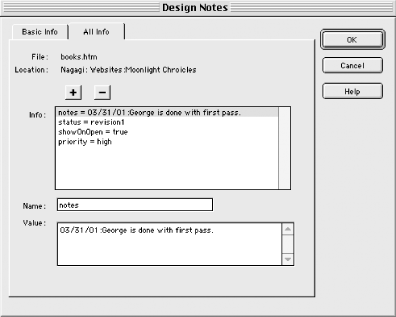
In the All Info tab of the Design Notes dialog box, shown in Figure 6-13, you can edit the existing name/value pairs or
add custom ones.

The following fields control the editing of name/value pairs:
- Info
-
A list of the name/value pairs for this design note. You may see the
status, notes, and
showOnOpen name/value pairs from the Basic Info
tab listed here. You can add custom name/value pairs using the plus
(+) button.
- Name
-
Specifies the name portion of the name/value pair highlighted in the
Info list. The default names are status,
notes, and showOnOpen, but you
can add your own custom names. We'll discuss three more
pseudo-default names—assigned,
due, and priority—later.
- Value
-
Specifies the value portion of the name/value pair highlighted in the
Info list.
You can edit, add, and delete name/value pairs.
- Editing an existing name/value pair
-
Highlight an existing name/value pair in the Info list. Its name
appears in the Name field and its value appears in the Value field.
You can edit the Value, but should generally leave the Name alone.
For example, if you change the name notes to
myNotes, it creates a new name/value pair
whose value will no longer appear under the Basic Info tab.
- To add a custom name/value pair
-
Use the plus (+) button to create a blank line in the Info list.
Specify a name for your new property in the Name field and assign a
value to it using the Value field. You might specify
priority for the Name and then fill in a Value
such as low. (Later, we'll see how to display custom name/value
pairs in the Site Files window.)
 |
By using name/value pairs consistently in all your Design Notes,
you'll be able to display and sort the information easily.
|
|
- To delete a name/value pair
-
Select the item you wish to delete from the Info list and then click
the minus (-) button. If you accidentally delete a name/value pair,
use the Cancel button in the dialog box to abort the changes.
6.5.3 Viewing and Sorting Contents of Design Notes
If a Design Note is
attached to a document, Dreamweaver displays a little
balloon icon
next to the document name in the Site Files window, as shown in Figure 6-14.

There are many ways to view some or all of the information within
your Design Notes. To view the contents of a design note associated
with a document use any of these methods:
Double-click a file's Design Notes icon in the Site Files
window, as seen in Figure 6-14.
Select a file and choose File  Design Notes. Design Notes.
Choose Design Notes from the contextual menu in the Local Files pane
or Site Map pane.
If the Show When File is Opened option is enabled in the Design Notes
dialog box, the Design Note will open automatically when you open the
document with which it is associated.
The contents of your Design Notes can be retrieved and displayed in
the Local Files and Remote Files panes of the Site Files window.
Here's how it works:
Use View  File View Columns in the Site window (Windows) or
Site File View Columns in the Site window (Windows) or
Site  Site Files View Site Files View  File
View Columns (Macintosh) to open the File View Columns category of
the Site Definition dialog box (see Figure 6-6). File
View Columns (Macintosh) to open the File View Columns category of
the Site Definition dialog box (see Figure 6-6).
The Notes item in the Column List merely displays a balloon indicator
in the Site Files window next to documents with associated Design
Notes (see Figure 6-14). Enable this column by
selecting Notes from the Column List and checking the Show checkbox.
To add a custom column that displays the actual contents of notes,
continue with Step 3.
Use the plus (+) button to add a new column. Specify a Column Name of your choice, such as Status. (Although using
a name that matches the property specified in Step 5 is advisable,
you can use any name you like for the column heading.)
In the Associate with Design Note field, specify the Name portion of
the name/value pair you want to display in this column. You can pick
a predefined name (Assigned,
Due, Status, or
Priority) from the pop-up menu, or enter a custom
name (which should match a name/value pair used commonly across all
your Design Notes, not the name of a specific document). Pick Status
to extract the status field from the Basic Info
tab of the Design Notes. To display the full text of the Notes field,
enter notes (it isn't one of the pop-up
menu options, but it corresponds to the comments entered into Design
Notes).
Enable the Show checkbox for this item. You can also set the column alignment and choose whether to share the
column configuration publicly.
Click OK to close the File View Columns dialog box. In the Design Notes dialog box associated with each document, provide
a value for the name/value pair used in Step 5. For example, you
might choose a status from the Status pop-up menu under the Basic
Info tab or assign a value to a custom name/value pair under the All
Info tab. See the previous section for details.
The columns you create in the File View Columns category of the Site
Definition dialog box are shown in the Site Files window. You can
sort files in the Local Files pane of the Site Files window by
clicking on the column headings. For example, you can sort files
according to which have Design Notes or according to their status or
priority fields (if you've created appropriate custom columns
for these). If you've enabled the Upload Design Notes for
Sharing option, Design Notes is uploaded to the server and made
available in the Remote Files pane of the Site Files window.
Design Notes can also be sorted and searched using the Design Notes
Report, explained in Section 6.9
later in this chapter.
6.5.4 Removing Design Notes
Design Notes are stored in .mno files (which are just XML files).
Dreamweaver stores .mno files in
_notes folders (one for each folder of your
site, including its local root folder). Of course, Dreamweaver
handles the housekeeping for you, so you usually don't have to
worry about this issue.
You can delete unwanted Design Notes in several ways:
To delete a Design Note attached to an individual file, use File
 Design Notes to open the Design Notes dialog box. Click on the
All Info tab in this dialog box and then use the minus (-) button to
delete all properties listed in the Info field. Once you've
deleted all the contents, click OK and Dreamweaver will delete the
entire .mno file. Design Notes to open the Design Notes dialog box. Click on the
All Info tab in this dialog box and then use the minus (-) button to
delete all properties listed in the Info field. Once you've
deleted all the contents, click OK and Dreamweaver will delete the
entire .mno file.
To delete Design Notes associated with files that no longer exist,
use the Clean Up button in the Design Notes category of the Site
Definition dialog box.
To delete Design Notes en masse, delete one or more
.mno files in the _notes folders scattered throughout your
site's local folder and its subfolders. The
Site  Define Sites Define Sites  Remove
command, which deletes a site definition, also deletes Design Notes
for the site but leaves behind the empty _notes folders. (You'll
have to use the Windows File Explorer or the Macintosh Finder to
delete the folders.) Remove
command, which deletes a site definition, also deletes Design Notes
for the site but leaves behind the empty _notes folders. (You'll
have to use the Windows File Explorer or the Macintosh Finder to
delete the folders.)
|


