|
|
< Day Day Up > |
|
1.5 Working with EclipseYou use the Eclipse Java Development Tools (JDT), a series of six seamlessly integrated plug-ins, for Java development in Eclipse. Even if you've written Java for years, you're about to have a whole new experience, one that makes Java development so smooth that when you understand how to use the JDT, you'll wonder what took people so long to make this a reality. Eclipse is all about code development, and the only way to really understand what's going on is by creating code, so we're going to start by using the JDT to create and run the amazingly useful application you see in Example 1-1. This Java application just displays the message "No worries." on the console. Example 1-1. The Ch01_01.java examplepublic class Ch01_01
{
public static void main(String[] args)
{
System.out.println("No worries.");
}
}
How can you create this application using Eclipse, and how is Eclipse going to make your job easier? The answers are coming up right now. In Eclipse, all Java code must be inside a Java project, so the first step is to create a Java project. 1.5.1 Creating a Java ProjectTo invoke the
Java perspective, and enter the code for our first example,
Ch01_01.java, start Eclipse and select the
Window Figure 1-6. The Eclipse Java perspective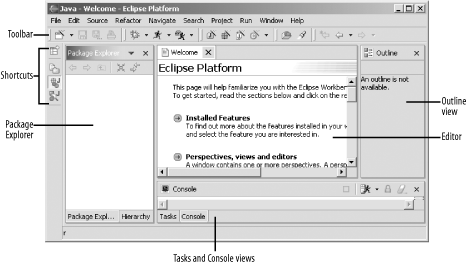 It's worth getting to know the Java perspective before we start using it. At the top are the standard menu bars and toolbars, populated with new items for the Java perspective, which we'll become familiar with in the coming pages. The left pane holds the Package Explorer and Hierarchy views, and you use the tabs at the bottom of this pane to flip between these views. The Package Explorer view gives you an overview of the package you're working on and lets you navigate through Java projects, selecting what files you want to open in the editor. The Hierarchy view lets you examine type hierarchiesyou select an item in a code editor, right-click it, and select the Open Type Hierarchy context menu item. When you do, the hierarchy view will display the hierarchy of that item, giving you a clickable inheritance tree for the item, including all members. That can be a big help if you're trying to figure out the syntax of methods you want to override or which methods are available. The Outline view in the pane at right presents a structured, hierarchical view of the contents of the file open in the main editor pane and lets you jump to elements in it. This is great for developers who are accustomed to using a simple text editor to develop long Java files, because this view organizes the main sections of long code files, letting you move around at will (more on this view in the next chapter). At the bottom of the Java perspective are the Tasks and Console views, which you can select between using tabs. The Tasks view displays pending tasks, such as errors that the compiler has noticed and which need to be fixed, and the Console view shows you what's going on in the output consoleour sample application will write to the Console view, for example. Editors are stacked in the middle pane and are accessible with the tabs at upper left in that pane. The JDT code editors give you an immense amount of power, far beyond simply entering text. There are all kinds of hidden assets built-in here, most of which are utterly unobtrusive until you decide you want to use them. That
gives us an overview; to create a new Java project in the Java
perspective, select the File Figure 1-7. The New Project dialog box, first pane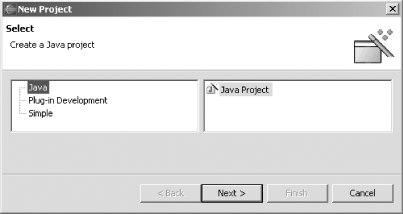 Select the Java and Java Project items and click Next to bring up the next pane of this dialog box. Enter the name of this new project, Ch01_01, in the Project Name box, and click Next, bringing up the next pane of the dialog, which you see in Figure 1-8. As you can see in this pane, we're about to create a new project named Ch01_01 in its own folder. You can use the Projects tab here to include other projects in the build path, something we'll do as our projects become more involved. The Libraries tab lets you browse to libraries and JAR files you want included in the build path; by default, only the JRE System Library is included. The Order and Export tab lets you specify the order of classes in your build path, and gives you the option of whether you want to export the current projects so its code will be available to other projects. In this case, just click Finish to create our new project, Ch01_01. Figure 1-8. The New Project dialog box, third pane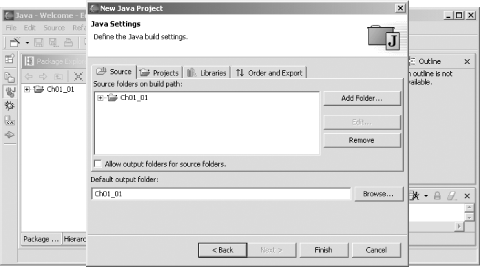 This adds the new Ch01_01 project to the Package Explorer, as you see in Figure 1-9. The project is represented as a folder in your workspace, and, at this point, the folder only contains the libraries we've included on the build path, the JRE System Library. Figure 1-9. A new project in the Package Explorer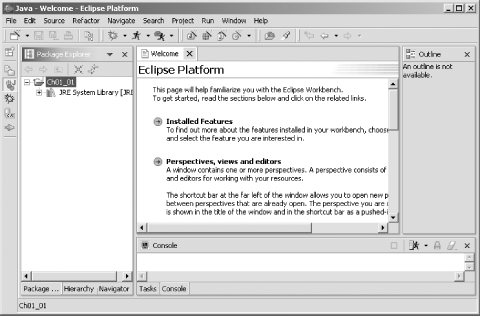 Projects like this organize your files, classes, libraries, and exports. We don't even have any code in this one yet, so the next step is to add a new public Java class to the project. 1.5.2 Creating a Java ClassIn our example, the public class is
Ch01_01, and Eclipse stores public classes like
this one in their own files. There are several techniques for
creating new classes in Eclipse: you can use the toolbar item with
the circled C icon, you can use the File Figure 1-10. Creating a new Java class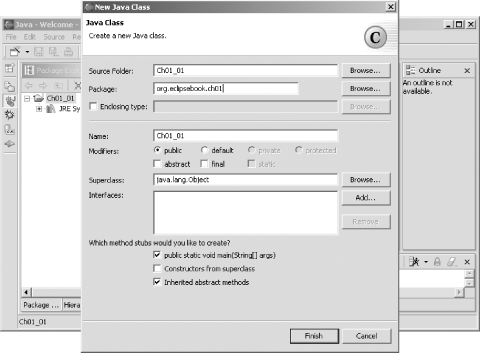 Note the options in this dialog. You can set a class's access specifierpublic, private, or protected; you can make the class abstract or final; you can specify the new class's superclass (java.lang.Object is the default); and you can specify which, if any, interfaces it implements. We're going to put our examples into Java packages to avoid any conflict with other code; here, we'll use packages named after the example's chapter, like org.eclipsebook.ch01. In this case, just enter the name of this new class, Ch01_01, in the Name box, and enter the name of a new package we'll create for this class, org.eclipsebook.ch01, in the Package box, and click Finish to accept the other defaults. Note, in particular, that under the question "Which method stubs would you like to create?" we're leaving the checkbox marked "public static void main(String[] args)" checked. Doing so means that Eclipse will automatically create an empty main method for us. Clicking the Finish button creates and opens our new public class, Ch01_01, as you see in Figure 1-11; note the package statement that creates the org.eclipsebook.ch01 package. This new class will be stored in its own file, Ch01_01.java, in the Eclipse folder workspace\Ch01_01. Figure 1-11. A new Java class in Eclipse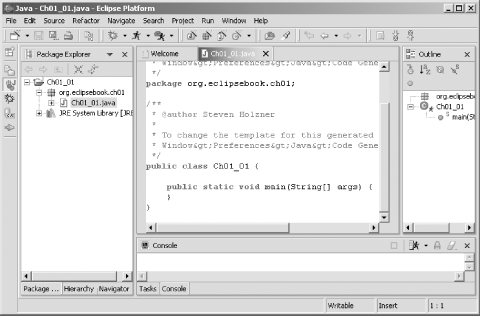 So far, so good; you can see the main method that Eclipse has added to our class already. Now let's enter some code of our own. 1.5.3 Using Code AssistYou can type in code using the JDT's editor as with any editor, as you'd expect, but there's a lot more utility here than in a standard text editor. For example, the JDT also supports a facility named code assist that helps you by completing code you've already started to type, and it's a handy tool you'll find yourself using over and over. For example, say that you want to enter the code System.out.println("No worries."); in the main method. To see code assist do its thing, move the mouse cursor inside the main method's body and type System., and then pause. Code assist will automatically display the various classes in the System namespace, as you see in Figure 1-12. Figure 1-12. Using code assist to create a method call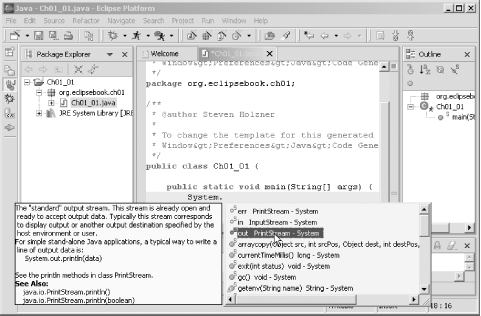 When you highlight out in the list of possible classes with the mouse, code assist will give you a rundown of what this class does, as you see at left in the figure. Double-click out in the code assist list so that code assist will insert it into your code, and type a period to give you System.out., and pause again. Code assist will display the methods of the out class. Double-click the code assist suggestion println(String arg0), and code assist will insert this code into the main method: public class Ch01_01
{
public static void main(String[] args)
{
System.out.println( )
}
}
Edit this now to display our "No worries." text (you'll see that code assist adds the closing quotation mark automatically as you type): public class Ch01_01
{
public static void main(String[] args)
{
System.out.println("No worries.")
}
}
However, Eclipse displays this new code with a wavy red line under it, which indicates there's a problem. To see what's going on, rest the mouse cursor over the new code, and a tool tip will appear, as you can see in Figure 1-13, indicating that there's a missing semicolon at the end of the line. Figure 1-13. Checking an error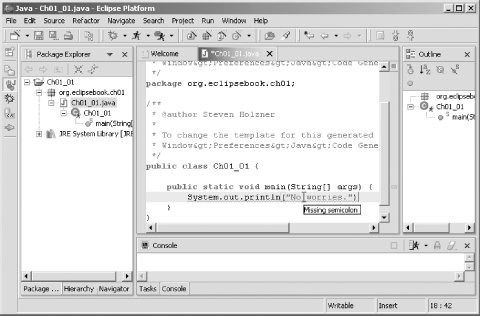 Add that semicolon now to give you the complete code and make the wavy red line disappear: public class Ch01_01
{
public static void main(String[] args)
{
System.out.println("No worries.");
}
}
Our code is complete. In Figure 1-13, note that the Package Explorer is giving us an overview of the project, showing the public class Ch01_01 and the main method in that class. In this way, the Package Explorer view gives you access to all the items in a project. To bring an item up in a code editor, just double-click it in the Package Explorer view.
As you can see in this example, the coding was made a little easier because code assist knew all the members of the System.out class and let you select from among them. Code assist will automatically appear when you type a dot (.). You can also make code assist appear at any time while you're typing codejust type Ctrl+Space.
Each time you edit the code in a file, as we're doing here in Ch01_01.java, an asterisk appears in front of the filename file in its code editor tab, as you see in Figure 1-13. This asterisk indicates that changes to the file have not yet been saved. There are many ways to save your work: click the diskette icon (for Save) in the toolbar; click the diskette followed by an ellipsis ( . . . ) icon (for Save As . . . ) in the toolbar; right-click the code itself and select the Save context menu item; or select the Save, Save As, or Save All menu items in the File menu. Alright, we've got our first code written and stored to disk. How about running it? 1.5.4 Running Your Code
If you look closely at the Package
Explorer view in Figure 1-13,
you'll see that the circled C icon for our
Ch01_01 class also has a small running figure in
it. That is Eclipse's way of indicating this class
is runnable because it has a
main method. To run this code and see the output,
select the Run Figure 1-14. Running our Ch01_01 example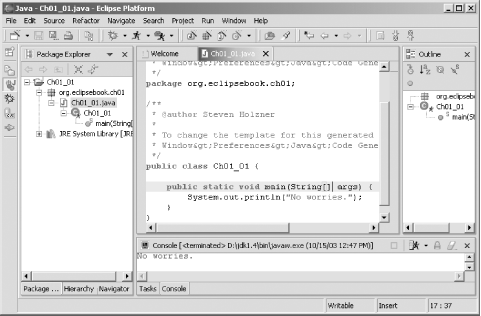 Congratulationsnow you're an Eclipse developer. 1.5.5 Using the ScrapbookThere's another way to run code in a Java Project, and you don't need a main method to do it: you can use a scrapbook page instead. Scrapbook pages give you a way of executing code, even partial code, on the flya big help in the development process. This is not an essential skill, but it's a useful one. To create a
scrapbook page, select the File String[] args = {};
org.eclipsebook.ch01.Ch01_01.main(args);
Figure 1-15. Using a scrapbook page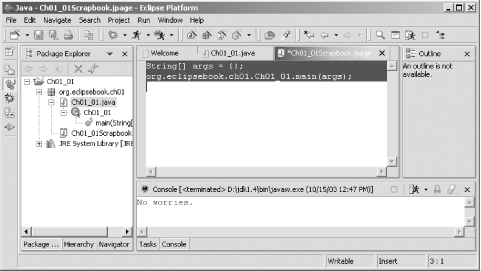 To
tell the scrapbook page what code to run, select all the code
you've entered, as you see in Figure 1-15, right-click it, and select the Execute
context menu item (you can also select the Run
As you can see, the JDT are very helpful. There's also a lot morefor example, what if you've got an error in your code? Eclipse can help here, too. |
|
|
< Day Day Up > |
|
 Open Perspective