|
|
< Day Day Up > |
|
1.6 Using Quick FixQuick Fix lets the JDT suggest ways of fixing simple errors, and that's one of the things that Java should have had a long, long time ago. For example, say you change the Ch01_01 code to display the "No worries." message along with today's date: public class Ch01_01 {
public static void main(String[] args) {
outString = "No Worries on ";
Calendar rightNow = Calendar.getInstance( );
System.out.println(outString + rightNow.getTime( ));
}
}
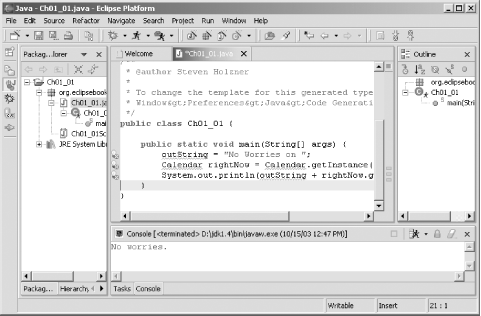
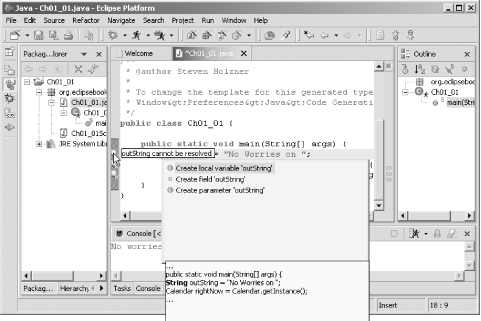
You can probably spot a few errors here. The variable outString is not declared, which makes the first and last lines of code in main invalid, and the Calendar class has not been imported, making the middle line of code invalid. If you were using javac, you'd have to quit editing and run javac to catch those errors. But the second you enter these lines into Eclipse, they'll be flagged as errors with wavy red underlines, as you see in Figure 1-16. Figure 1-16. Quick Fix indicators Eclipse doesn't let you down by just showing you the errors—it also suggests solutions. Note the yellow light bulb and red X icons in the bar to the left of the code editor, which is called the marker bar. These icons tell you that Quick Fix is available for all the errors. Note also the hollow red rectangles in the bar on the right of the code editor view, called the overview ruler. These hollow red rectangles indicate statements that Quick Fix can fix—solid red rectangles flag compiler errors—and you can use these icons to navigate to problems to fix. If you let the mouse cursor hover over the first light bulb icon in the marker bar, you'll see a tool tip appear with the description of the error ("outString cannot be resolved"), as in Figure 1-17. Figure 1-17. Using Quick Fix To activate Quick Fix and see what the JDT suggests to fix the problem, click the light bulb icon on the affected line. Doing that displays a number of options, the first of which is "Create local variable `outString'", as you see in Figure 1-17. Quick Fix also indicates what its suggested solution will look like in the context of your code, as you see at the bottom of the figure. To fix the code, select the Create local variable option by double-clicking it, which changes our code to this, declaring outString as a variable of type String: public class Ch01_01 {
public static void main(String[] args) {
String outString = "No Worries on ";
Calendar rightNow = Calendar.getInstance( );
System.out.println(outString + rightNow.getTime( ));
}
}
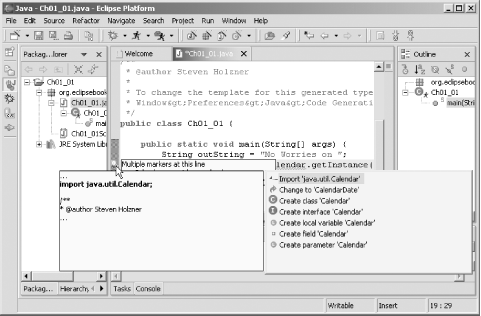
Declaring outString also fixes the last line in the main method, which references that variable, so the light bulb icon disappears from that line as well. We've still got to fix the problem with the middle line of code in the main method, which uses the Calendar class. You can see what Quick Fix suggests for this problem in Figure 1-18—importing the java.util.Calendar class. (This aspect of Quick Fix alone is worth the price of admission: you no longer have to hunt through entire package hierarchies to find what package to import when you want to use a class whose name—but not package—you remember.) Figure 1-18. Using Quick Fix to import a package To use this suggested Quick Fix, double-click the "Import `java.util.Calendar'" line, which imports java.util.Calendar and changes your code to this: import java.util.Calendar;
.
.
.
public class Ch01_01 {
    public static void main(String[] args) {
        String outString = "No Worries on ";
        Calendar rightNow = Calendar.getInstance( );
        System.out.println(outString + rightNow.getTime( ));
    }
}
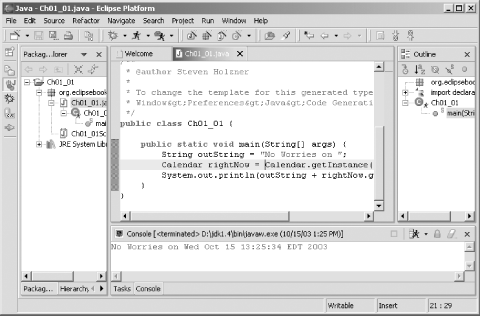
After resolving these problems with Quick Fix, you can run the code as you see in Figure 1-19. Now you'll see that there are no worries, as the text message in the Console view indicates. Figure 1-19. The fixed code at work |
|
|
< Day Day Up > |
|