|
|
< Day Day Up > |
|
10.5 Using the Easy Struts Plug-inThe Easy Struts plug-in is available for free from http://sourceforge.net/projects/easystruts. This plug-in adds Struts support to a project and has a number of code-generation wizards that let you create actions, forms, and so on. To use this plug-in, Easy Struts recommends that you start by creating a Tomcat project using the Sysdeo Tomcat plug-in we looked at in Chapter 9 (which means that we'll use an older version of Tomcat in this example, as we did when using the Tomcat plug-in in the previous chapter). Call this Tomcat project Ch10_02.
To work with Easy Struts, you start by
configuring the plug-in. Select Window Figure 10-5. Configuring the Easy Struts plug-in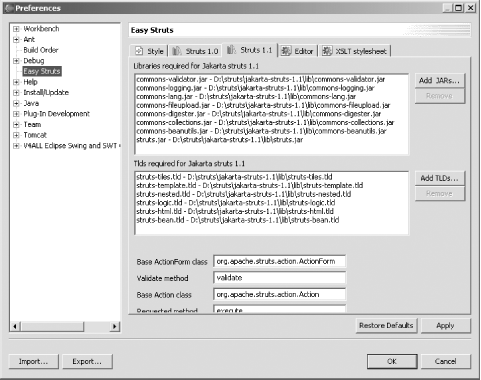 To add Struts support to the
Ch10_02 project, right-click that project and
select New Figure 10-6. Adding EasyStruts support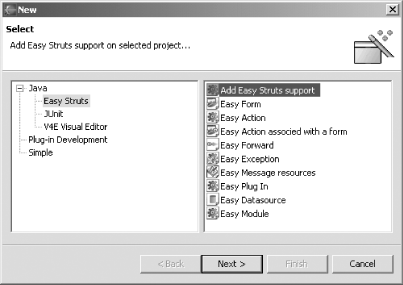 Clicking Next brings up the next pane in the dialog, shown in Figure 10-7, where you can select Struts options; set the package to org.eclipsebook.ch10 and click Finish. Figure 10-7. Configuring Struts support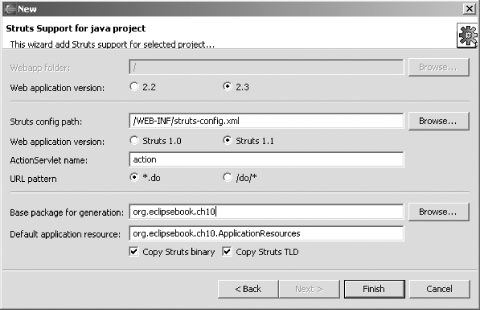 With the current version of the
plug-in, you must also select Project Adding
Easy Struts support adds the Struts JAR files to the project
automatically. To create an input form and a corresponding bean to
hold the input form's data, right-click the project
and select New Figure 10-8. Creating a form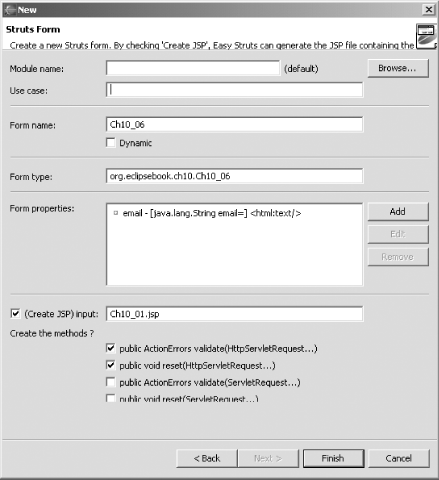 Give this new form bean the name Ch10_06 to match the name of our bean in the project we just developed, select the (Create JSP) input checkbox so that Easy Struts will create a JSP form connected to this form bean, and name the JSP form Ch10_01.jsp, as in our earlier project. Easy Struts gives you some rudimentary support for creating properties in the form bean, along with associated HTML controls in the JSP page. To do that, you click the Add button next to the Form properties box. The only one of our controls that is simple, however, is the text box where the user can enter his email address (the other controls are a more advanced checkbox list and a select control, which Easy Struts can't help us with), so click the Add button, enter the name of the property to add, email, leave its type as java.lang.String, and select the HTML text control as the associated control to create in the JSP form. When done, click Finish to add the new property to the form and click Finish to create Ch10_01.jsp and Ch10_06.java. You can see the resulting Ch10_01.jsp in Example 10-11 and Ch10_06.java in Example 10-12. They're good starts, but a lot of programming is required to make them match our earlier code. Example 10-11. Generated JSP file<%@ taglib uri="/WEB-INF/struts-bean.tld" prefix="bean"%>
<%@ taglib uri="/WEB-INF/struts-html.tld" prefix="html"%>
<html>
<head>
<meta name = "Generator" content = "Easy Struts Xslt generator for Eclipse
(http://easystruts.sf.net).">
<title>Struts Form for Ch10_06</title>
</head>
<body>
<html:form action="/[ACTION_PATH]">
email : <html:text property="email"/><html:errors
property="email"/></br>
<html:submit/><html:cancel/>
</html:form>
<body>
</html>
Example 10-12. Generated Java filepackage org.eclipsebook.ch10;
import javax.servlet.http.HttpServletRequest;
import org.apache.struts.action.ActionErrors;
import org.apache.struts.action.ActionForm;
import org.apache.struts.action.ActionMapping;
/**
* Ch10_06.java created by EasyStruts - XsltGen.
* http://easystruts.sf.net
* created on 12-02-2003
*
* XDoclet definition:
* @struts:form name="Ch10_06"
*/
public class Ch10_06 extends ActionForm {
// --------------------------------------------------------- Instance Variables
/** email property */
private String email;
// --------------------------------------------------------- Methods
/**
* Method validate
* param ActionMapping mapping
* @param HttpServletRequest request
* @return ActionErrors
*/
public ActionErrors validate(
ActionMapping mapping,
HttpServletRequest request) {
throw new UnsupportedOperationException(
"Generated method 'validate(...)' not implemented.");
}
/**
* Returns the email.
* @return String
*/
public String getEmail( ) {
return email;
}
/**
* Set the email.
* @param email The email to set
*/
public void setEmail(String email) {
this.email = email;
}
}
To
create an action servlet, right-click the project, select
New Figure 10-9. Creating an action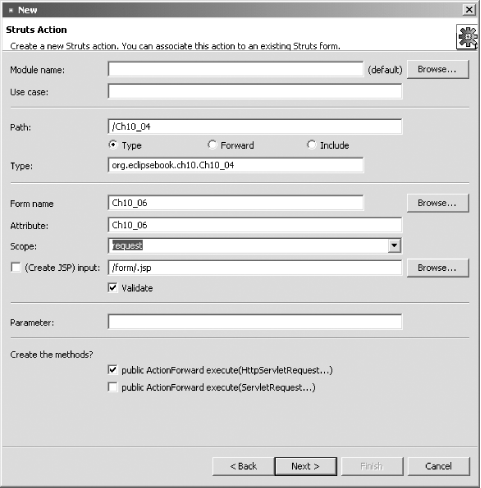 Clicking the Next button takes you to the next pane, where you can create forwards to other servlets and JSPs; in this case, just click Finish to generate the action servlet skeleton for Ch10_04.java you see in Example 10-13. As you can see, the backbone of an action servlet is there, but it will take a lot of work to add all the code we had in our earlier version of this file. Example 10-13. Generated servlet codepackage org.eclipsebook.ch10;
import javax.servlet.http.HttpServletRequest;
import javax.servlet.http.HttpServletResponse;
import org.apache.struts.action.Action;
import org.apache.struts.action.ActionForm;
import org.apache.struts.action.ActionForward;
import org.apache.struts.action.ActionMapping;
/**
* Ch10_04.java created by EasyStruts - XsltGen.
* http://easystruts.sf.net
* created on 12-02-2003
*
* XDoclet definition:
* @struts:action path="/Ch10_04" name="Ch10_06" input="/form/.jsp" validate="true"
*/
public class Ch10_04 extends Action {
// --------------------------------------------------------- Instance Variables
// --------------------------------------------------------- Methods
/**
* Method execute
* @param ActionMapping mapping
* @param ActionForm form
* @param HttpServletRequest request
* @param HttpServletResponse response
* @return ActionForward
* @throws Exception
*/
public ActionForward execute(
ActionMapping mapping,
ActionForm form,
HttpServletRequest request,
HttpServletResponse response)
throws Exception {
Ch10_06 Ch10_06 = (Ch10_06) form;
throw new UnsupportedOperationException(
"Generated method 'execute(...)' not implemented.");
}
}
As you can see, Easy Struts provides skeletal code for the various parts of a Struts program, and it's up to you to fill in the details. We're not going to go through the whole process here, but if you're interested, the Ch10_02 file in the download for this book is the resulting application—the same as the one we created earlier in this chapter—but it's based on Easy Struts. That completes our look at Eclipse and building Struts projects manually and with a plug-in. Struts applications need a lot of code and multiple files, but that's been useful to us since it gave us a look at developing larger scale applications with Eclipse. In the next two chapters, we're going to take a look at developing our own plug-ins. |
|
|
< Day Day Up > |
|