|
|
< Day Day Up > |
|
12.1 Creating a Multi-Page Editor The first example in this chapter is going
to create a multi-page editor associated with the file extension
we're going to specify: .xyz.
When the user double-clicks a file with that extension in the Package
Explorer, Eclipse will use our editor to open and edit it. That
editor will have two tabs corresponding to its two pagesthe
default tab will display the text contents of the file, and the
Sorted tab will display those contents sorted in alphabetical order.
You can create files with the .xyz extension
using the New 12.1.1 Creating the CodeTo create the code skeleton for
this example, select New Figure 12-1. Creating a plug-in with a multi-page editor Select the Plug-in with a multi-page editor item, as you see in the figure, and click Next. In the following pane, set the Provider name to Eclipse Book and click Next again. In the next pane that appears, set the File Extensions item to xyz to associate the plug-in with that extension, as you see in Figure 12-2, and click Next again. Figure 12-2. Configuring the plug-in's editor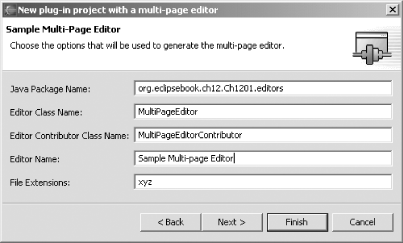 In the next pane, set the file extension to xyz, and give file.xyz as the initial file name, as shown in Figure 12-3. Then click Finish to create the code skeleton for this plug-in. Figure 12-3. Configuring the plug-in's wizard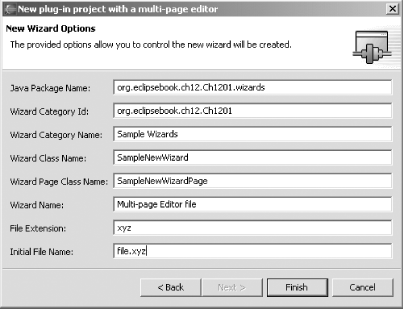 Here are the files the PDE wizard creates and adds to the src folder in the org.eclipsebook.ch12.Ch12_01 project: src |_ _org.eclipsebook.ch12.Ch12_01 | |_ _Ch12_01Plugin.java The standard plug-in file | |_ _org.eclipsebook.ch12.Ch1201.editors | |_ _MultiPageEditor.java The editor's code | |_ _MultiPageEditorContributor.java The editor actions (menus/toolbar items) | |_ _org.eclipsebook.ch12.Ch1201.wizards | |_ _SampleNewWizard.java The wizard's code | |_ _SampleNewWizardPage.java The code for the wizard's page | |__ _plugin.xml 12.1.2 Dissecting the WizardThis plug-in supports both a wizard and a multi-page editor. We're going to focus on the editor, but it's instructive to take a brief look at the wizard as well. The job of the wizard is to create a new file, file.xyz, and to add it to the project. The Java code that does this is the SampleNewWizard class, which extends the Eclipse Wizard class. The visual page that the wizard displays to the user is supported in the SampleNewWizardPage class; that class constructs a composite SWT object that displays the controls the user will interact with. Here's how code in SampleNewWizard creates the page the wizard will display: public class SampleNewWizard extends Wizard implements INewWizard {
private SampleNewWizardPage page;
private ISelection selection;
public SampleNewWizard( ) {
super( );
setNeedsProgressMonitor(true);
}
public void addPages( ) {
page = new SampleNewWizardPage(selection);
addPage(page);
}
.
.
.
After the user has filled in the data the wizard asks for (which is the project to add the new file to and the name of the file) and clicked Finish, the SampleNewWizard class's doFinish method is called. This method is passed both the name of the project to add the new file to and the name of the file. Take a look at this method's code, which shows how to create a new file, add it to an Eclipse project, and open that file in Eclipsesome of the most impressive things you can do in a plug-in: private void doFinish(
String containerName,
String fileName,
IProgressMonitor monitor)
throws CoreException {
// create a sample file
monitor.beginTask("Creating " + fileName, 2);
IWorkspaceRoot root = ResourcesPlugin.getWorkspace( ).getRoot( );
IResource resource = root.findMember(new Path(containerName));
if (!resource.exists( ) || !(resource instanceof IContainer)) {
throwCoreException("Container \"" + containerName +
"\" does not exist.");
}
IContainer container = (IContainer) resource;
final IFile file = container.getFile(new Path(fileName));
try {
InputStream stream = openContentStream( );
if (file.exists( )) {
file.setContents(stream, true, true, monitor);
} else {
file.create(stream, true, monitor);
}
stream.close( );
} catch (IOException e) {
}
monitor.worked(1);
monitor.setTaskName("Opening file for editing...");
getShell( ).getDisplay( ).asyncExec(new Runnable( ) {
public void run( ) {
IWorkbenchPage page =
PlatformUI.getWorkbench( )
.getActiveWorkbenchWindow( ).getActivePage( );
try {
page.openEditor(file);
} catch (PartInitException e) {
}
}
});
monitor.worked(1);
}
The default text in the new file is set when doFinish opens a new input stream to read the contents it should place in the file. That's done in the openContentStream method, which we're going to modify in order to place our own text, "Here is the sample text.", into the new file by default. Here's the new code to add to this method: private InputStream openContentStream( ) {
String contents =
"Here is the sample text.";
return new ByteArrayInputStream(contents.getBytes( ));
}
That modifies the wizard to fill the new file with the default text we've specified. 12.1.3 Coding a Multi-Page EditorThe real action in this example takes place in MultiPageEditor.java, the Java support for the editor that edits .xyz files. (MultiPageEditorContributor.java is also part of the editor, but it is peripheral to this discussion since it provides the support for menu and toolbar actions, which we discussed in Chapter 11.) The goal here is to add two pages to this editor: a simple text-editing page that displays the text in an .xyz file and a second page that displays the text sorted in alphabetical order. To set up those two pages, we're going to adapt the code written for us by the PDE wizard. In MultiPageEditor.java, the MultiPageEditor class supports the editor we're creating (this class extends the MultiPageEditorPart class, which is an Eclipse class that uses an SWT tab folder control to display editor pages). To display the text in the first page of the editor, this example uses an org.eclipse.editors.ui.text.TextEditor object named editor; to display the sorted text in the second page, it uses an org.eclipse.editors.custom.StyledText object named text. After creating those objects, you can use the MultiPageEditorPart class's addPage method to add the two new pages to the editor. To do that, you override the MultiPageEditor class's createPages method, which is responsible for creating the pages in the editor and is called automatically when the editor starts. Here's how that looks in our modified code: public class MultiPageEditor extends MultiPageEditorPart {
private TextEditor editor;
private StyledText text;
public MultiPageEditor( ) {
super( );
}
void createPage0( ) {
try {
editor = new TextEditor( );
int index = addPage(editor, getEditorInput( ));
setPageText(index, editor.getTitle( ));
} catch (PartInitException e) {
ErrorDialog.openError(
getSite( ).getShell( ),
"Error creating nested text editor",
null, e.getStatus( ));
}
}
void createPage1( ) {
Composite composite = new Composite(getContainer( ), SWT.NONE);
FillLayout layout = new FillLayout( );
composite.setLayout(layout);
text = new StyledText(composite, SWT.H_SCROLL | SWT.V_SCROLL);
text.setEditable(false);
int index = addPage(composite);
setPageText(index, "Sorted");
}
protected void createPages( ) {
createPage0( );
createPage1( );
}
That creates and adds the two pages
we're going to use in this editor. The next step is
to enable actions like File public void doSave(IProgressMonitor monitor) {
getEditor(0).doSave(monitor);
}
public void doSaveAs( ) {
IEditorPart editor = getEditor(0);
editor.doSaveAs( );
setPageText(0, editor.getTitle( ));
setInput(editor.getEditorInput( ));
}
public boolean isSaveAsAllowed( ) {
return true;
}
We still need to sort the words to be displayed in the sorted editor. You can catch page changes by overriding the pageChange method, and if the new page holds the sorted editor (the standard text editor is page 0, the sorted text editor is page 1), we'll sort the words before displaying them with a custom method named sort: protected void pageChange(int newPageIndex) {
super.pageChange(newPageIndex);
if (newPageIndex == 1) {
sort( );
}
}
In the sort method, we get access to the unsorted text in the plain text editor (the editor object) like this: String unsortedText = editor.getDocumentProvider( ).getDocument(editor.getEditorInput( )).get( ). The next step is to sort that text by breaking it up into an ArrayList of words using the StringTokenizer class, breaking on spaces, tabs, new lines, and carriage returns. Here's what that looks like: void sort( ) {
String unsortedText = editor.getDocumentProvider( )
.getDocument(editor.getEditorInput( )).get( );
StringTokenizer stringTokenizer =
new StringTokenizer(unsortedText, " \t\n\r");
ArrayList wordArrayList = new ArrayList( );
while (stringTokenizer.hasMoreTokens( )) {
wordArrayList.add(stringTokenizer.nextToken( ));
}
.
.
.
After breaking the words up into an ArrayList, the next step is to sort those words and reassemble them. The final step is to put the result into the StyleText control, text, which displays the sorted text in the editor's second page. Here's the code: void sort( ) {
String unsortedText = editor.getDocumentProvider( )
.getDocument(editor.getEditorInput( )).get( );
StringTokenizer stringTokenizer =
new StringTokenizer(unsortedText, " \t\n\r");
ArrayList wordArrayList = new ArrayList( );
while (stringTokenizer.hasMoreTokens( )) {
wordArrayList.add(stringTokenizer.nextToken( ));
}
Collections.sort(wordArrayList, Collator.getInstance( ));
StringWriter sortedText = new StringWriter( );
for (int loopIndex = 0; loopIndex < wordArrayList.size( ); loopIndex++) {
sortedText.write(((String) wordArrayList.get(loopIndex)));
sortedText.write(System.getProperty("line.separator"));
}
text.setText(sortedText.toString( ));
}
That
sorts and displays the text in file.xyz in the
Sorted tab's editor, which completes our custom
version of MultiPageEditor.java.
We've set up our new editor and handled its text in
code. To see this editor at work, start the Run-time Workbench and
create a new Java project, testProject. Now
right-click on testProject and select New Figure 12-4. Invoking the new wizard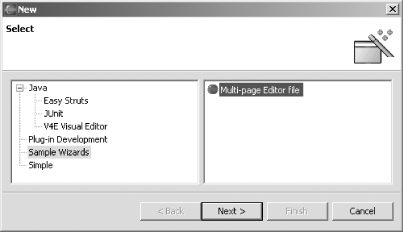 Your new wizard indicates the name of the new file, file.xyz by default, and asks you to specify a container for the file, as shown in Figure 12-5. Browse to testProject with the Browse button and click Finish to create the file. Figure 12-5. Using the new wizard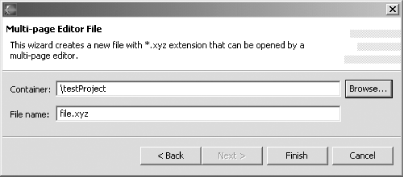 That creates file.xyz and opens it for editing with the sample text we specified, as shown in Figure 12-6. Note that you can also see file.xyz in the Package Explorer. Figure 12-6. Editing file.xyz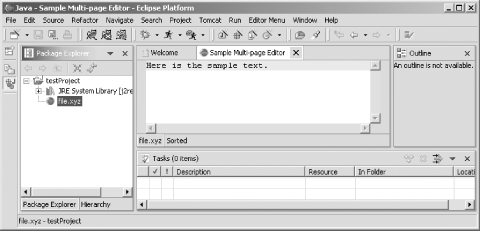 Our multi-page editor has two tabs: file.xyz and Sorted. Clicking the Sorted tab displays the second editor, containing the sorted text as you see in Figure 12-7. Figure 12-7. Viewing the sorted text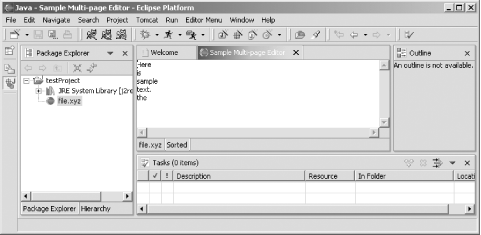
Our customized editor is working as it
shouldit'll open any
.xyz file you double-click in the Package
Explorer. You can make changes to the text in that file in the
editor's first page, and save the new text with
Eclipse's File |
|
|
< Day Day Up > |
|
 File menu item, but this plug-in example is
also going to have a built-in wizard that will create
File menu item, but this plug-in example is
also going to have a built-in wizard that will create