|
|
< Day Day Up > |
|
2.4 RefactoringOne of the major advantages of using a good Java IDE like Eclipse is that it can let you rename and move Java elements around, and it will update all references to those items throughout your code automatically. 2.4.1 Renaming ElementsFor example, take a look at the code in Example 2-6. Here, we've used code assist to create a new method to display a simple message, but we forgot to change the default name for the method that code assist supplied. Example 2-6. The Ch02_06.java examplepackage org.eclipse.ch02;
/**
* @author Steven Holzner
*
* To change the template for this generated type comment go to
* Window>Preferences>Java>Code Generation>Code and Comments
*/
public class Ch0206 {
public static void main(String[] args) {
name( );
}
public static void name( ) {
System.out.println("No worries.");
}
}
This default name for the new method,
name, is called in the main
method, and it could be called from other locations in your code as
well. How can you change the name of this method and automatically
update all calls to it? Select name in the editor
and then select the Refactor Figure 2-20. Refactoring a method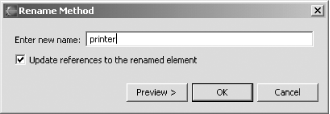 Enter the new name for the method, printer in this case, and click OK. When you do, the name of this method and all references to it will be updated throughout your code, including all code in the project, as you see here: package org.eclipse.ch02;
/**
* @author Steven Holzner
*
* To change the template for this generated type comment go to
* Window>Preferences>Java>Code Generation>Code and Comments
*/
public class Ch0206 {
public static void main(String[] args) {
printer( );
}
public static void printer( ) {
System.out.println("No worries.");
}
}
We've
also misnamed the class in this
exampleCh0206, instead of
Ch02_06. To rename the class, select
Ch0206 in the editor and select the
Refactor Figure 2-21. Refactoring a class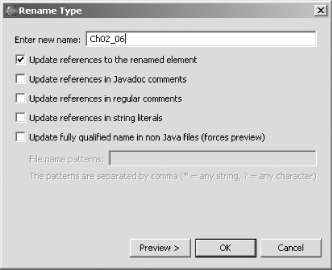 Clicking OK not only changes the name of the class in the code, it even changes the name of the class's file from Ch0206.java to Ch02_06.java, as you can see by checking the Package Explorer. Here's the new code: package org.eclipse.ch02;
/**
* @author Steven Holzner
*
* To change the template for this generated type comment go to
* Window>Preferences>Java>Code Generation>Code and Comments
*/
public class Ch02_06 {
public static void main(String[] args) {
printer( );
}
public static void printer( ) {
System.out.println("No worries.");
}
}
In fact, we've unaccountably managed to misname the package as well when creating this exampleorg.eclipse.ch02 instead of org.eclipsebook.ch02. When you refactor it, the name is changed both in the Package Explorer and throughout your code: package org.eclipsebook.ch02;
/**
* @author Steven Holzner
*
* To change the template for this generated type comment go to
* Window>Preferences>Java>Code Generation>Code and Comments
*/
public class Ch02_06 {
public static void main(String[] args) {
printer( );
}
public static void printer( ) {
System.out.println("No worries.");
}
}
As you can see, it's easy to rename Java elements in your codeEclipse will handle the details, making the changes throughout your code automatically.
2.4.2 Moving ElementsRefactoring works
automatically across files as well. Say, for example, that you want
to move the printer method to another class,
Ch02_06Helper. To see how this works, create that
new class now, which Eclipse will put in its own file,
Ch02_06Helper.java. Then select the method you
want to move, printer, by selecting the word
"printer" in the declaration of
this method. Next, select the Refactor package org.eclipsebook.ch02;
/**
* @author Steven Holzner
*
* To change the template for this generated type comment go to
* Window>Preferences>Java>Code Generation>Code and Comments
*/
public class Ch02_06Helper {
public static void printer( ) {
System.out.println("No worries.");
}
}
Figure 2-22. Moving a method between classes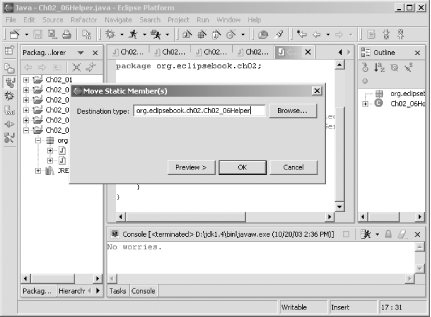 And the call to the printer method is automatically qualified as Ch02_06Helper.printer back in the Ch02_06 class in the main method: package org.eclipsebook.ch02;
/**
* @author Steven Holzner
*
* To change the template for this generated type comment go to
* Window>Preferences>Java>Code Generation>Code and Comments
*/
public class Ch02_06 {
public static void main(String[] args) {
Ch02_06Helper.printer( );
}
}
2.4.3 Extracting InterfacesYou
can also extract interfaces using refactoring. To see how this works,
we'll create an interface for the
Ch02_06Helper class (this class has the
printer method in it). Convert
printer from a static to a standard method by
deleting the keyword static in the method
declaration. Then select the name of the class,
Ch02_06Helper, in the editor and select
Refactor Figure 2-23. Extracting an interface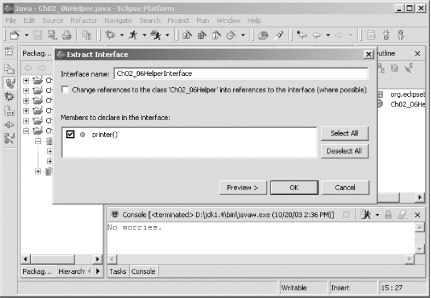 Clicking OK creates a new file, Ch02_06HelperInterface.java, where the interface is declared: package org.eclipsebook.ch02;
/**
* @author Steven Holzner
*
* To change the template for this generated type comment go to
* Window>Preferences>Java>Code Generation>Code and Comments
*/
public interface Ch02_06HelperInterface {
public abstract void printer( );
}
The original class is now declared to implement this new interface, Ch02_06HelperInterface: package org.eclipsebook.ch02;
/**
* @author Steven Holzner
*
* To change the template for this generated type comment go to
* Window>Preferences>Java>Code Generation>Code and Comments
*/
public class Ch02_06Helper implements Ch02_06HelperInterface {
public void printer( ) {
System.out.println("No worries.");
}
}
Besides renaming and moving elements and extracting interfaces, there are other operations you can perform with refactoring, such as converting anonymous classes to nested classes, changing a method's signature, and converting a local variable to a class field. For these and other options, take a look at the items available in the Refactor menu. |
|
|
< Day Day Up > |
|
 Rename menu item, opening the
Rename Method dialog you see in
Rename menu item, opening the
Rename Method dialog you see in 