|
|
< Day Day Up > |
|
8.1 Working with MenusAs you'd expect, SWT supports menus, as any GUI builder should. The process of creating and supporting menus in your SWT applications is not necessarily easy, but it's not unduly difficult. To make this work in an example, we're going to create a menu system with a File menu and a Help menu and react to various menu selections, displaying text in a label to match the selected items. To create a menu system in SWT, you create a Menu object, corresponding to the top level of the menu system. As with all the SWT controls, you can see the allowed styles back in Table 7-1; here are the possible styles for menus:
The File and Help menus are MenuItem objects associated with the Menu object, and here are the possible styles for menu items:
We begin by creating the File menu and setting its text this wayas in other GUI support packages, the "&" before the "F" in File sets the shortcut for this menu (allowing you, for example, to open the menu by pressing Alt+F in Windows, or Apple+F in Mac OS X): menuBar = new Menu(shell, SWT.BAR);
fileMenuHeader = new MenuItem(menuBar, SWT.CASCADE);
fileMenuHeader.setText("&File");
That adds the File menu item to the menu bar. The next step is to create a drop-down menu that will display the File menu's items, which works like this: menuBar = new Menu(shell, SWT.BAR);
fileMenuHeader = new MenuItem(menuBar, SWT.CASCADE);
fileMenuHeader.setText("&File");
fileMenu = new Menu(shell, SWT.DROP_DOWN);
fileMenuHeader.setMenu(fileMenu);
In this example, we're going to give the File menu two items, Save and Exit, and we only have to create two new MenuItem objects to do that: menuBar = new Menu(shell, SWT.BAR);
fileMenuHeader = new MenuItem(menuBar, SWT.CASCADE);
fileMenuHeader.setText("&File");
fileMenu = new Menu(shell, SWT.DROP_DOWN);
fileMenuHeader.setMenu(fileMenu);
fileSaveItem = new MenuItem(fileMenu, SWT.PUSH);
fileSaveItem.setText("&Save");
fileExitItem = new MenuItem(fileMenu, SWT.PUSH);
fileExitItem.setText("E&xit");
The File fileSaveItem.addSelectionListener(new fileSaveItemListener( )); fileExitItem.addSelectionListener(new fileExitItemListener( )); When the File class fileSaveItemListener implements SelectionListener
{
public void widgetSelected(SelectionEvent event)
{
label.setText("Saved");
}
public void widgetDefaultSelected(SelectionEvent event)
{
label.setText("Saved");
}
}
On the other hand, when the user selects the File class fileExitItemListener implements SelectionListener
{
public void widgetSelected(SelectionEvent event)
{
shell.close( );
display.dispose( );
}
public void widgetDefaultSelected(SelectionEvent event)
{
shell.close( );
display.dispose( );
}
}
When you've got the menu system configured as you want it, you add the menuBar object to the current shell with the setMenuBar method, and display the shell as usual: shell.setMenuBar(menuBar);
shell.open( );
while(!shell.isDisposed( )) {
if(!display.readAndDispatch( )) display.sleep( );
}
display.dispose( );
That's all it takes for the File menu. In this
example, we also want to add the Help Example 8-1. Using SWT menuspackage org.eclipsebook.ch08;
import org.eclipse.swt.widgets.*;
import org.eclipse.swt.SWT;
import org.eclipse.swt.events.*;
public class Ch08_01 {
Display display;
Shell shell;
Menu menuBar, fileMenu, helpMenu;
MenuItem fileMenuHeader, helpMenuHeader;
MenuItem fileExitItem, fileSaveItem, helpGetHelpItem;
Label label;
public Ch08_01( ){
display = new Display( );
shell = new Shell(display);
shell.setText("Menu Example");
shell.setSize(300, 200);
label = new Label(shell, SWT.CENTER);
label.setBounds(shell.getClientArea( ));
menuBar = new Menu(shell, SWT.BAR);
fileMenuHeader = new MenuItem(menuBar, SWT.CASCADE);
fileMenuHeader.setText("&File");
fileMenu = new Menu(shell, SWT.DROP_DOWN);
fileMenuHeader.setMenu(fileMenu);
fileSaveItem = new MenuItem(fileMenu, SWT.PUSH);
fileSaveItem.setText("&Save");
fileExitItem = new MenuItem(fileMenu, SWT.PUSH);
fileExitItem.setText("E&xit");
helpMenuHeader = new MenuItem(menuBar, SWT.CASCADE);
helpMenuHeader.setText("&Help");
helpMenu = new Menu(shell, SWT.DROP_DOWN);
helpMenuHeader.setMenu(helpMenu);
helpGetHelpItem = new MenuItem(helpMenu, SWT.PUSH);
helpGetHelpItem.setText("&Get Help");
fileExitItem.addSelectionListener(new fileExitItemListener( ));
fileSaveItem.addSelectionListener(new fileSaveItemListener( ));
helpGetHelpItem.addSelectionListener(new helpGetHelpItemListener( ));
shell.setMenuBar(menuBar);
shell.open( );
while(!shell.isDisposed( )) {
if(!display.readAndDispatch( )) display.sleep( );
}
display.dispose( );
}
class fileExitItemListener implements SelectionListener
{
public void widgetSelected(SelectionEvent event)
{
shell.close( );
display.dispose( );
}
public void widgetDefaultSelected(SelectionEvent event)
{
shell.close( );
display.dispose( );
}
}
class fileSaveItemListener implements SelectionListener
{
   public void widgetSelected(SelectionEvent event)
   {
    label.setText("Saved");
   }

   public void widgetDefaultSelected(SelectionEvent event)
   {
    label.setText("Saved");
   }
}
class helpGetHelpItemListener implements SelectionListener
{
public void widgetSelected(SelectionEvent event)
{
label.setText("No worries!");
}
public void widgetDefaultSelected(SelectionEvent event)
{
label.setText("No worries!");
}
}
public static void main(String [] args) {
Ch08_01 menuExample = new Ch08_01( );
}
}
You can see the results in Figure 8-1 and Figure 8-2; when
the user selects the File Figure 8-1. Selecting an SWT menu item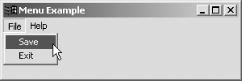 Figure 8-2. The results of selecting a menu item
|
|
|
< Day Day Up > |
|

 Save and File