|
|
< Day Day Up > |
|
8.4 Working with TreesTrees are another standard SWT element; you use the Tree class to create trees and the TreeItem class to add nodes to the tree. Here are the possible SWT styles for trees:
In this example, we'll create a new tree with a border: final Tree tree = new Tree(shell, SWT.BORDER); tree.setSize(290, 290); shell.setSize(300, 300); To add nodes to the tree, use the TreeItem class, passing the tree object to the TreeItem constructor. In this example, we'll add five top-level items to the tree: final Tree tree = new Tree(shell, SWT.BORDER);
tree.setSize(290, 290);
shell.setSize(300, 300);
for(int loopIndex1 = 0; loopIndex1 < 5; loopIndex1++) {
TreeItem item0 = new TreeItem(tree, 0);
item0.setText("Level 0 Item " + loopIndex1);
.
.
.
}
Each tree node can have subnodes, and those subnodes can themselves have subnodes, and so on; you just pass the node you're adding children to to the TreeItem constructor. For example, here's how we add five children to every node and five children to each of those children in turn: for(int loopIndex1 = 0; loopIndex1 < 5; loopIndex1++) {
TreeItem item0 = new TreeItem(tree, 0);
item0.setText("Level 0 Item " + loopIndex1);
for(int loopIndex2 = 0; loopIndex2 < 5; loopIndex2++) {
TreeItem item1 = new TreeItem(item0, 0);
item1.setText("Level 1 Item " + loopIndex2);
for(int loopIndex3 = 0; loopIndex3 < 5; loopIndex3++) {
TreeItem item2 = new TreeItem(item1, 0);
item2.setText("Level 2 Item " + loopIndex3);
}
}
}
That creates the tree; all that's left is to display the shell. You can see the whole listing in Example 8-4. Example 8-4. Using SWT treespackage org.eclipse.ch08;
import org.eclipse.swt.*;
import org.eclipse.swt.widgets.*;
public class Ch08_04 {
public static void main(String [] args) {
Display display = new Display( );
Shell shell = new Shell(display);
shell.setText("Trees");
final Tree tree = new Tree(shell, SWT.BORDER);
tree.setSize(290, 290);
shell.setSize(300, 300);
for(int loopIndex1 = 0; loopIndex1 < 5; loopIndex1++) {
    TreeItem item0 = new TreeItem(tree, 0);
    item0.setText("Level 0 Item " + loopIndex1);
    for(int loopIndex2 = 0; loopIndex2 < 5; loopIndex2++) {
        TreeItem item1 = new TreeItem(item0, 0);
        item1.setText("Level 1 Item " + loopIndex2);
        for(int loopIndex3 = 0; loopIndex3 < 5; loopIndex3++) {
            TreeItem item2 = new TreeItem(item1, 0);
            item2.setText("Level 2 Item " + loopIndex3);
        }
    }
}
shell.open( );
while(!shell.isDisposed( )) {
if(!display.readAndDispatch( )) display.sleep( );
}
display.dispose( );
}
}
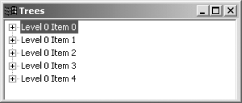
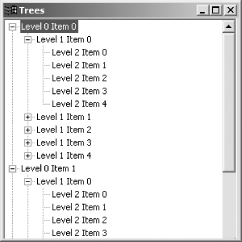
When the shell first opens, you can see the five top-level nodes in the tree, as in Figure 8-7. Figure 8-7. A closed tree Clicking any of the + boxes opens the corresponding node, as you see in Figure 8-8. Figure 8-8. Opening a tree As you can see, it's relatively easy to add nodes to a tree. Trees are substantial controls—you can also support checkmarks with the setChecked and getChecked methods, as well as images with the setImage method. You can handle selection events in trees as well—TreeItem objects can handle selection events just as the ToolbarItem objects we saw earlier; just add a selection listener to them. |
|
|
< Day Day Up > |
|