|
|
< Day Day Up > |
|
Recipe 1.5 Creating a Java Project1.5.1 ProblemYou want to start programming some Java. Where do you start? 1.5.2 SolutionSelect File 1.5.3 DiscussionIn Eclipse, all code—Java or otherwise—has to go into a project, and creating Eclipse projects is a basic skill. Projects organize your files, classes, libraries, and exports. Over the next few recipes, we're going to create a Java project that will use the code you see in Example 1-1 to display some simple text, "Stay cool."
Example 1-1. The FirstApp.java examplepublic class FirstApp
{
public static void main(String[] args)
{
System.out.println("Stay cool.");
}
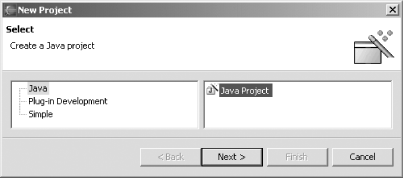
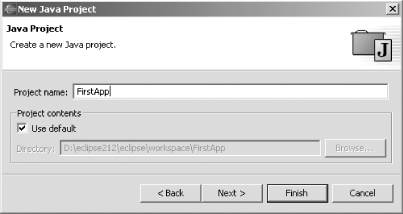
}To get started, create a new Java project by selecting File Figure 1-5. The New Project dialog We want to create a Java project, so select Java in the left pane and Java Project in the right pane. Click Next, and in the next dialog name the project FirstApp, as shown in Figure 1-6. Figure 1-6. Naming a project Click Finish to finish creating the project. (If you click Next, additional options for creating projects appear in the dialog that opens, but this chapter deals with basic Eclipse skills; you can learn more about project creation options in Chapter 3.) If you've opened Eclipse for the first time and/or the Resource perspective is the only perspective open, Eclipse will ask you if you want to switch to the Java perspective, as shown in Figure 1-7. Click Yes. Figure 1-7. Switching perspectives After this new project, FirstApp, is created, it's opened in the Java perspective. We've already discussed perspectives informally, but now that we're about to work with them directly we'll take a more in-depth look in the next two recipes. We'll continue developing the code for this example in the recipes that follow. 1.5.4 See AlsoRecipe 1.8 on creating a Java class; Chapter 1 of Eclipse (O'Reilly). |
|
|
< Day Day Up > |
|