|
|
< Day Day Up > |
|
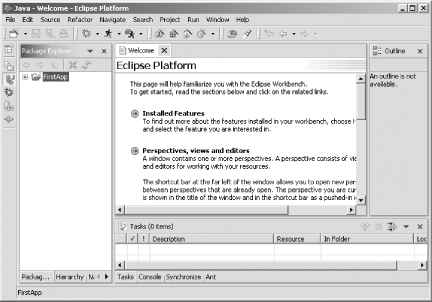
Recipe 1.7 Mastering the Java Perspective1.7.1 ProblemWhat is the Java perspective, and what can I use it for? 1.7.2 SolutionYou can see the parts of the Java perspective, as presented by the Eclipse JDT, in Figure 1-8. The Java perspective is showing FirstApp, the project we've been developing over the previous few recipes (you can see this project in the Package Explorer on the left side of the figure). Figure 1-8. The Java perspective 1.7.3 DiscussionThis is the main perspective you use for Java development; if you're going to be using Eclipse on a daily basis, this is the perspective you'll be staring at a lot. In other words, this is your development environment.
Take a look at the Java perspective in Figure 1-8. At the top of this perspective are the standard workbench menu bars and toolbars, now populated with the items for the Java perspective. You're going to get familiar with those items in this and in coming chapters.
On the left side of Figure 1-8, you see the Package Explorer and Hierarchy views stacked on top of each other. You can use the tabs at the bottom to flip between these two views. The Package Explorer view is especially important for Java programming and is the view you use most frequently in Java development. It gives you an overview of your projects in Java terms, enabling you to navigate through files and classes. Double-clicking an item in the Package Explorer opens that item in the central editor window in the Java perspective. The Hierarchy view enables you to work with type hierarchies. To use this view, right-click an item in the perspective's editor, and choose Open Type Hierarchy. This makes the item's type hierarchy appear in this view as a clickable inheritance tree. Working with an item's type hierarchy like this can be great if you want to look up the syntax of an inherited method. On the right side of the Java perspective is the Outline view, which shows a hierarchical view of the elements in the file currently open in the editor. Double-clicking items in this view enables you to jump to those items in the editor. Being able to work with an outline of the current file in this way is good if you have a very long code file and are tired of scrolling 20 pages at a time. This view is covered in more detail in Chapter 2. At the bottom of the Java perspective are the stacked Task and Console views, selectable via the tabs you see in Figure 1-8 (as in most GUIs, space is at a premium in Eclipse, and you'll often see views stacked). The Tasks view gives you a list of pending tasks, put there either by Eclipse (as when there are compilation errors that need to be fixed) or by you as reminders. The Console view shows you output to the console—for example, our first sample application will write the text "Stay cool." to the console. In the central window of the Java perspective is a Welcome message that explains such concepts as perspectives, views, and editors. This central space is where editors are stacked, and you select between them with the tabs that appear at the top (the Welcome message's tab is shown in Figure 1-8). Unlike views, you enter text and data in editors, and the JDT editors are specially designed to work with Java. In addition to being the place where you enter Java code, JDT editors also feature an abundance of hidden power, such as syntax highlighting, syntax checking, automatic code completion, and more.
1.7.4 See AlsoChapters 1 and 2 of Eclipse (O'Reilly). |
|
|
< Day Day Up > |
|