|
|
< Day Day Up > |
|
Recipe 13.6 Configuring a View's Actions13.6.1 ProblemYou need to make the items in a view do something when clicked, right-clicked, or double-clicked. 13.6.2 SolutionConfigure the view's actions. If you've used a PDE template to create your plug-in, edit the makeActions method. 13.6.3 DiscussionIn the previous two recipes, we created a plug-in that supports a view based on an SWT tree control. To make the items created in the previous recipe do something when the user interacts with them, edit the code in the makeActions method in SampleView.java. In the code, you can get access to the item that was clicked, right-clicked, or double-clicked using the following line: Object obj = ((IStructuredSelection)selection).getFirstElement( ) Here's how to modify the code in makeActions to create actions that will handle menu selections when you right-click or double-click the items in the view: private void makeActions( ) {
action1 = new Action( ) {
public void run( ) {
showMessage("You selected Action 1");
}
};
action1.setText("Action 1");
action1.setToolTipText("Action 1 tooltip");
action1.setImageDescriptor(PlatformUI.getWorkbench( ).getSharedImages( ).
getImageDescriptor(ISharedImages.IMG_OBJS_INFO_TSK));
action2 = new Action( ) {
public void run( ) {
showMessage("You selected Action 2");
}
};
action2.setTex("Action 2");
action2.setToolTipText("Action 2 tooltip");
action2.setImageDescriptor(PlatformUI.getWorkbench( ).getSharedImages( ).
getImageDescriptor(ISharedImages.IMG_OBJS_TASK_TSK));
doubleClickAction = new Action( ) {
public void run( ) {
ISelection selection = viewer.getSelection( );
Object obj =
((IStructuredSelection)selection).getFirstElement( );
showMessage("You double-clicked " + obj.toString( ));
}
};
}To work with Item View, start the Run-time Workbench, and select
Window Figure 13-13. Selecting Item View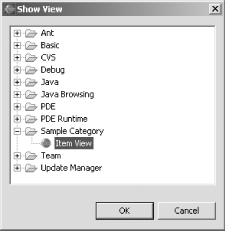 Our new view appears at the bottom of Figure 13-14. That's a new, functional view that we've added to the Eclipse IDE. Not bad. Figure 13-14. The new Item View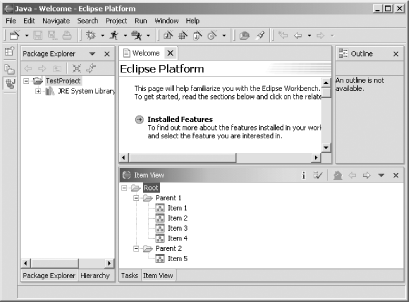 Double-clicking an item in the view activates the action for double-clicks, as shown in Figure 13-15. Figure 13-15. Double-clicking an item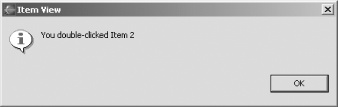 For that matter, you also can right-click an item, and select Action 1 or Action 2 from the context menu which appears. A message box indicates which action you selected, as shown in Figure 13-16. Figure 13-16. Selecting a context menu item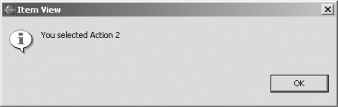 That gets our view plug-in working. You can see that adding a view to Eclipse isn't so hard after all. You can create a template using PDE tools and modify the template's code. You aren't restricted to basing your view on tables or trees, although those are traditional, and you can use an SWT composite control to host your own collection of controls in the view. 13.6.4 See AlsoRecipe 13.4 on creating plug-ins that support views; Recipe 13.5 on adding items to a view; Chapter 11 and Chapter 12 of Eclipse (O'Reilly). |
|
|
< Day Day Up > |
|
 Show View