|
|
< Day Day Up > |
|
Recipe 5.2 Testing an Application with JUnit5.2.1 ProblemYou want to create a JUnit test case. 5.2.2 SolutionCreate a JUnit-based class, and implement the tests you want to run. Then use the JUnit plug-in to see your test results immediately. 5.2.3 DiscussionAs an example, we're going to test the application TestApp, shown in Example 5-1, which uses a class named TestClass. This application has two methods: get, which returns a string, and set, which returns a confirming value of true if the value you pass is 0 or greater. Example 5-1. A simple Java classpackage org.cookbook.ch05;
public class TestClass
{
public String get( ) {
return "Test String";
}
public boolean set(int index) {
if (index < 0) {
return false;
} else {
return true;
}
}
}To test this application, use the JUnit Wizard plug-in to create a new class in
the project that extends the JUnit TestCase class.
To invoke the wizard, right-click the class you want to test,
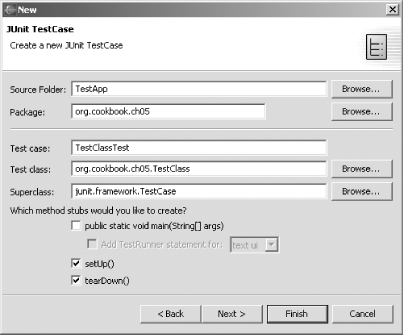
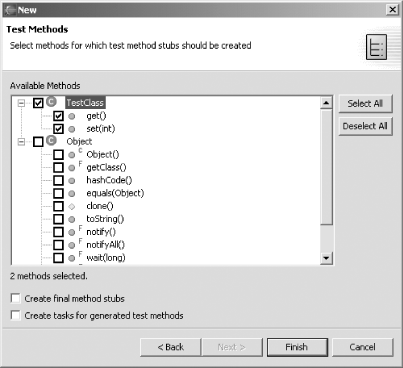
TestClass here, and select New Figure 5-3. Creating a new JUnit TestCase-based class Expand the Java node in the left pane, and select JUnit. In the right pane, select TestCase. Click Next, displaying the dialog shown in Figure 5-4. Figure 5-4. Configuring a JUnit test class The JUnit convention is to name test cases by adding "Test" to the name of the class you're testing. In our example, JUnit suggests a test case name of TestClassTest. Be sure to check the setUp and tearDown method checkboxes, as shown in Figure 5-4. These methods enable you to set up and clean up after data and/or objects in the test case (the JUnit term for these items is fixtures). Click Next to open the next dialog, shown in Figure 5-5. Figure 5-5. Selecting methods to test with JUnit In this dialog you select the methods you want to test so that the JUnit Wizard can create stubs for them. In this case, we want to test the set and get methods, so select them, as shown in Figure 5-5, and click Finish. This creates the TestClassTest class, shown in Example 5-2. You can see method stubs in the TestClassTest class to test the set and get methods; these stubs are named testSet and testGet. Example 5-2. Testing TestClasspackage org.cookbook.ch05;
import junit.framework.TestCase;
public class TestClassTest extends TestCase
{
/**
* Constructor for TestClassTest.
* @param arg0
*/
public TestClassTest(String arg0)
{
super(arg0);
}
/*
* @see TestCase#setUp( )
*/
protected void setUp( ) throws Exception
{
super.setUp( );
}
/*
* @see TestCase#tearDown( )
*/
protected void tearDown( ) throws Exception
{
super.tearDown( );
}
public void testGet( )
{
}
public void testSet( )
{
}
}To test your code, add code to these JUnit stubs that calls the methods you want to test. To call the nonstatic get and set methods in our code, you'll need an object of the TestClass class, which we'll name testClassObject. We'll create that object in the JUnit setUp method, called before each JUnit test starts: public class TestClassTest extends TestCase
{
TestClass testClassObject;
.
.
.
protected void setUp( ) throws Exception
{
super.setUp( );
testClassObject = new TestClass( );
}Now that we've created this object, testClassObject, let's get to work. In the testGet method, you can test the TestClass class's get method, which is supposed to return a String object. Here's how to check that return value: public void testGet( ) {
assertEquals(testClassObject.get( ), "Test String");
}The set method is supposed to return true if it's been successful, so let's test it with an assertTrue call like so: public void testSet( ) {
assertTrue(testClassObject.set(-1));
}After adding this test code, highlight the
TestClassTest class in the Package Explorer and
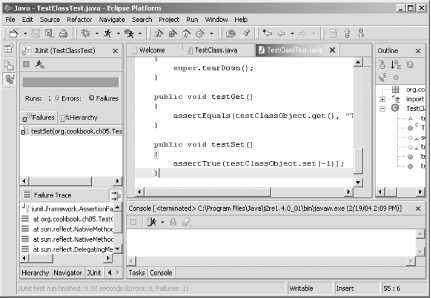
select Run Figure 5-6. Results of a JUnit test The red bar at the top of this view (which appears in black and white in the figure) indicates that there was an error, and if you look under the Failures tab in the JUnit view, you'll see that the testSet test failed. That's because the set method returns true only if you pass it a non-negative value, but we passed it a value of -1, which means that running assertTrue on the return value will fail: public void testSet( ) {
assertTrue(testClassObject.set(-1));
}Change that code by passing set a value of 1 instead: public void testSet( ) {
assertTrue(testClassObject.set(1));
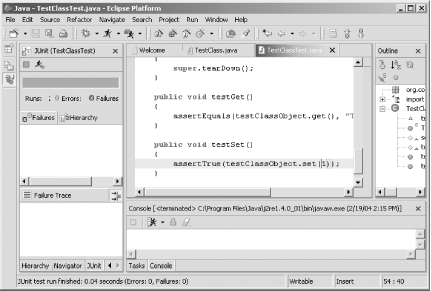
}Now rerun the test, and you'll see a green bar for success, as displayed in glorious black and white in Figure 5-7. Congratulations—the tests passed. All systems are go. Figure 5-7. A successful JUnit test You can see how this works; when you (or anyone) make(s) changes to your code, just run the test case again, and you'll get an instant green if things are OK. 5.2.3.1 Eclipse 3.0As of this writing, the JUnit process is similar in Eclipse 3.0, except that in 3.0, you have a few more options, such as specifying whether you want to add a constructor to your test case in addition to the setUp and tearDown methods. 5.2.4 See AlsoRecipe 5.1 on installing JUnit; the JUnit section of the Java Extreme Programming Cookbook (O'Reilly); Chapter 3 of Eclipse (O'Reilly). |
|
|
< Day Day Up > |
|