| [ Team LiB ] |
|
9.3 ImplementationNow we can start creating the two new Kerberos realms. Before we begin, we must establish the prerequisites that must be satisfied before implementation of the new realms can start. The first prerequisite is a DNS server with functioning forward and reverse DNS zones for the sample.com DNS domain. In our example, the service is hosted through the existing Active Directory domain, and appropriate DNS records have been added to the zone files already for all of the machines in our sample network. The second prerequisite is that all machines have NTP installed and configured. The Windows domain will perform time synchronization against the domain controllers, but NTP must be manually installed and configured on the Unix machines. Before the Kerberos realms is implemented as described below, these two services must be functioning correctly. 9.3.1 Implementing UNIX.SAMPLE.COMWe'll start with UNIX.SAMPLE.COM. Both KDCs, unixkdc1.sample.com and unixkdc2.sample.com, have a fresh installation of the latest FreeBSD distribution. Two 18GB hot-swappable SCSI disks have been installed into each machine, and each box has a hardware RAID card set up to do mirroring across the installed drives. The partition layout looks like Table 9-1.
This layout gives ample room for Kerberos database growth, while enforcing the separation between the critical Kerberos database data and any log files or temporary files. A partition layout such as the one above ensures that these log files cannot fill up the entire disk, which may cause the operating system or Kerberos software to malfunction or, worse, corrupt the Kerberos database. 9.3.1.1 Building and installing the Kerberos KDC softwareThe first task to perform when implementing a new Kerberos realm is, of course, installing the Kerberos KDC software. We'll be following the steps outlined in Chapter 4 to build our MIT Kerberos 5 KDC. Grab the MIT Kerberos 5 distribution from http://web.mit.edu/kerberos/www. Once the distribution is downloaded and uncompressed, we can begin configuring and compiling it for our uses. We will compile the MIT Kerberos code with a prefix of /krb5. In our case, there's no reason to compile in the Kerberos 4 compatibility code, so we will explicitly specify this on the configure line: > ./configure --prefix=/krb5 --without-krb4 creating cache ./config.cache checking for C compiler... cc checking for gcc... cc checking whether the C compiler (cc ) works... yes checking whether the C compiler (cc ) is a cross-compiler... no checking whether we are using GNU C... yes ... Assuming the configure step went well, it's now time to make the distribution and install it: # gmake && gmake install # mkdir /krb5/var # mkdir /krb5/var/krb5kdc # chown root /krb5/var/krb5kdc # chmod 700 /krb5/var/krb5kdc Note that we use gmake as we're building on FreeBSD. Other operating systems such as Linux that use GNU Make by default can simply use "make" instead. Note that the software must be placed on both KDCs, and (assuming that both KDCs are running the same operating system and processor platform) this can be accomplished by simply taring up the /krb5 directory on one and placing it on the other. Even though we haven't created the realm yet and the /krb5/var/krb5kdc directory is currently empty, when mirroring the Kerberos software between the two machines, do not copy the Kerberos databases. The slave replication script that we'll put in place below will handle replicating the Kerberos database between the master and slave KDCs, and manually copying the Kerberos database located in the /krb5/var/krb5kdc directory from one to the other can corrupt it. Once the software has been installed, it's time to create a kdc.conf file to be installed on both KDCs. This file must be placed in the /krb5/var/krb5kdc directory on each KDC. While this file is not strictly necessary, it is still a good idea to spell out the intended configuration, which in this case includes the directories where the KDC database are located as well as the default ticket lifetimes and encryption types. [kdcdefaults]
kdc_ports = 88
[realms]
UNIX.SAMPLE.COM = {
database_name = /krb5/var/krb5kdc/principal
admin_keytab = /krb5/var/krb5kdc/kadm5.keytab
acl_file = /krb5/var/krb5kdc/kadm5.acl
dict_file = /krb5/var/krb5kdc/kadm5.dict
key_stash_file = /krb5/var/krb5kdc/.k5.UNIX.SAMPLE.COM
kadmind_port = 749
max_life = 10h 0m 0s
max_renewable_life = 7d 0h 0m 0s
master_key_type = des3-hmac-sha1
supported_enctypes = des3-hmac-sha1:normal des-cbc-crc:normal
}
9.3.1.2 Realm configuration filesWith this file in place, we can now create the krb5.conf file that will be used for every host in the UNIX.SAMPLE.COM Kerberos realm. Note the additional entries in the domain_realm stanza, as there is no unix.sample.com DNS domain that contains all of the hosts in the UNIX.SAMPLE.COM Kerberos realm. As a result, the mapping between DNS names and the corresponding Kerberos realm must be specified explicitly. [libdefaults]
default_realm = UNIX.SAMPLE.COM
[realms]
UNIX.SAMPLE.COM = {
kdc = unixkdc1.sample.com:88
kdc = unixkdc2.sample.com:88
admin_server = unixkdc1.sample.com
};
SAMPLE.COM = {
kdc = exchange.sample.com:88
};
[domain_realm]
.sample.com = SAMPLE.COM
sample.com = SAMPLE.COM
.hosting.sample.com = UNIX.SAMPLE.COM
hosting.sample.com = UNIX.SAMPLE.COM
dns.sample.com = UNIX.SAMPLE.COM
billing.sample.com = UNIX.SAMPLE.COM
unixkdc1.sample.com = UNIX.SAMPLE.COM
unixkdc2.sample.com = UNIX.SAMPLE.COM
[logging]
kdc = FILE:/var/log/kdc.log
admin_server = FILE:/var/log/kadmin.log
This file is installed on all machines that are members of the UNIX.SAMPLE.COM Kerberos realm. The logging stanza is only important for the KDC machines, but will do no harm if it is included with the krb5.conf file installed on other machines as well. 9.3.1.3 Creating the realmNow we're ready to initialize and create the first principals in our new realm. First, initialize the Kerberos database: unixkdc1# /krb5/sbin/kdb5_util create -s Initializing database '/krb5/var/krb5kdc/principal' for realm 'UNIX.SAMPLE.COM', master key name 'K/M@UNIX.SAMPLE.COM' You will be prompted for the database Master Password. It is important that you NOT FORGET this password. Enter KDC database master key: Re-enter KDC database master key to verify: We also have to set up the administrative interface. First, we'll create an administrative user principal: unixkdc1# /krb5/sbin/kadmin.local Authenticating as principal jgarman/admin@UNIX.SAMPLE.COM with password. kadmin.local: addprinc jgarman WARNING: no policy specified for jgarman@UNIX.SAMPLE.COM; defaulting to no policy Enter password for principal "jgarman@UNIX.SAMPLE.COM": Re-enter password for principal "jgarman@UNIX.SAMPLE.COM": Principal "jgarman@UNIX.SAMPLE.COM" created. kadmin.local: addprinc jgarman/admin WARNING: no policy specified for jgarman/admin@UNIX.SAMPLE.COM; defaulting to no policy Enter password for principal "jgarman/admin@UNIX.SAMPLE.COM": Re-enter password for principal "jgarman/admin@UNIX.SAMPLE.COM": Principal "jgarman/admin@UNIX.SAMPLE.COM" created. While we're already in kadmin, we might as well also set up the principals required to perform kadmin tasks over the network. We'll create the two principals needed for this task, kadmin/admin and kadmin/changepw: kadmin.local: ktadd -k /krb5/var/krb5kdc/kadm5.keytab kadmin/admin kadmin/changepw Entry for principal kadmin/admin with kvno 3, encryption type Triple DES cbc mode with HMAC/sha1 added to keytab WRFILE:/krb5/var/krb5kdc/kadm5.keytab. Entry for principal kadmin/admin with kvno 3, encryption type DES cbc mode with CRC- 32 added to keytab WRFILE:/krb5/var/krb5kdc/kadm5.keytab. Entry for principal kadmin/changepw with kvno 3, encryption type Triple DES cbc mode with HMAC/sha1 added to keytab WRFILE:/krb5/var/krb5kdc/kadm5.keytab. Entry for principal kadmin/changepw with kvno 3, encryption type DES cbc mode with CRC-32 added to keytab WRFILE:/krb5/var/krb5kdc/kadm5.keytab. Also, we can create the host principals for the machines in our new realm. We won't show them all, but here's the kadmin commands to add host principals for our master and slave KDCs to the Kerberos database: kadmin.local: addprinc -randkey host/unixkdc1.sample.com WARNING: no policy specified for host/unixkdc1.sample.com@UNIX.SAMPLE.COM; defaulting to no policy Principal "host/unixkdc1.sample.com@UNIX.SAMPLE.COM" created. kadmin.local: addprinc -randkey host/unixkdc2.sample.com WARNING: no policy specified for host/unixkdc2.sample.com@UNIX.SAMPLE.COM; defaulting to no policy Principal "host/unixkdc2.sample.com@UNIX.SAMPLE.COM" created. While we're in kadmin and logged into the master KDC as root, we can extract the host key for the master KDC and place it in the system keytab. We'll do the same for the other machines in the realm later. kadmin.local: ktadd host/unixkdc1.sample.com Entry for principal host/unixkdc1.sample.com with kvno 3, encryption type Triple DES cbc mode with HMAC/sha1 added to keytab WRFILE:/etc/krb5.keytab. Entry for principal host/unixkdc1.sample.com with kvno 3, encryption type DES cbc mode with CRC-32 added to keytab WRFILE:/etc/krb5.keytab. Once the basic principals for our realm are in place, we can also exit kadmin and create an administrative ACL file that grants jgarman/admin@UNIX.SAMPLE.COM permission to modify the Kerberos database. Our new /krb5/var/krb5kdc/kadm5.acl file on unixkdc1 simply has one line in it: jgarman/admin@UNIX.SAMPLE.COM * Now we can start up the Kerberos KDC and kadmin servers: unixkdc1# /krb5/sbin/krb5kdc unixkdc1# /krb5/sbin/kadmind 9.3.1.4 Setting up slave replicationNow that the master Kerberos KDC is up and running, we can begin setting up our slave KDC for database replication. The first task is to ensure that the Kerberos binaries have been successfully copied over or rebuilt from source on the slave machine, as discussed above in the installation section for the master KDC. Once the Kerberos binaries are in place, the keytab for the slave machine's host key can be extracted from the Kerberos database through kadmin: unixkdc2# /krb5/sbin/kadmin Authenticating as principal jgarman/admin@UNIX.SAMPLE.COM with password. Enter password: kadmin: ktadd host/unixkdc2.sample.com Entry for principal host/unixkdc2.sample.com with kvno 3, encryption type Triple DES cbc mode with HMAC/sha1 added to keytab WRFILE:/etc/krb5.keytab. Entry for principal host/unixkdc2.sample.com with kvno 3, encryption type DES cbc mode with CRC-32 added to keytab WRFILE:/etc/krb5.keytab. Next, we create the kpropd.acl file in the /krb5/var/krb5kdc directory that will list all of the host principals of the participating KDCs in our realm. For our example, the kpropd.acl file will contain the following entries: host/unixkdc1.sample.com@UNIX.SAMPLE.COM host/unixkdc2.sample.com@UNIX.SAMPLE.COM Now we can place an entry in the slave KDC's inetd.conf file to enable the Kerberos database propagation service. First, the following line needs to be placed in the slave's /etc/services file: krb5_prop 754/tcp Then we can place the following line into the slave's /etc/inetd.conf to enable the service. krb5_prop stream tcp nowait root /krb5/sbin/kpropd kpropd After restarting inetd on unixkdc2, we can perform a quick test to ensure that the database propagation works. Log into unixkdc1 and issue the kprop command: unixkdc1# /krb5/sbin/kdb5_util dump /krb5/var/krb5kdc/slavedump unixkdc1# /krb5/sbin/kprop -f /krb5/var/krb5kdc/slavedump unixkdc2.sample.com Database propagation to unixkdc2.sample.com: SUCCEEDED On unixkdc2, you'll have to re-enter the Kerberos master key first entered when the Kerberos database was initialized. Since the replicated database is encrypted with the Kerberos master key, the slave needs the master key to decrypt and load the replicated database. unixkdc2# /krb5/sbin/kdb5_util stash kdb5_util: Cannot find/read stored master key while reading master key kdb5_util: Warning: proceeding without master key Enter KDC database master key: Finally, a script such as the one shown in Chapter 4, at the end of Section 4.4.1.5, can be used to automate the task of replicating the master KDC database to the slave. Once the database has been propagated to unixkdc2, the KDC service can be started on unixkdc2 as well: unixkdc2# /krb5/sbin/krb5kdc 9.3.1.5 Installing the Kerberos software on client and application serversThe MIT Kerberos 5 distribution needs to be installed on the rest of the machines in the UNIX.SAMPLE.COM realm. The same configuration and installation instructions given above for the KDC software will make the Kerberos client libraries and utilities as well. Log into each Kerberos client and application server, and make the Kerberos software: > ./configure --prefix=/krb5 --without-krb4 creating cache ./config.cache checking for C compiler... cc checking for gcc... cc checking whether the C compiler (cc ) works... yes checking whether the C compiler (cc ) is a cross-compiler... no checking whether we are using GNU C... yes ... > su Password: # gmake && gmake install Copy the krb5.conf file listed above in Section 9.3.1.2 above into the /etc directory on the target machine. Then you'll be able to use kadmin to login remotely to the Kerberos database, create a principal for this machine, and extract the host key to the machine's keytab. As an example, for www1.hosting.sample.com, the commands would look like the following: www1# /krb5/sbin/kadmin Authenticating as principal jgarman/admin@UNIX.SAMPLE.COM with password. Enter password: kadmin: addprinc -randkey host/www1.hosting.sample.com WARNING: no policy specified for host/www1.hosting.sample.com@UNIX.SAMPLE.COM; defaulting to no policy Principal "host/www1.hosting.sample.com@UNIX.SAMPLE.COM" created. kadmin: ktadd host/www1.hosting.sample.com Entry for principal host/www1.hosting.sample.com with kvno 3, encryption type Triple DES cbc mode with HMAC/sha1 added to keytab WRFILE:/etc/krb5.keytab. Entry for principal host/www1.hosting.sample.com with kvno 3, encryption type DES cbc mode with CRC-32 added to keytab WRFILE:/etc/krb5.keytab. Once the host key has been extracted into a keyfile, the Kerberized telnet daemon can be enabled by adding the Kerberized telnet daemon to the host's inetd.conf file. Any telnet service lines in the /etc/inetd.conf file should be changed to the following, assuming that the Kerberos distribution was installed in /krb5: telnet stream tcp nowait root /krb5/sbin/telnetd telnetd After the inetd.conf file has been modified, inetd must be restarted for the changes to take effect. Before testing the Kerberos telnet functionality, remember that each user's .k5login file, located in their home directory, must contain the names of the Kerberos principals authorized to that user's account. For example, with a Unix username of tdurden and two principals tdurden@SAMPLE.COM and tdurden@UNIX.SAMPLE.COM, the .k5login file must contain both principal names, otherwise the Kerberos login program will refuse authorization for the cross-realm principal, tdurden@SAMPLE.COM. 9.3.2 Establishing Cross-Realm Relationships with SAMPLE.COMWe must establish a cross-realm trust between the UNIX.SAMPLE.COM realm and the Active Directory domain SAMPLE.COM. This trust will be used so that users in the SAMPLE.COM Active Directory domain can transparently log into machines located in the UNIX.SAMPLE.COM Kerberos realm. We'll be following the instructions outlined in Chapter 8 to establish a cross-realm trust between a Unix-based Kerberos realm and a Windows domain. First, we'll create the appropriate cross-realm principals on the Unix KDC: unixkdc1# /krb5/sbin/kadmin Authenticating as principal jgarman/admin@UNIX.SAMPLE.COM with password. Enter password: kadmin: addprinc -e des:normal krbtgt/SAMPLE.COM@UNIX.SAMPLE.COM WARNING: no policy specified for krbtgt/SAMPLE.COM@UNIX.SAMPLE.COM; defaulting to no policy Enter password for principal "krbtgt/SAMPLE.COM@UNIX.SAMPLE.COM": Re-enter password for principal "krbtgt/SAMPLE.COM@UNIX.SAMPLE.COM": Principal "krbtgt/SAMPLE.COM@UNIX.SAMPLE.COM" created. kadmin: addprinc -e des:normal krbtgt/UNIX.SAMPLE.COM@SAMPLE.COM WARNING: no policy specified for krbtgt/UNIX.SAMPLE.COM@SAMPLE.COM; defaulting to no policy Enter password for principal "krbtgt/UNIX.SAMPLE.COM@SAMPLE.COM": Re-enter password for principal "krbtgt/UNIX.SAMPLE.COM@SAMPLE.COM": Principal "krbtgt/UNIX.SAMPLE.COM@SAMPLE.COM" created. Remember the passwords given here; we'll be entering them in on the Windows side next. After logging in under a Domain Administrator account on a machine in the SAMPLE.COM domain, start the Active Directory Domains and Trusts tool, right click on the SAMPLE.COM domain in the tree view on the left, and select Properties. After selecting the Trusts tab and clicking the Add button in the Domains trusted by this domain group, the window pictured in Figure 9-3 appears. Figure 9-3. Establishing cross-realm relationship between UNIX.SAMPLE.COM and SAMPLE.COM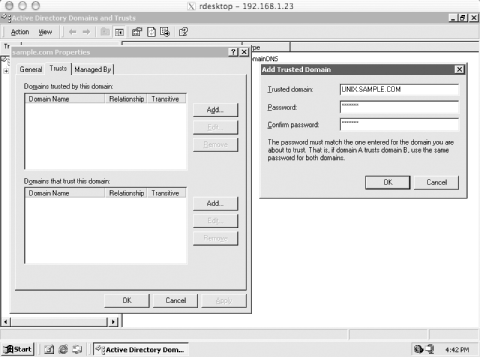 Here, you'll enter the password associated with the krbtgt/SAMPLE.COM@UNIX.SAMPLE.COM principal. Repeat the process for "Domains that trust this domain". At this point, you can click Add, and enter the password that is associated with the krbtgt/UNIX.SAMPLE.COM@SAMPLE.COM principal. 9.3.3 Implementing LABS.SAMPLE.COMThe next realm, LABS.SAMPLE.COM, is much simpler: there is no cross-realm relationship and only a single KDC, with no database replication. Once again, we'll go through the process of installing and configuring the KDC and Kerberos client utilities for this realm; however, this time we'll use the Heimdal Kerberos distribution. The disk layout for the KDC of the LABS.SAMPLE.COM realm is similar to the disk layout used earlier for UNIX.SAMPLE.COM's KDCs (Table 9-2).
9.3.3.1 Building and installing the Kerberos KDC softwareWe'll follow the steps outlined in Chapter 4 to build our Heimdal Kerberos KDC. Grab the Heimdal Kerberos distribution from http://www.pdc.kth.se/heimdal. Once the distribution is downloaded and uncompressed, we can begin configuring and compiling it. We compile the Heimdal Kerberos code with a prefix of /usr/heimdal, and place the Kerberos database in /usr/heimdal/db. > ./configure --prefix=/usr/heimdal checking for gcc... gcc checking for C compiler default output... a.out checking whether the C compiler works... yes checking whether we are cross compiling... no checking for suffix of executables... checking for suffix of object files... o ... Assuming the configure step went well, it's now time to make the distribution and install it: # make && make install # mkdir /usr/heimdal/db # chown root /usr/heimdal/db # chmod 700 /usr/heimdal/db # ln -s /usr/heimdal/db /var/heimdal We've created a symbolic link from /var/heimdal to the location we'd like to keep our Kerberos database, /usr/heimdal/db. This avoids the problem of the /var partition filling up with log files and possibly corrupting or otherwise interfering with the proper operation of the Kerberos KDC. 9.3.3.2 Realm configuration filesBefore we can continue with initializing the LABS.SAMPLE.COM Kerberos database, we need to create an /etc/krb5.conf file that will be installed on each machine in the LABS.SAMPLE.COM realm, including the KDC. [libdefaults]
default_realm = LABS.SAMPLE.COM
[realms]
LABS.SAMPLE.COM = {
kdc = labkdc.labs.sample.com:88
admin_server = labkdc.labs.sample.com
};
[domain_realm]
.labs.sample.com = LABS.SAMPLE.COM
labs.sample.com = LABS.SAMPLE.COM
[logging]
kdc = FILE:/var/log/kdc.log
admin_server = FILE:/var/log/kadmin.log
9.3.3.3 Creating the realmWith the krb5.conf file in place, we can continue on to initializing the Kerberos database and populating the realm with administrative principals. First, we establish a stash file where the master key for the Kerberos database will be stored: labkdc# /usr/heimdal/sbin/kstash Master key: Verifying password - Master key: /usr/heimdal/sbin/kstash: writing key to `/var/heimdal/m-key' Now, we can initialize the realm, using the local kadmin interface: labkdc# /usr/heimdal/sbin/kadmin -l kadmin> init LABS.SAMPLE.COM Realm max ticket life [unlimited]:1d Realm max renewable ticket life [unlimited]:1w We have decided to make the maximum ticket lifetime 24 hours, and the maximum renewable ticket lifetime one week. These parameters can of course be adjusted. While still inside of kadmin, we can create our administrative user and give him permissions to modify the Kerberos database through kadmin. First, we'll create the administrative user principals: kadmin> add jgarman Max ticket life [1 day]: Max renewable life [1 week]: Principal expiration time [never]: Password expiration time [never]: Attributes []: jgarman@LABS.SAMPLE.COM's Password: Verifying password - jgarman@LABS.SAMPLE.COM's Password: kadmin> add jgarman/admin Max ticket life [1 day]: Max renewable life [1 week]: Principal expiration time [never]: Password expiration time [never]: Attributes []: jgarman/admin@LABS.SAMPLE.COM's Password: Verifying password - jgarman/admin@LABS.SAMPLE.COM's Password: Now, we'll have to give jgarman/admin@LABS.SAMPLE.COM administrative rights on the Kerberos database. All we need to do is place the following line in the /usr/heimdal/db/kadmind.acl file: jgarman/admin@LABS.SAMPLE.COM all This entry will grant jgarman/admin@LABS.SAMPLE.COM all administrative rights to all principals in the Kerberos database. Now we can start the KDC to finish the installation. labkdc# /usr/heimdal/libexec/kdc & labkdc# /usr/heimdal/libexec/kadmind & 9.3.3.4 Installing the Kerberos software on client and application serversThe Heimdal Kerberos distribution needs to be installed on the rest of the machines in the LABS.SAMPLE.COM realm. The same configuration and installation instructions given above for the KDC software will make the Kerberos client libraries and utilities as well. Log into each Kerberos client and application server, and make the Kerberos software: > ./configure --prefix=/usr/heimdal checking for gcc... gcc checking for C compiler default output... a.out checking whether the C compiler works... yes checking whether we are cross compiling... no checking for suffix of executables... checking for suffix of object files... o ... > su Password: # make && make install Copy the krb5.conf file listed above in Section 9.3.3.2 into the /etc directory on the target machine. Then you'll be able to use Heimdal's ktutil program to login remotely to the Kerberos database, create a principal for this machine, and extract the host key to the machine's keytab. The commands to extract a host key for linux.labs.sample.com are: linux# /usr/heimdal/sbin/ktutil get host/linux.labs.sample.com jgarman/admin@LABS.SAMPLE.COM's Password: Once the host key has been extracted onto a keyfile on a host, the Kerberized telnet daemon can be enabled on the host. This is done simply by adding the Kerberized telnet daemon to the inetd.conf file on the host, as seen in Chapter 4. Assuming that the Kerberos distribution was installed in /usr/heimdal, any telnet service lines in the /etc/inetd.conf file should be changed to: telnet stream tcp nowait root /usr/heimdal/libexec/telnetd telnetd After the inetd.conf file has been modified, inetd must be restarted for the changes to take effect. 9.3.4 Configuring ApplicationsNow that all of the realms have been set up and the cross-realm keys have been established between UNIX.SAMPLE.COM and SAMPLE.COM, we can configure Reflection X for transparent login to the Unix hosts from the Windows domain. We'll start by adding a user principal to the Active Directory domain with which we can do some tests along the way. Ensure that the principal has the "Use DES encryption types for this account" checkbox checked, as shown in Figure 9-4. Figure 9-4. Setting the DES encryption checkbox in the jgarman user's properties dialog box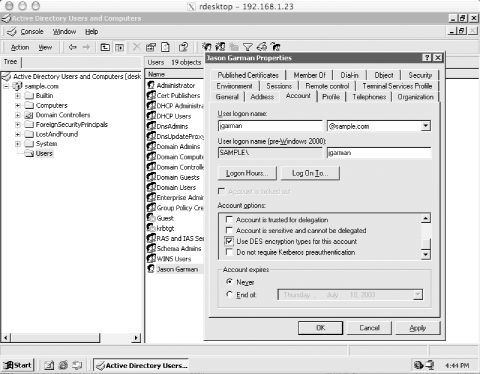 Now we continue to configure WRQ Reflection X to use Kerberos authentication for its telnet connections to the Unix hosts. These telnet sessions will then start X11 client programs that will display back on the Windows host. To do this, you'll need a copy of Reflection X and the freely downloadable Reflection Security Components. More information on Reflection X can be found in Chapter 7 and at the WRQ home page at http://www.wrq.com. Now we need to set up our first user's Reflection Security Components. Start the Kerberos Manager application, which can be found inside the Utilities subfolder of the WRQ Reflection folder in the Start Menu's Programs folder. When Kerberos Manager is started for the first time by a user, it opens the Initial Configuration dialog box pictured in Figure 9-5. Figure 9-5. Reflection Kerberos initial configuration window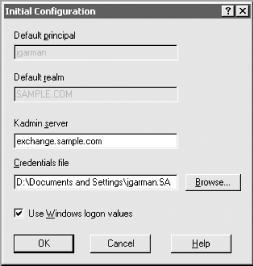 Note that since we're using the credentials associated with the user's Windows domain login, we can check the "Use Windows logon values" checkbox, which fills in the first two text boxes for us. The kadmin server should be set to one of the domain controllers for SAMPLE.COM, in this case exchange.sample.com. Once this configuration is complete, the next step is to use the Kerberos Manager to add the configuration information for UNIX.SAMPLE.COM. The same information that is encoded in the Unix systems' /etc/krb5.conf file must be entered into Reflection Security Components, namely the addresses of the KDCs for the realm and the DNS names of the various machines in the realm. The realm configuration parameters can be accessed through the Kerberos Manager program's Configuration/Configure Realms menu option. That menu option displays the list of currently configured realms. We'll add the UNIX.SAMPLE.COM realm to this list by clicking the Add button. Enter the realm name, UNIX.SAMPLE.COM, and one of the KDCs, unixkdc1.sample.com, in the dialog box. UNIX.SAMPLE.COM will be listed in the left-hand list box; click on it and then on the Properties button. We'll use the properties dialog box to set the KDCs and DNS name to realm mappings for the UNIX.SAMPLE.COM realm. The KDC tab controls the list of KDCs for the realm. Switch to that tab, and enter the information for the second KDC, unixkdc2.sample.com. The result is Figure 9-6. Figure 9-6. Creating the UNIX.SAMPLE.COM realm configuration in Reflection Kerberos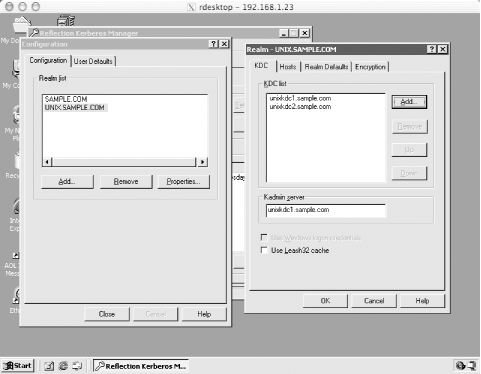 Ensure that the kadmin server is the master KDC, unixkdc1.sample.com, as the slave KDC does not run the kadmin service. Next, enter in the DNS names of all the hosts in this realm under the hosts tab. Just as in the /etc/krb5.conf file, names prefixed with a period match all names within the DNS domain specified. The hosts tab for our example should look like Figure 9-7. Figure 9-7. Creating the hostname to realm mapping for UNIX.SAMPLE.COM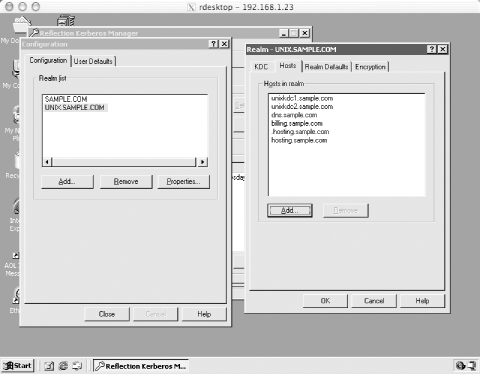 You could enter information for LABS.SAMPLE.COM here as well if you wish to use Kerberos to log into the lab machines through Reflection X as well. Since there is no cross-realm key shared between SAMPLE.COM and LABS.SAMPLE.COM, you'll have to log into the LABS.SAMPLE.COM Kerberos realm through Reflection X, as it cannot use the domain credentials to authenticate you to the labs Kerberos realm. Once the Kerberos realm setup is finished, host connections can be established to each of the machines in UNIX.SAMPLE.COM. Since Reflection uses the TGT acquired by Windows during the login process, and cross-realm relationships have been established between the Active Directory domain and the UNIX.SAMPLE.COM Kerberos realm, Reflection uses your existing Kerberos credentials to acquire tickets for the Unix host and log into it. This is just one example of a Kerberized application that can take advantage of the Kerberos infrastructure. As needs grow, more applications can be made Kerberos-aware to extend the usefulness of the single-sign-on Kerberos system. |
| [ Team LiB ] |
|