
|
|
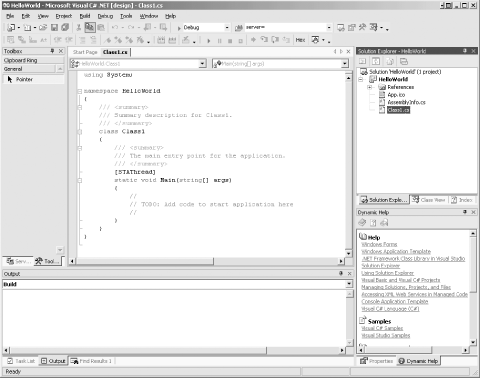
4.2 Inside the Integrated Development Environment (IDE)The Visual Studio .NET Integrated Development Environment (IDE) is centered around an editor. An editor is much like a word processor, except that it produces simple text (without formatting, such as bold and italics). As you may recall, source code files are simple text files. The Visual Studio .NET IDE also provides support for building Graphical User Interfaces (GUIs), which are integral to Windows and web projects. The following pages introduce some of the key features of the IDE. 4.2.1 LayoutThe IDE is a Multiple Document Interface (MDI) application. There is a main window, and within the main window are a number of smaller windows. The central window is the text editing window. Figure 4-3 shows the basic layout. Figure 4-3. The IDE To the left of the editing window are a number of tabbed windows that contain tools used when creating Windows and web applications. To the right of the editing window is a window called the Solution Explorer. This window shows the files in the current project and the solution to which the project belongs. In the lower-right corner is the dynamic help window. In the lower-left corner are a number of tabbed windows, including the task list. The IDE will add tasks to this list when your program has errors that must be fixed, and you can add tasks of your own to assist you in remembering what work remains to be done. All of these windows are resizable and dockable, and many windows share space by using tabs. They can be resized by placing the mouse cursor over the edge you want to move. The cursor will change to a double arrow resizing cursor, at which point you can drag the window edge one way or the other. The Visual Studio .NET window has a titlebar across the top, with menus below. Under the menus are toolbars with buttons that duplicate many of the common menu commands. Nearly everything that can be done through menus can also be done with context-sensitive pop-up menus, as described shortly. By default, the toolbars are docked along the top of the window. As with many Windows applications, they can be undocked and moved to other locations, either left free-floating or docked along other window edges. You move the toolbars by grabbing them with the mouse and dragging them where you want. Right-clicking on the titlebar of a dockable window pops up a menu with three mutually exclusive check items that let you customize the behavior of the window:
In the upper-right corner of the main IDE window are two icons:
|

|
|