|
|
< Day Day Up > |
|
6.4 Validating DataSome of the validation strategies discussed in this section use regular expressions, which are powerful text-matching patterns, written in a language all their own. If you're not familiar with regular expressions, Appendix B provides a quick introduction.
As mentioned earlier, Example 6-8 doesn't indicate what's wrong with the form if the check in validate_form( ) fails. Example 6-9 alters validate_form( ) and show_form( ) to manipulate and print an array of possible error messages. Example 6-9. Displaying error messages with the form// Logic to do the right thing based on
// the hidden _submit_check parameter
if ($_POST['_submit_check']) {
// If validate_form( ) returns errors, pass them to show_form( )
if ($form_errors = validate_form( )) {
show_form($form_errors);
} else {
process_form( );
}
} else {
show_form( );
}
// Do something when the form is submitted
function process_form( ) {
print "Hello, ". $_POST['my_name'];
}
// Display the form
function show_form($errors = '') {
// If some errors were passed in, print them out
if ($errors) {
print 'Please correct these errors: <ul><li>';
print implode('</li><li>', $errors);
print '</li></ul>';
}
print<<<_HTML_
<form method="POST" action="$_SERVER[PHP_SELF]">
Your name: <input type="text" name="my_name">
<br/>
<input type="submit" value="Say Hello">
<input type="hidden" name="_submit_check" value="1">
</form>
_HTML_;
}
// Check the form data
function validate_form( ) {
// Start with an empty array of error messages
$errors = array( );
// Add an error message if the name is too short
if (strlen($_POST['my_name']) < 3) {
$errors[ ] = 'Your name must be at least 3 letters long.';
}
// Return the (possibly empty) array of error messages
return $errors;
}The code in Example 6-9 takes advantage of the fact that an empty array evaluates to false. The line if ($form_errors = validate_form( )) decides whether to call show_form( ) again and pass it the error array or to call process_form( ). The array that validate_form( ) returns is assigned to $form_errors. The truth value of the if( ) test expression is the result of that assignment, which, as you saw in Chapter 3 in Section 3.1, is the value being assigned. So, the if( ) test expression is true if $form_errors has some elements in it, and false if $form_errors is empty. If validate_form( ) encounters no errors, then the array it returns is empty. It is a good idea to do validation checks on all of the form elements in one pass, instead of redisplaying the form immediately when you find a single element that isn't valid. A user should find out all of his errors when he submits a form instead of having to submit a form over and over again, with a new error message revealed on each submission. The validate_form( ) function in Example 6-9 does this by adding an element to $errors for each problem with a form element. Then, show_form( ) prints out a list of the error messages. The validation methods shown here all go inside the validate_form( ) function. If a form element doesn't pass the test, then a message is added to the $errors array. 6.4.1 Required ElementsTo make sure something has been entered into a required element, check the element's length with strlen( ), as in Example 6-10. Example 6-10. Verifying a required elementif (strlen($_POST['email']) = = 0) {
$errors[ ] = "You must enter an email address.";
}It is important to use strlen( ) when checking a required element instead of testing the value itself in an if( ) statement. A test such as if (! $_POST['quantity']) treats a value that evaluates to false as an error. Using strlen( ) lets users enter a value such as 0 into a required element. 6.4.2 Numeric or String ElementsTo ensure that a submitted value is an integer or floating-point number, use the conversion functions intval( ) and floatval( ). They give you the number (integer or floating point) inside a string, discarding any extraneous text or alternative number formats. To use these functions for form validation, compare a submitted form value with what you get when you pass the submitted form value through intval( ) or floatval( ) and then through strval( ). The strval( ) function converts the cleaned-up number back into a string so that the comparison with the element of $_POST works properly. If the submitted string and the cleaned-up string don't match, then there is some funny business in the submitted value and you should reject it. Example 6-11 shows how to check whether a submitted form element is an integer. Example 6-11. Checking for an integerif ($_POST['age'] != strval(intval($_POST['age'])) {
$errors[ ] = 'Please enter a valid age.';
}If $_POST['age'] is an integer such as 59, 0, or -32, then intval($_POST['age']) returns, respectively, 59, 0, or -32. The two values match and nothing is added to $errors. But if $_POST['age'] is 52-pickup, then intval($_POST['age']) is 52. These two values aren't equal, so the if( ) test expression succeeds and a message is added to $errors. If $_POST['age'] contains no numerals at all, then intval($_POST['age']) returns 0. For example, if old is submitted for $_POST['age'], then intval($_POST['age']) returns 0. Similarly, Example 6-12 shows how to use floatval( ) and strval( ) to check that a submitted value is a floating-point or decimal number. Example 6-12. Checking for a floating-point numberif ($_POST['price'] != strval(floatval($_POST['price']))) {
$errors[ ] = 'Please enter a valid price.';
}The floatval( ) function works like intval( ), but it understands a decimal point. In Example 6-12, if $_POST['price'] contains a valid floating-point number or integer (such as 59.2, 12, or -23.2), then floatval($_POST['price']) is equal to $_POST['price'], and nothing is added to $errors. But letters and other junk in $_POST['price'] trigger an error message. When validating elements (particularly string elements), it is often helpful to remove leading and trailing whitespace with the trim( ) function. You can combine this with the strlen( ) test for required elements to disallow an entry of just space characters. The combination of trim( ) and strlen( ) is shown in Example 6-13. Example 6-13. Combining trim( ) and strlen( )if (strlen(trim($_POST['name'])) = = 0) {
$errors[ ] = "Your name is required.";
}If you want to use the whitespace-trimmed value subsequently in your program, alter the value in $_POST and the test the altered value, as in Example 6-14. Example 6-14. Changing a value in $_POST$_POST['name'] = trim($_POST['name']);
if (strlen($_POST['name']) = = 0) {
$errors[ ] = "Your name is required.";
}Because $_POST is auto-global, a change to one of its elements inside the validate_form( ) function persists to other uses of $_POST after the change in another function, such as process_form( ). 6.4.3 Number RangesTo check whether a number falls within a certain range, first make sure the input is a number. Then, use an if( ) statement to test the value of the input, as shown in Example 6-15. Example 6-15. Checking for a number rangeif ($_POST['age'] != strval(intval($_POST['age']))) {
$errors[ ] = "Your age must be a number.";
} elseif (($_POST['age'] < 18) || ($_POST['age'] > 65)) {
$errors[ ] = "Your age must be at least 18 and no more than 65.";
}To test a date range, convert the submitted date value into an epoch timestamp and then check that the timestamp is appropriate. (For more information on epoch timestamps and the strtotime( ) function used in Example 6-16, see Chapter 9.) Because epoch timestamps are integers, you don't have to do anything special when using a range that spans a month or year boundary. Example 6-16 checks to see whether a supplied date is less than six months old. Example 6-16. Checking a date range// Get the epoch timestamp for 6 months ago
$range_start = strtotime('6 months ago');
// Get the epoch timestamp for right now
$range_end = time( );
// 4-digit year is in $_POST['yr']
// 2-digit month is in $_POST['mo']
// 2-digit day is is $_POST['dy']
$submitted_date = strtotime($_POST['yr'] . '-' .
$_POST['mo'] . '-' .
$_POST['dy']);
if (($range_start > $submitted_date) || ($range_end < $submitted_date)) {
$errors[ ] = 'Please choose a date less than six months old.';
}6.4.4 Email AddressesChecking an email address is arguably the most common form validation task. There is, however, no perfect one-step way to make sure an email address is valid, since "valid" could mean different things depending on your goal. If you truly want to make sure that someone providing you an email address is giving you a working address, and that the person providing it controls that address, you need to do two things. First, when the email address is submitted, send a message containing a random string to that address. In the message, tell the user to submit the random string in a form on your site. Or, include a URL in the message that the user can just click on, which has the code embedded into it. If the code is submitted (or the URL is clicked on), then you know that the person who received the message and controls the email address submitted it to your site (or at least is aware of and approves of the submission). If you don't want to go to all the trouble of verifying the email address with a separate message, there are still some syntax checks you can do in your form validation code to weed out mistyped addresses. The regular expression ^[^@\s]+@([-a-z0-9]+\.)+[a-z]{2,}$ matches most common email addresses and fails to match common mistypings of addresses. Use it with preg_match( ) as shown in Example 6-17. Example 6-17. Checking the syntax of an email addressif (! preg_match('/^[^@\s]+@([-a-z0-9]+\.)+[a-z]{2,}$/i',
$_POST['email'])) {
$errors[ ] = 'Please enter a valid e-mail address';
}The one danger with this regular expression is that it doesn't allow any whitespace in the username part of the email address (before the @). An address such as "Marles Pickens"@sludge.example.com is valid according to the standard that defines Internet email addresses, but it won't pass this test because of the space character in it. Fortunately, addresses with embedded whitespace are rare enough that you shouldn't run into any problems with it. 6.4.5 <select> MenusWhen you use a <select> menu in a form, you need to ensure that the submitted value for the menu element is one of the permitted choices in the menu. Although a user can't submit an off-menu value using a mainstream, well-behaved browser such as Mozilla or Internet Explorer, an attacker can construct a request containing any arbitrary value without using a browser. To simplify display and validation of <select> menus, put the menu choices in an array. Then, iterate through that array to display the <select> menu inside the show_form( ) function. Use the same array in validate_form( ) to check the submitted value. Example 6-18 shows how to display a <select> menu with this technique. Example 6-18. Displaying a <select> menu$sweets = array('Sesame Seed Puff','Coconut Milk Gelatin Square',
'Brown Sugar Cake','Sweet Rice and Meat');
// Display the form
function show_form( ) {
print<<<_HTML_
<form method="post" action="$_SERVER[PHP_SELF]">
Your Order: <select name="order">
_HTML_;
foreach ($GLOBALS['sweets'] as $choice) {
print "<option>$choice</option>\n";
}
print<<<_HTML_
</select>
<br/>
<input type="submit" value="Order">
<input type="hidden" name="_submit_check" value="1">
</form>
_HTML_;
}The HTML that show_form( ) in Example 6-18 prints is: <form method="post" action="order.php"> Your Order: <select name="order"> <option>Sesame Seed Puff</option> <option>Coconut Milk Gelatin Square</option> <option>Brown Sugar Cake</option> <option>Sweet Rice and Meat</option> </select> <br/> <input type="submit" value="Order"> <input type="hidden" name="_submit_check" value="1"> </form> Inside validate_form( ), use the array of <select> menu options like this: if (! in_array($_POST['order'], $GLOBALS['sweets'])) {
$errors[ ] = 'Please choose a valid order.';
}If you want a <select> menu with different displayed choices and option values, you need to use a more complicated array. Each array element key is a value attribute for one option. The corresponding array element value is the displayed choice for that option. In Example 6-19, the option values are puff, square, cake, and ricemeat. The displayed choices are Sesame Seed Puff, Coconut Milk Gelatin Square, Brown Sugar Cake, and Sweet Rice and Meat. Example 6-19. A <select> menu with different choices and values$sweets = array('puff' => 'Sesame Seed Puff',
'square' => 'Coconut Milk Gelatin Square',
'cake' => 'Brown Sugar Cake',
'ricemeat' => 'Sweet Rice and Meat');
// Display the form
function show_form( ) {
print<<<_HTML_
<form method="post" action="$_SERVER[PHP_SELF]">
Your Order: <select name="order">
_HTML_;
// $val is the option value, $choice is what's displayed
foreach ($GLOBALS['sweets'] as $val => $choice) {
print "<option value=\"$val\">$choice</option>\n";
}
print<<<_HTML_
</select>
<br/>
<input type="submit" value="Order">
<input type="hidden" name="_submit_check" value="1">
</form>
_HTML_;
}The form displayed by Example 6-19 is as follows: <form method="post" action="order.php"> Your Order: <select name="order"> <option value="puff">Sesame Seed Puff</option> <option value="square">Coconut Milk Gelatin Square</option> <option value="cake">Brown Sugar Cake</option> <option value="ricemeat">Sweet Rice and Meat</option> </select> <br/> <input type="submit" value="Order"> <input type="hidden" name="_submit_check" value="1"> </form> The submitted value for the <select> menu in Example 6-19 should be puff, square, cake, or ricemeat. Example 6-20 shows how to verify this in validate_form( ). Example 6-20. Checking a <select> menu submission valueif (! array_key_exists($_POST['order'], $GLOBALS['sweets'])) {
$errors[ ] = 'Please choose a valid order.';
}6.4.6 HTML and JavaScriptSubmitted form data that contains HTML or JavaScript can cause big problems. Consider a simple "guestbook" application that lets users submit comments on a web page and then displays a list of those comments. If users behave nicely and enter only comments containing plain text, the guestbook remains benign. One user submits Cool page! I like how you list the different ways to cook fish. When you come along to browse the guestbook, that's what you see. The situation is more complicated when the guestbook submissions are not just plain text. If an enthusiastic user submits This page <b>rules!!!!</b> as a comment, and it is redisplayed verbatim by the guestbook application, then you see rules!!!! in bold when you browse the guestbook. Your web browser can't tell the difference between HTML tags that come from the guestbook application itself (perhaps laying out the comments in a table or a list) and HTML tags that happen to be embedded in the comments that the guestbook is printing. Although seeing bold text instead of plain text is a minor annoyance, displaying unfiltered user input leaves the guestbook open to giving you a much larger headache. Instead of <b></b> tags, one user's submission could contain a malformed or unclosed tag (such as <a href=" with no ending " or >) that prevents your browser from displaying the page properly. Even worse, that submission could contain JavaScript code that, when executed by your web browser as you look at the guestbook, does nasty stuff such as send a copy of your cookies to a stranger's email box or surreptitiously redirect you to another web page. The guestbook acts as a facilitator, letting a malicious user upload some HTML or JavaScript that is later run by an unwitting user's browser. This kind of problem is called a cross-site scripting attack because the poorly written guestbook allows code from one source (the malicious user) to masquerade as coming from another place (the guestbook site.) To prevent cross-site scripting attacks in your programs, never display unmodified external input. Either remove suspicious parts (such as HTML tags) or encode special characters so that browsers don't act on embedded HTML or JavaScript. PHP gives you two functions that make these tasks simple. The strip_tags( ) function removes HTML tags from a string, and the htmlentities( ) function encodes special HTML characters. Example 6-21 demonstrates strip_tags( ). Example 6-21. Stripping HTML tags from a string// Remove HTML from comments $comments = strip_tags($_POST['comments']); // Now it's OK to print $comments print $comments; If $_POST['comments'] contains I <b>love</b> sweet <div class="fancy">rice</div> & tea., then Example 6-21 prints: I love sweet rice & tea. All HTML tags and their attributes are removed, but the plain text between the tags is left intact. Example 6-22 demonstrates htmlentities( ). Example 6-22. Encoding HTML entities in a string$comments = htmlentities($_POST['comments']); // Now it's OK to print $comments print $comments; If $_POST['comments'] contains I <b>love</b> sweet <div class="fancy">rice</div> & tea., then Example 6-22 prints: I <b>love</b> sweet <div class="fancy">rice</fancy> & tea. The characters that have a special meanings in HTML (<, >, &, and ") have been changed into their entity equivalents:
When a browser sees <, it prints out a < character instead of thinking "OK, here comes an HTML tag." This is the same idea (but with a different syntax) as escaping a " or $ character inside a double-quoted string, as you saw earlier in Chapter 2 in Section 2.1. Figure 6-4 shows what the output of Example 6-22 looks like in a web browser. Figure 6-4. Displaying entity-encoded text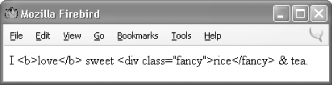 In most applications, you should use htmlentities( ) to sanitize external input. This function doesn't throw away any content, and it also protects against cross-site scripting attacks. A discussion board where users post messages, for example, about HTML ("What does the <div> tag do?") or algebra ("If x<y, is 2x>z?") wouldn't be very useful if those posts were run through strip_tags( ). The questions would be printed as "What does the tag do?" and "If xz?". 6.4.7 Beyond SyntaxMost of the validation strategies discussed in this chapter so far check the syntax of a submitted value. They make sure that what's submitted matches a certain format. However, sometimes you want to make sure that a submitted value has not just the correct syntax, but an acceptable meaning as well. The <select> menu validation does this. Instead of just assuring that the submitted value is a string, it matches against a specific array of values. The confirmation-message strategy for checking email messages is another example of checking for more than syntax. If you ensure only that a submitted email address has the correct form, a mischievous user can provide an address such as president@whitehouse.gov that almost certainly doesn't belong to her. The confirmation message makes sure that the meaning of the addressi.e., "this email address belongs to the user providing it"is correct. |
|
|
< Day Day Up > |
|