| [ Team LiB ] |
|
9.1 ASP.NET Mobile ControlsASP.NET Mobile Controls are special Web Controls that run on the web server and render the appropriate web content targeting a wide array of mobile devices such as mobile phones using Wireless Markup Language (WML) via Wireless Application Protocol (WAP) to PDAs such as Pocket PC, Palm Pilot, and so on. The web server receives requests from the web browsers on the mobile devices just the same as it would receive requests from a full-fledged browser; however, the Mobile Controls on these specialized web pages know how to render the content based on the capability of the requesting web browsers. For example, if the request came from a WML-capable mobile phone, the Mobile Controls would render WML. If the request came from a Pocket PC web browser, the Mobile Controls would render HTML. 9.1.1 System.Web.UI.MobileControls namespaceIn the same way that the System.Web.UI.WebControls namespace provides classes for building web pages that can be rendered by traditional web browsers, the MobileControls namespace include classes that for constructing web pages that will be rendered by mobile devices. Instead of the Page class discussed in Chapter 7, for example, the MobileControls namespace provides a MobilePage class. MobilePage is the base class to all mobile device Web Forms and derives class from the ASP.NET Page class. All ASP.NET Mobile Controls derive from the MobileControl base class, which derives from the corresponding ASP.NET Control class. Here, you also have the choice to use the stock controls provided to you similar to ASP.NET Web Controls and Html Controls. You can also customize controls by deriving and extending stock controls, creating user control or composite server controls or even create your own Mobile Control from deriving directly from MobileControl class. Notice that the programming paradigm is still very similar to how you would do it in the normal ASP.NET world.[2]
9.1.2 ASP.NET Web Server Controls Versus Mobile ControlsTable 9-1 shows the mobile controls and their counterparts in ASP.NET where the mapping is one-to-one.
Although most of Web Server controls map one-to-one to a mobile control, others are mapped down to a simpler control that serves the same purpose. Table 9-2 shows such mappings.
Other controls, such as PhoneCall, DeviceSpecific, Form, StyleSheet, TextView, are controls that are specific to the mobile environment and do not exist in the standard ASP.NET. 9.1.3 ASP.NET Mobile Web ApplicationIn this section, you will learn how ASP.NET Mobile Controls can be used to create a mobile web application that utilizes the PubsWS Web Service developed in Chapter 6. This application queries and displays the list of books found in the Pubs database. Using the application, mobile device users can view general information about a book and either buy a hard copy of the title or download it to a mobile device. Let's start by opening a new ASP.NET Mobile Web Application in Visual Studio .NET. To open a Mobile Web application, simply select Mobile Web application in the New Project window. To view information in the Pubs database, you will use an ObjectList control. To add the control to your form, you add the following tags in HTML view: <mobile:ObjectList id="bookList" runat="server" AutoGenerateFields="False"> <Field DataField="title"></Field> <Field DataField="type" DataFormatString="Type: {0}"></Field> <Field DataField="price" DataFormatString="Price: ${0}"></Field> <Field DataField="title_id" DataFormatString="RefID: {0}"></Field> <Field DataField="notes"></Field> <Command Name="buy" Text="Buy"></Command> <Command Name="dnload" Text="Download"></Command> </mobile:ObjectList> The previous code snippet is similar to how you would have a DataGrid on an ASP.NET page. In this case the ObjectList control is used instead. Similar to the Column tags of the DataGrid control, the Field tags are data bound fields that also provide some formatting. The two Command tags represent the two operation that the user will be able to perform on a data item. In this example, the user can buy or download the book. If you prefer using the VS.NET visual environment, you can drag an ObjectList onto the form directly from the Mobile Web Forms menu of the VS.NET Toolbox and then set its properties using the Property window. The preceding code creates an ObjectList control, binds it to specific fields of the Pubs database, and provides for two commandsBuy and Downloadthat that the user can issue on any item selected from the list. Next, you need to add a web reference to the PubsWS Web Service and name it PubsWSProxy (see Chapter 6 to review how this is done). Finally, you can switch to the code behind page of your application and write a page load handler that uses the PubsWS proxy to load the Pubs data into a DataSet that the ObjectList can bind to, as shown in the following code fragment: If Not IsPostBack Then
Dim oProxy As PubsWSProxy.PubsWS = New PubsWSProxy.PubsWS
oProxy.Credentials = New Net.NetworkCredential("uid", "pwd", "domain")
Dim oDS As DataSet = oProxy.GetBooks( )
bookList.DataSource = oDS.Tables(0).DefaultView
bookList.DataBind( )
End If
There is no need to set up the Credentials for the proxy object if your Web Service allows anonymous access. Now if you run the application, the page shown in Figure 9-1 will display in your browser. Figure 9-1. Book listing in Microsoft Internet Explorer (IE)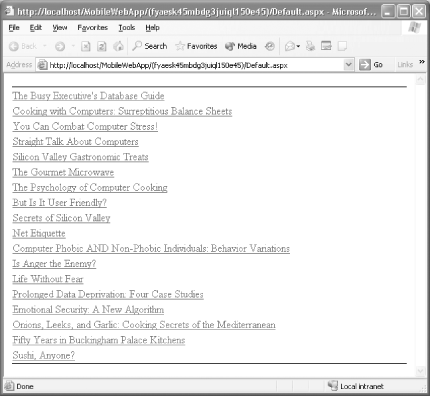 We are viewing this application using a desktop Internet Explorer to test it out. Notice that in Figure 9-1 the ObjectList control does not show the bound data as a grid,[3] but instead as a list of hyper links to the first fields of each record.[4] Clicking on any book in the list will cause all fields of the selected item to be displayed, as shown in Figure 9-2. Note that the commands that apply to the selected item are also shown on the form.
Figure 9-2. Book detail screen in IE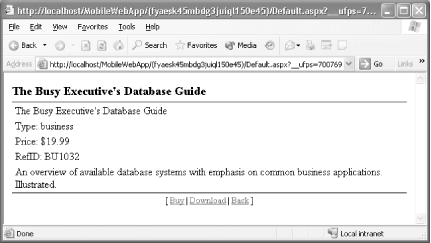 Now let's add another form to the mobile web application to handle the buying and downloading of the book: <mobile:Form id=FormPurchase runat="server"> <mobile:TextView id=txtPurchaseInfo runat="server"></mobile:TextView> <mobile:Label id=labelCC runat="server">Credit Card #</mobile:Label> <mobile:TextBox id=txtCC runat="server"></mobile:TextBox> <mobile:Command id=cmdSubmit runat="server">Submit</mobile:Command> </mobile:Form> The purchase form uses a TextView control that displays some simple formatted text and a TextBox control to collect a credit card number. The form also makes use of a submit button to post the form data back to the server for processing. To complete this part of the application, you must write an event handler for the ItemCommand event of the ObjectList that is triggered when the user chooses to buy or download the book: Private Sub bookList_ItemCommand _
( _
ByVal sender As Object, _
ByVal e As System.Web.UI.MobileControls.ObjectListCommandEventArgs _
) Handles bookList.ItemCommand
Dim sTmp As String
Dim oListItem As MobileControls.ObjectListItem = _
CType(e.CommandArgument, MobileControls.ObjectListItem)
If e.CommandName = "buy" Then
sTmp = "<b>Buying</b> "
ElseIf e.CommandName = "dnload" Then
sTmp = "<b>Downloading</b> "
End If
sTmp += "book " + oListItem.Item("title_id")
sTmp += " " + oListItem.Item("price")
CType(FormPurchase.FindControl("txtPurchaseInfo"), _
MobileControls.TextView).Text = sTmp
ActiveForm = FormPurchase
End Sub
The ItemCommand function inspects the CommandName of the ObjectList's event to decide which button the user clicked in order to display the appropriate form. If the user chooses to buy the first book, the device will display the page shown in Figure 9-3. Figure 9-3. Purchase form in IE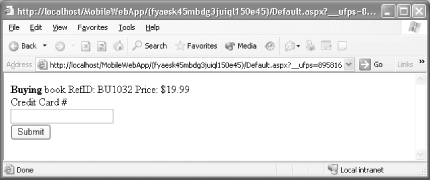 For the submit click, we don't really process any ordering but just navigate the user back to the default page: Private Sub cmdSubmit_Click _
( _
ByVal sender As Object, ByVal e As System.EventArgs _
) Handles cmdSubmit.Click
'More Processing Code Here
RedirectToMobilePage("default.aspx")
End Sub
A primary motivation for using mobile controls in this sample application is to make it accessible to browsers other than IE. We can use the actual device to test the application or to use the emulator that comes with .NET Framework SDK (see the sidebar Working with Microsoft Emulators). Figure 9-4 shows how the book list page is rendered by the Pocket PC's Internet Explorer. Figure 9-4. Book listing on Pocket PC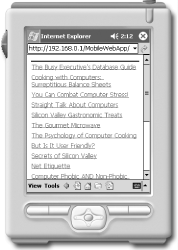 This display is very similar the output from IE that we've have seen earlier because Pocket PC Internet Browser is capable of displaying HTML. Figure 9-5 shows the page that is displayed when the user selects the first book in the list. Figure 9-5. Book detail screen on Pocket PC Finally, Figure 9-6 shows the purchase form displayed when a mobile device user chooses to download the book. Figure 9-6. Purchase form on Pocket PC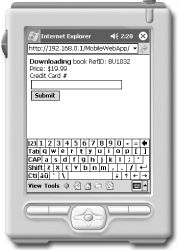 From an emulated web phone (or any WML viewer), however, the screens are drastically different. The reason is that the mobile controls sense the capability of the phone browser and only render WML instead of full blown HTML. Figure 9-7 shows the same application from a phone emulator. Figure 9-7. Book listing on mobile phone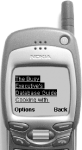 This is the first screen showing the list of books. You can use the center rocker button to move up and down the list. The currently selected book will be highlighted. When you decided on a book, press the center button to select it. Because the screen for the phone is much smaller than the Pocket PC, the WML translation of the page content decided to show the three choices that you can pick for the selected book (View the details, buy, or download the book), as shown in Figure 9-8. Figure 9-8. Intermediate form for commands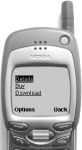 Let's press the center button one more time to see the book detail screen. Again, this screen is scrollable via the center rocker button. Figure 9-9 and Figure 9-10 show the progression through the data. Figure 9-9. Book detail screen on mobile phone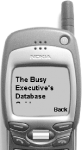 Figure 9-10. Book detail screen on mobile phone, part 2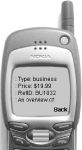 Now that we've seen the detail for this book and it's quite interesting, we press the right button (underneath the word "Back") to go back a screen and press the down button to highlight "Buy," as in Figure 9-11. Figure 9-11. Choosing Buy option on mobile phone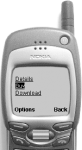 When the user chooses to buy the book, the purchase form appears. Again, the user will have to use the up/down button to scroll down to select the text box to enter the credit card number, as in Figure 9-12 and Figure 9-13. Figure 9-12. Purchase form on mobile phone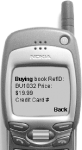 Figure 9-13. Purchase form on mobile phone, part 2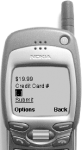 Once the credit card text box is selected, an input box type of screen shows up to collect the credit card number, as in Figure 9-14 and Figure 9-15. Figure 9-14. Credit card field input on mobile phone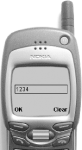 Figure 9-15. Purchase form with credit card info to be submitted on mobile phone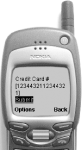 |
| [ Team LiB ] |
|